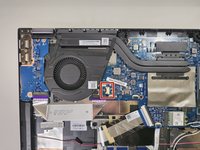
Ana içeriğe geç

Lenovo IdeaPad Flex 5 14ARE05 Cooling Fan Replacement

Neye ihtiyacın var

  1. Lenovo IdeaPad Flex 5 14ARE05 Cooling Fan Replacement, Back Panel: adım 1, 2 resimden 1. Lenovo IdeaPad Flex 5 14ARE05 Cooling Fan Replacement, Back Panel: adım 1, 2 resimden 2.
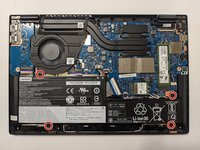
    • Remove the five 8 mm screws using a T5 Torx Screwdriver.

    • Remove the four 5 mm screws using a T5 Torx Screwdriver.

  2. Lenovo IdeaPad Flex 5 14ARE05 Cooling Fan Replacement: adım 2, 3 resimden 1. Lenovo IdeaPad Flex 5 14ARE05 Cooling Fan Replacement: adım 2, 3 resimden 2. Lenovo IdeaPad Flex 5 14ARE05 Cooling Fan Replacement: adım 2, 3 resimden 3.
    • Use a small suction cup to pull open the back case at the two hinge cutouts.

    • Gently, use the plastic opening tool around the edges of the laptop to pry up the rest of the back panel.

  3. Lenovo IdeaPad Flex 5 14ARE05 Cooling Fan Replacement: adım 3, 1 resimden 1.
    • Once all the clips have been disengaged, lift off the back cover.

  4. Lenovo IdeaPad Flex 5 14ARE05 Cooling Fan Replacement, Battery: adım 4, 2 resimden 1. Lenovo IdeaPad Flex 5 14ARE05 Cooling Fan Replacement, Battery: adım 4, 2 resimden 2.
    • Remove the four 5 mm Phillips #00 screws that secure the battery in place.

  5. Lenovo IdeaPad Flex 5 14ARE05 Cooling Fan Replacement: adım 5, 2 resimden 1. Lenovo IdeaPad Flex 5 14ARE05 Cooling Fan Replacement: adım 5, 2 resimden 2.
    • Rotate the device 90 degrees.

    • Gently lift up on the battery and use a spudger to disconnect the battery connector.

  6. Lenovo IdeaPad Flex 5 14ARE05 Cooling Fan Replacement, Cooling Fan: adım 6, 1 resimden 1.
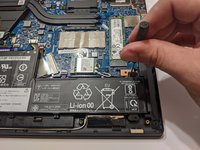
    • Remove the four 2 mm screws using a JIS #1 screwdriver.

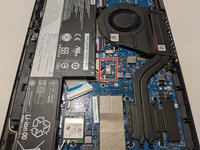
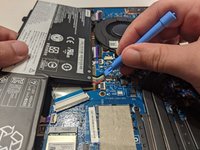
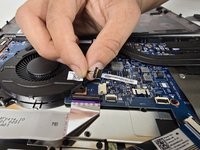
    • Remove the three 5 mm screws using a JIS #1 screwdriver.

  7. Lenovo IdeaPad Flex 5 14ARE05 Cooling Fan Replacement: adım 7, 3 resimden 1. Lenovo IdeaPad Flex 5 14ARE05 Cooling Fan Replacement: adım 7, 3 resimden 2. Lenovo IdeaPad Flex 5 14ARE05 Cooling Fan Replacement: adım 7, 3 resimden 3.
    • Unplug the wire at the bottom right of the fan.

    • Carefully lift the fan from its place.

Sonuç

To reassemble your device, follow these instructions in reverse order.

Michael Souza

Üyelik tarihi: 10/18/24

135 İtibar

1 Kılavuz yazıldı

Ekip

UMass Dartmouth, Team 1-6, Konn Fall 2024 UMass Dartmouth, Team 1-6, Konn Fall 2024 üyesi

UMASSD-KONN-F24S1G6

4 Üyeler

5 adet Kılavuz yazıldı

0 Yorum

Yorum Ekle

İstatistikleri Görüntüle:

Son 24 Saat: 0

Son 7 gün: 10

Son 30 gün: 46

Her zaman: 108