Ana içeriğe geç

Lenovo IdeaPad Y580-2099 Daughterboard Replacement

Neye ihtiyacın var

  1. Lenovo IdeaPad Y580-2099 Daughterboard Replacement, Battery: adım 1, 1 resimden 1.
    • Slide out both locks for the battery, located on the back of the device.

  2. Lenovo IdeaPad Y580-2099 Daughterboard Replacement: adım 2, 2 resimden 1. Lenovo IdeaPad Y580-2099 Daughterboard Replacement: adım 2, 2 resimden 2.
    • Remove the battery.

  3. Lenovo IdeaPad Y580-2099 Daughterboard Replacement, Keyboard: adım 3, 2 resimden 1. Lenovo IdeaPad Y580-2099 Daughterboard Replacement, Keyboard: adım 3, 2 resimden 2.
    • Unscrew the 2 screws on the bottom of the device.

    • Slide the back panel out.

  4. Lenovo IdeaPad Y580-2099 Daughterboard Replacement: adım 4, 1 resimden 1.
    • Unscrew the 3 "keyboard" detected screws.

  5. Lenovo IdeaPad Y580-2099 Daughterboard Replacement: adım 5, 2 resimden 1. Lenovo IdeaPad Y580-2099 Daughterboard Replacement: adım 5, 2 resimden 2.
    • Flip the laptop over and open up.

    • Then pry up the whole keyboard using the spudger.

    • Make sure to use a plastic spudger. You could damage the device using anything else.

    • Make sure not to take the frame that goes around the keys off. This part is not removable.

  6. Lenovo IdeaPad Y580-2099 Daughterboard Replacement, Daughterboard: adım 6, 1 resimden 1.
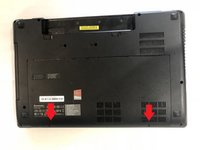
    • Use a Phillips #0 screwdriver to remove the 16 screws highlighted. There are 12 M2.5 x 8 mm long screws, and 4 M2 x 2 mm long screws.

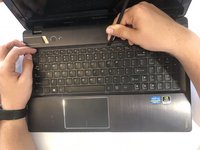
    • Use a Phillips #0 screwdriver to remove the 10 mm screw (highlighted in orange) that secures the disc drive.

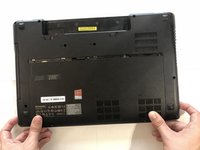
    • Quickly survey and make sure all screws on the back panel are removed from the device.

    • Some of the screws may have been removed in previous steps.

  7. Lenovo IdeaPad Y580-2099 Daughterboard Replacement: adım 7, 1 resimden 1.
    • Carefully slide the disc drive out.

  8. Lenovo IdeaPad Y580-2099 Daughterboard Replacement: adım 8, 1 resimden 1.
    • Use a Phillips #0 screwdriver to remove the three M2 x 3 mm long screws circled in red.

  9. Lenovo IdeaPad Y580-2099 Daughterboard Replacement: adım 9, 1 resimden 1.
    • Lift open the top panel carefully as there are wire cables secured to the motherboard.

  10. Lenovo IdeaPad Y580-2099 Daughterboard Replacement: adım 10, 1 resimden 1.
    Bu adımda kullanılan alet:
    Tweezers
    $4.99
    Satın Al
    • After locating the cable holding the top panel in place, carefully unhook the handle using precision tweezers.

    • Carefully remove the top plate.

  11. Lenovo IdeaPad Y580-2099 Daughterboard Replacement: adım 11, 1 resimden 1.
    • Now that the top plate is removed, locate the daughter board. (Highlighted in Red).

  12. Lenovo IdeaPad Y580-2099 Daughterboard Replacement: adım 12, 1 resimden 1.
    • Use a plastic spudger or precision tweezers to carefully unhook the daughterboard cables.

  13. Lenovo IdeaPad Y580-2099 Daughterboard Replacement: adım 13, 1 resimden 1.
    • Use a Phillips #0 screwdriver to remove the two M2.5 x 3 mm long screws that secure the daughterboard.

  14. Lenovo IdeaPad Y580-2099 Daughterboard Replacement: adım 14, 1 resimden 1.
    • Check and make sure all screws and cable wires are detached before attempting to remove the daughterboard.

    • Carefully remove the daughterboard.

Sonuç

To reassemble your device, follow these instructions in reverse order.

Jeryn Fast

Üyelik tarihi: 04/12/22

421 İtibar

3 adet Kılavuz yazıldı

Ekip

IUPUI, Team 1-1, Beck Spring 2022 IUPUI, Team 1-1, Beck Spring 2022 üyesi

IUPUI-BECK-S22S1G1

3 Üyeler

3 adet Kılavuz yazıldı

0 Yorum

Yorum Ekle

İstatistikleri Görüntüle:

Son 24 Saat: 0

Son 7 gün: 0

Son 30 gün: 1

Her zaman: 139