Ana içeriğe geç

Lenovo IdeaPad Yoga 11S Display Replacement

Neye ihtiyacın var

  1. Lenovo IdeaPad Yoga 11S Display Replacement, Top Assembly: adım 1, 3 resimden 1. Lenovo IdeaPad Yoga 11S Display Replacement, Top Assembly: adım 1, 3 resimden 2. Lenovo IdeaPad Yoga 11S Display Replacement, Top Assembly: adım 1, 3 resimden 3.
    • Remember to power off the device before removing any parts.

    • Position the laptop so that the bottom enclosure is facing upward.

    • Use a Phillips #0 Screwdriver to remove the ten 1.9mm screws holding the bottom enclosure in place.

    • Use an opening tool to carefully pry up the rubber pads.

    • Use a Phillips screwdriver to remove the two screws under the rubber pads, which secure the keyboard.

  2. Lenovo IdeaPad Yoga 11S Display Replacement, Remove Keyboard: adım 2, 1 resimden 1.
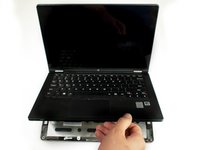
    • Flip the laptop over and swing open the display.

    • Lift the edge of the keyboard closest to the trackpad up.

    • Carefully disconnect keyboard ribbon cable from the laptop.

    • Remove the keyboard.

  3. Lenovo IdeaPad Yoga 11S Display Replacement: adım 3, 1 resimden 1.
    • Remove the two screws securing the midframe.

  4. Lenovo IdeaPad Yoga 11S Display Replacement: adım 4, 3 resimden 1. Lenovo IdeaPad Yoga 11S Display Replacement: adım 4, 3 resimden 2. Lenovo IdeaPad Yoga 11S Display Replacement: adım 4, 3 resimden 3.
    • Grab the front edge of the top assembly and lift it up carefully.

    • There are three ribbon cables that attach the top assembly to the motherboard. Lift carefully to avoid damaging them.

    • Gently slide the three ribbon cables out of their slots.

    • Remove the top assembly completely by pulling it off of the device.

  5. Lenovo IdeaPad Yoga 11S Display Replacement, Display: adım 5, 1 resimden 1.
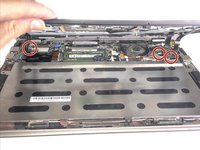
    • Keep the device positioned where it sits on the bottom encasing with the display open.

    • Locate the four 1.9mm screws used to attach the display brackets to the bottom enclosure of the device.

    • Use a Phillips #00 Screwdriver to remove the four screws.

  6. Lenovo IdeaPad Yoga 11S Display Replacement: adım 6, 1 resimden 1.
    • Use a plastic opening tool to lift the retaining flap to disconnect the right display cable connector.

    • Gently pull the display cable out of the socket.

  7. Lenovo IdeaPad Yoga 11S Display Replacement: adım 7, 1 resimden 1.
    • Use a plastic opening tool to lift the retaining flap to disconnect the left display cable connector.

    • Gently pull the display cable out of the socket.

  8. Lenovo IdeaPad Yoga 11S Display Replacement: adım 8, 1 resimden 1.
    • Gently lift the display to detach it from the device.

Sonuç

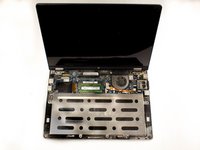
To reassemble your device, follow these instructions in reverse order.

5 farklı kişi bu kılavuzu tamamladı.

Landon Epps

Üyelik tarihi: 03/26/15

982 İtibar

5 adet Kılavuz yazıldı

Ekip

Baylor, Team 7-11, Williams Spring 2015 Baylor, Team 7-11, Williams Spring 2015 üyesi

BU-WILLIAMS-S15S7G11

3 Üyeler

10 adet Kılavuz yazıldı

0 Yorum

Yorum Ekle

İstatistikleri Görüntüle:

Son 24 Saat: 0

Son 7 gün: 6

Son 30 gün: 14

Her zaman: 4,994