Giriş
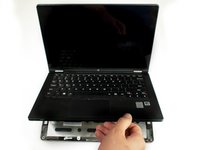
The top assembly contains the keyboard and trackpad. Removing it allows access to the logic board, battery, and RAM.
Neye ihtiyacın var
-
-
Position the laptop so that the bottom enclosure is facing upward.
-
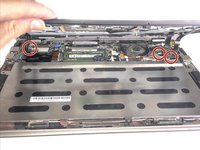
Use a Phillips #0 Screwdriver to remove the ten 1.9mm screws holding the bottom enclosure in place.
-
Use an opening tool to carefully pry up the rubber pads.
-
Use a Phillips screwdriver to remove the two screws under the rubber pads, which secure the keyboard.
-
-
-
Flip the laptop over and swing open the display.
-
Lift the edge of the keyboard closest to the trackpad up.
-
Carefully disconnect keyboard ribbon cable from the laptop.
-
Remove the keyboard.
-
-
-
-
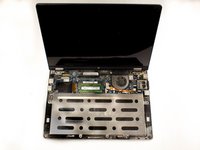
Grab the front edge of the top assembly and lift it up carefully.
-
Gently slide the three ribbon cables out of their slots.
-
Remove the top assembly completely by pulling it off of the device.
You need to remove the keyboard too otherwise you will miss the 2 screws underneath!
I’m pretty sure all you need to do is remove 4 screws on the back (2 under the foot pads on the upper side and 2 in the middle, all beneath the keyboard), then loosen the keyboard from the top slide forward and up, not the whole cover, then the dimm slot is right there
-


To reassemble your device, follow these instructions in reverse order.
To reassemble your device, follow these instructions in reverse order.
İptal et: Bu kılavuzu tamamlamadım.
2 farklı kişi bu kılavuzu tamamladı.

Ekip

Baylor, Team 7-11, Williams Spring 2015 Baylor, Team 7-11, Williams Spring 2015 üyesi
BU-WILLIAMS-S15S7G11
3 Üyeler
10 adet Kılavuz yazıldı
under the rubber pads can be, or are? the bottom pads are much more secured.
zZz - Yanıt
2 of them. The 2 near the screen hinges. They release the keyboard.
jsoper - Yanıt
Mine had t5 Torx screws on the perimeter and center, with #0 phillips underneath the foot pads.
dan lench - Yanıt
Mine also had the T5 Torx screws.
Willem -