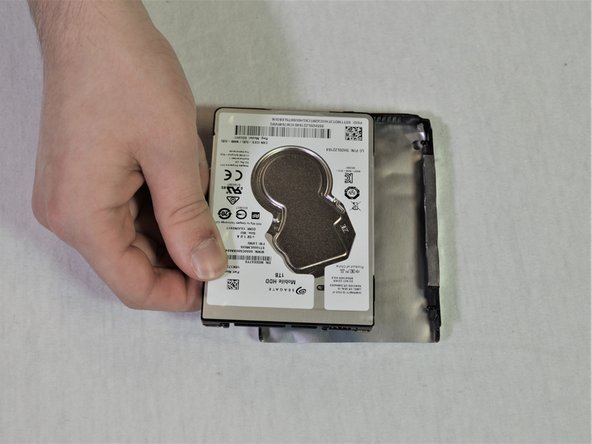
Ana içeriğe geç

Lenovo Ideapad 320-15ABR Hard Drive Replacement

Neye ihtiyacın var

  1. Lenovo Ideapad 320-15ABR Hard Drive Replacement, Back Panel: adım 1, 1 resimden 1.
    • Before you proceed, make sure your computer is turned off and is not connected to any power source.

    • Remove the single 7 mm Phillips #1 screw securing the optical drive.

    • Be sure to store the screws carefully as they are easy to lose. A magnetic project mat is recommended

  2. Lenovo Ideapad 320-15ABR Hard Drive Replacement: adım 2, 3 resimden 1. Lenovo Ideapad 320-15ABR Hard Drive Replacement: adım 2, 3 resimden 2. Lenovo Ideapad 320-15ABR Hard Drive Replacement: adım 2, 3 resimden 3.
    • Carefully remove the optical drive bracket by pulling the bezel away from the laptop.

  3. Lenovo Ideapad 320-15ABR Hard Drive Replacement: adım 3, 2 resimden 1. Lenovo Ideapad 320-15ABR Hard Drive Replacement: adım 3, 2 resimden 2.
    • Using the Phillips #1 screwdriver, remove the twelve screws around the back panel from the laptop.

  4. Lenovo Ideapad 320-15ABR Hard Drive Replacement: adım 4, 3 resimden 1. Lenovo Ideapad 320-15ABR Hard Drive Replacement: adım 4, 3 resimden 2. Lenovo Ideapad 320-15ABR Hard Drive Replacement: adım 4, 3 resimden 3.
    • Use an opening tool to pry out the back cover.

  5. Lenovo Ideapad 320-15ABR Hard Drive Replacement: adım 5, 3 resimden 1. Lenovo Ideapad 320-15ABR Hard Drive Replacement: adım 5, 3 resimden 2. Lenovo Ideapad 320-15ABR Hard Drive Replacement: adım 5, 3 resimden 3.
    • Remove the back panel by pulling it up and away from the laptop.

  6. Lenovo Ideapad 320-15ABR Hard Drive Replacement, Hard Drive: adım 6, 2 resimden 1. Lenovo Ideapad 320-15ABR Hard Drive Replacement, Hard Drive: adım 6, 2 resimden 2.
    • Before removing the drive, make a backup copy of all the information on it if possible. Never remove the drive while the system is operating or in suspend mode.

    • Gently lift up the hard disk from the left.

  7. Lenovo Ideapad 320-15ABR Hard Drive Replacement: adım 7, 3 resimden 1. Lenovo Ideapad 320-15ABR Hard Drive Replacement: adım 7, 3 resimden 2. Lenovo Ideapad 320-15ABR Hard Drive Replacement: adım 7, 3 resimden 3.
    • Do not lift hard drive straight up as it risks breaking the connection port.

    • Carefully pull the hard drive away and out of the connection port.

  8. Lenovo Ideapad 320-15ABR Hard Drive Replacement: adım 8, 3 resimden 1. Lenovo Ideapad 320-15ABR Hard Drive Replacement: adım 8, 3 resimden 2. Lenovo Ideapad 320-15ABR Hard Drive Replacement: adım 8, 3 resimden 3.
    • Detach the bracket from the hard drive by pulling the bracket edges apart.

Sonuç

To reassemble your device, follow these instructions in reverse order.

25 farklı kişi bu kılavuzu tamamladı.

Anurag Deb

Üyelik tarihi: 10/31/18

1.045 İtibar

3 adet Kılavuz yazıldı

4 Yorum

What is the maximum thickness of the replacement Hard Drive/SSD.

Drew Howden - Yanıt

It takes a standard 2.5” laptop HDD/SSD. They do not vary in thickness.

TheSolderSnake -

@TheSolderSnake You might want to use google to see the variation in 2.5” laptop drive thickness before making such a confident statement. ;)

Ben - Yanıt

This is gonna be fun! lol. I’ll be doing this in 5-15 minutes. Wish me luck!!!

Paul Hucik Jr - Yanıt

Yorum Ekle

İstatistikleri Görüntüle:

Son 24 Saat: 10

Son 7 gün: 40

Son 30 gün: 220

Her zaman: 23,717