Ana içeriğe geç

Lenovo Tab 2 A8 MicroUSB Charging Port Replacement

Neye ihtiyacın var

  1. Lenovo Tab 2 A8 MicroUSB Charging Port Replacement, Removing the Back Panel: adım 1, 3 resimden 1. Lenovo Tab 2 A8 MicroUSB Charging Port Replacement, Removing the Back Panel: adım 1, 3 resimden 2. Lenovo Tab 2 A8 MicroUSB Charging Port Replacement, Removing the Back Panel: adım 1, 3 resimden 3.
    • Place the tablet face down on a soft, stable surface that will protect the screen.

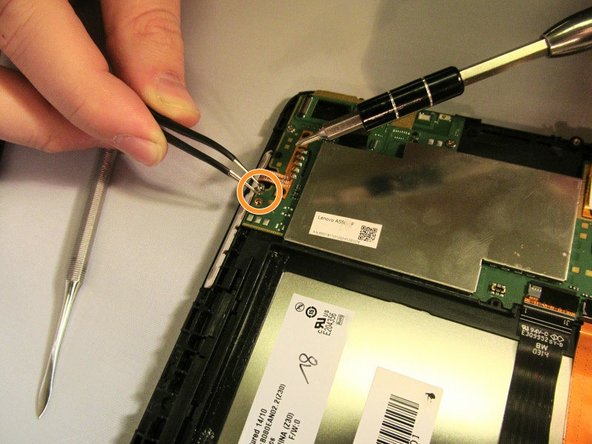
    • Next, Scrape off the seal over the screw in the back of the tablet with a Metal Spudger.

    • Use the Phillips #000 Screwdriver to remove the M1.4 × 2.5 screw.

    • If the seal covering the screw has already been removed, please proceed to the next step in the process.

    • As the screw is small, you may wish to extract it using a pair of tweezers.

  2. Lenovo Tab 2 A8 MicroUSB Charging Port Replacement: adım 2, 3 resimden 1. Lenovo Tab 2 A8 MicroUSB Charging Port Replacement: adım 2, 3 resimden 2. Lenovo Tab 2 A8 MicroUSB Charging Port Replacement: adım 2, 3 resimden 3.
    • Starting on the side, work your way around the the tablet to pop off the back cover. You will want to utilize a metal Spudger for this.

    • Some force may be required initially to pry the back cover off.

    • Note that the button tabs for this device are loose inside the case and will fall out when opening.

  3. Lenovo Tab 2 A8 MicroUSB Charging Port Replacement, Motherboard: adım 3, 3 resimden 1. Lenovo Tab 2 A8 MicroUSB Charging Port Replacement, Motherboard: adım 3, 3 resimden 2. Lenovo Tab 2 A8 MicroUSB Charging Port Replacement, Motherboard: adım 3, 3 resimden 3.
    • Using the Phillips #000 screwdriver, remove the four M1.4 × 2.5 screws holding the motherboard in place.

    • Because the screws are small, it is a good idea to remove them with a pair of tweezers.

  4. Lenovo Tab 2 A8 MicroUSB Charging Port Replacement: adım 4, 3 resimden 1. Lenovo Tab 2 A8 MicroUSB Charging Port Replacement: adım 4, 3 resimden 2. Lenovo Tab 2 A8 MicroUSB Charging Port Replacement: adım 4, 3 resimden 3.
    • Remove the M1.4 × 2.5 screw securing the battery lead to the battery with the Phillips #000 screwdriver.

    • With a pair of tweezers, gently move the battery lead so it will not obstruct the motherboard.

    • With a pair of tweezers, carefully unplug the strip connecting the screen to the motherboard.

    • The strip connecting the screen to the motherboard is firmly in place and may require some careful use of strength to unplug it.

  5. Lenovo Tab 2 A8 MicroUSB Charging Port Replacement: adım 5, 1 resimden 1.
    • Remove the motherboard by lifting the top edge and pulling outward to free it from the small tabs that hold it in place.

    • The small tabs can be broken if the motherboard is pried up too forcefully.

    • The button tabs are fastened to the motherboard by a small adhesive strip. Take care in removing the motherboard to avoid tearing the wires.

  6. Lenovo Tab 2 A8 MicroUSB Charging Port Replacement, MicroUSB Charging Port: adım 6, 1 resimden 1.
    • Flip the motherboard on to its back side.

    • The back side has less components on that side. You should see more green color than the front side.

    • Desolder the six soldering joints around the charging port.

    • With a set of tweezers, gentle lift the charging port off motherboard.

Sonuç

To reassemble your device, follow these instructions in reverse order.

2 farklı kişi bu kılavuzu tamamladı.

Melanie Turner

Üyelik tarihi: 01/26/17

143 İtibar

1 Kılavuz yazıldı

Ekip

IUPUI, Team 2-4, Baechle Spring 2017 IUPUI, Team 2-4, Baechle Spring 2017 üyesi

IUPUI-BAECHLE-S17S2G4

4 Üyeler

9 adet Kılavuz yazıldı

0 Yorum

Yorum Ekle

İstatistikleri Görüntüle:

Son 24 Saat: 1

Son 7 gün: 12

Son 30 gün: 50

Her zaman: 12,197