Bu sürüm, hatalı düzenlemeler içerebilir. En son doğrulanmış bellek kopyası dönün.
Neye ihtiyacın var
-
Bu adım çevrilmemiş. Çevrilmesine yardım edin
-
Orient the laptop so that it is bottom up, and the trackpad is closest to you.
-
Unscrew the seven captive screws with a Phillips #00 screwdriver.
-
Slide a blue opening pick in the gap between the bottom panel and chassis, and pry off the one clip on each side.
-
Remove the back cover from the device.
-
-
Bu adım çevrilmemiş. Çevrilmesine yardım edin
-
Use a Phillips #00 head screwdriver to remove the four 4 mm screws above the battery.
-
-
Bu adım çevrilmemiş. Çevrilmesine yardım edin
-
Lift the speaker modules on either side of the battery out of its pegs, and unwind the cable from the front of the battery.
-
Set the speaker modules out of the way.
-
-
Bu adım çevrilmemiş. Çevrilmesine yardım edin
-
Use tweezers to peel the plastic cover off the connector.
-
Use a spudger or your fingernail to pry up the battery straight up from the motherboard.
-
-
Bu adım çevrilmemiş. Çevrilmesine yardım edin
-
Lift the battery out of the frame and remove it from the device.
-
-
-
Bu adım çevrilmemiş. Çevrilmesine yardım edin
-
Unscrew the 3mm screw holding down the wireless adapter using a Phillips #00 screwdriver.
-
Slide the adapter out of its connector.
-
Detach the black and gray cables and separate them from the frame of the fan by gently pulling upwards.
-
-
Bu adım çevrilmemiş. Çevrilmesine yardım edin
-
Unlatch and remove the cable connecting to the frame of the fan by flipping the thin black tab up.
-
Separate the cable from the frame of the fan.
-
-
Bu adım çevrilmemiş. Çevrilmesine yardım edin
-
Loosen the five screws connecting the fan to the motherboard using a Philips #00 head screwdriver.
-
-
Bu adım çevrilmemiş. Çevrilmesine yardım edin
-
Gently disconnect the two cables located on right and left side of the fan.
-
Lift the fan up and out and remove it from the device.
-
-
Bu adım çevrilmemiş. Çevrilmesine yardım edin
-
Use a Phillips #00 screwdriver to remove the five 4 mm screws below the charging port.
-
Use a Phillips #00 screwdriver to remove the two 3 mm screws.
-
Use a Phillips #00 screwdriver to remove the two 5 mm screws securing a silver plate on the charging port, in the top-right.
-
Remove the silver plate on top of the charging port.
-
-
Bu adım çevrilmemiş. Çevrilmesine yardım edin
-
Disconnect all the ribbon wires from the motherboard.
-
All ribbon wires can be disconnected by flipping up the thin black tab at their connection points, and pulling the ribbon out.
-
-
Bu adım çevrilmemiş. Çevrilmesine yardım edin
-
Disconnect the black attachment at the top right corner of the motherboard.
-
Insert the SIM eject bit into the small hole on the top and apply a small amount of pressure to release the clip.
-
While maintaining pressure, gently pull on the wire that is connected to it to remove it.
-
-
Bu adım çevrilmemiş. Çevrilmesine yardım edin
-
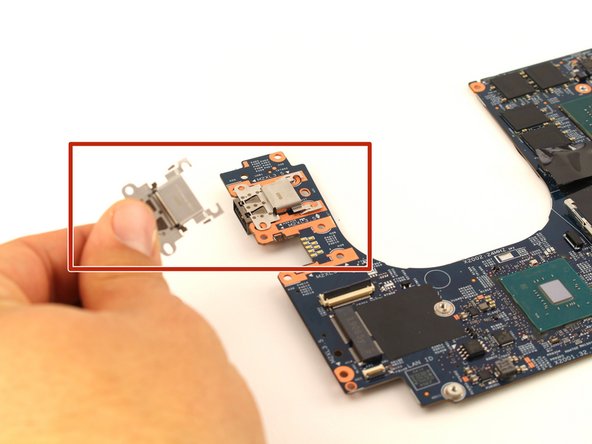
Once you have the motherboard removed, you now have access to the docking stations.
-
-
Bu adım çevrilmemiş. Çevrilmesine yardım edin
-
Gently push the docking station towards the center of the motherboard, lift up to release a lock, then pull it out to remove it from the device.
-


Ekip

Cal Poly, Team S7-G3, Regan Winter 2020 Cal Poly, Team S7-G3, Regan Winter 2020 üyesi
CPSU-REGAN-W20S7G3
4 Üyeler
8 adet Kılavuz yazıldı