Giriş
This guide will show you how to replace the Lenovo Yoga 920-13IKB's battery.
Neye ihtiyacın var
-
-
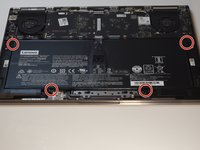
Remove the ten 5mm Torx T5 screws on the back cover to loosen the back cover.
-
-
-
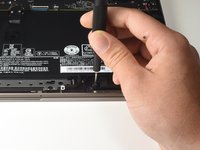
Slide the iFixit Opening Tool under the back cover to lift it up.
-
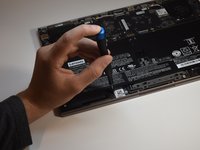
Pull up on the cover with your hand to release the tab holding the center of the cover in place.
Die Mitte der unteren Abdeckung wird von zwei Plastiknoppen am Gerät gehalten. Wenn die Schrauben gelöst sind, mit beiden Händen unter die Abdeckung greifen und nach oben gerade wegziehen.
-
-
-
-
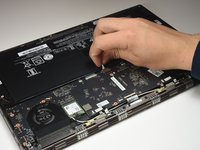
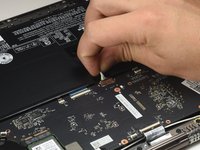
Grab the grouping of wires with your fingers close to the connector and gently pull to disconnect the battery from the motherboard.
This was the hardest step for me. My comments: The thin flap covering the wires is just a flap of the plastic covering around the battery. The connector fits tightly, needs to be really tugged out. You may need to bend the group of wires to get the new connector to seat in place. There will be a thin edge of the connector still sticking out when you have it seated. I needed to use a very thin bit from the ifixit kit to press the new connector into place. Great guide, worked perfectly!
Das Kabel ließ sich bei mir tatsächlich relativ leicht vom Akku ziehen. Das Aufstecken war dann aber umso schwerer und ich hatte zwischenzeitlich Angst, die Steckeraufnahme am Motherboard zu beschädigen. Der Stecker muss wirklich tief in die Aufnahme geschoben werden und bei mir war das nur unter Zuhilfenahme von Werkzeug möglich. Die iFixit-Plastiktools waren leider wenig hilfreich. Am Ende habe ich es nur mit Unterstützung der Griffstücke (hinteren Enden) der beiden Pinzetten meines Pro Tech Toolkits geschafft. Der Rest war dann einfach - auch wenn der Stecker des rückseitigen Deckels nicht mehr in die dafür vorgesehene Aufnahme des Akku geklippt werden konnte. Leider hat der Torx-Aufsatz (T5) etwas gelitten und musste nach dem Lösen und Befestigen der 10 Yoga-Schrauben getauscht werden. Die Spitze scheint etwas zu weich zu sein. Ansonsten gute Anleitung und perfektes Konzept.
-


To reassemble your device, follow these instructions in reverse order.
To reassemble your device, follow these instructions in reverse order.
İptal et: Bu kılavuzu tamamlamadım.
34 farklı kişi bu kılavuzu tamamladı.
Ekip

Cal Poly, Team S2-G3, White Winter 2019 Cal Poly, Team S2-G3, White Winter 2019 üyesi
CPSU-WHITE-W19S2G3
4 Üyeler
29 adet Kılavuz yazıldı
15Kılavuz Yorumları
What is the correct replacement battery for this device?
This is the battery that works in the 920: Lenovo Yoga 920 Battery - L16M4P60
Nice writeup!
Simple, a real simple straight forward process with the right tools of course. Thanks
Simple and easy. Great guide to! Thanks so much
I completed the replacement but when I turn on the computer I have gotten one of two messages: 1) incorrect voltage, 2) no battery detected. Therefore the battery isn’t charging. What should I do?
The instructions and photos were spot on. I would suggest adding a optional step of vacuuming or air spraying the interior after battery removal. Maybe adding Loctite to the screw although I don’t think my PC needed more.
I would not recommend either using Loctite or vacuuming. Unless you subject your device to ungodly amounts of vibration (which you still shouldn't do) using loctite will do nothing besides make your life harder next time you have to open the case. Vacuuming can spin the fans and cause them to induce a current that can destroy parts of your device.
Robb -
Les réparations impensables chez le marchand sont devenues très faciles
After battery replacement what happens with BIOS? It does not appear that there is a CMOS battery. Just want to ensure after install what to do if BIOS resets?
Good morning
I have problem to turn on my laptop after battery replacement.my power botton dont work ,i have to plug in laptop so he turn on automaticly,the new batter is fine,so after that i can use the power botton to turn on off the laptop.but after shuting down laptop for few minutes,the power botton dont work again,and i have to plug it on to run it.when i put on the old battery no problem.can u help resolving this trouble.