Ana içeriğe geç

Logitech G502 Hero Feet Replacement

Neye ihtiyacın var

  1. Logitech G502 Hero Feet Replacement, Prepare your mouse for disassembly: adım 1, 1 resimden 1.
    • Before starting your repair, unplug the mouse.

    • Throughout your repair, it may be helpful to lay your mouse on a soft cloth to stabilize it and prevent damage while you work.

  2. Logitech G502 Hero Feet Replacement, Remove the feet: adım 2, 2 resimden 1. Logitech G502 Hero Feet Replacement, Remove the feet: adım 2, 2 resimden 2.
    • The feet are secured to the bottom of the mouse with adhesive. In order to cleanly remove them, the adhesive needs to be thoroughly heated.

    • Heat an iOpener and lay it on the mouse feet for one minute to heat the adhesive.

    • Alternatively, you can use a hair dryer on the Low heat setting to soften the adhesive.

    • If you're using a hair dryer, only heat the feet a few seconds at a time or you may warp the plastic shell.

  3. Logitech G502 Hero Feet Replacement: adım 3, 3 resimden 1. Logitech G502 Hero Feet Replacement: adım 3, 3 resimden 2. Logitech G502 Hero Feet Replacement: adım 3, 3 resimden 3.
    • The feet have two layers—a rubberized one and an adhesive pad underneath.

    • If you're reusing the feet, be very careful not to separate the two layers or damage the feet.

    • Carefully slide the point of a spudger under the large foot near the front of the mouse, making sure it goes under both the foot and its adhesive pad.

    • The foot recesses have a small notch that makes it easier to slide your spudger under.

    • Gently slide the spudger farther under the foot and lift until you can grip the pad with your fingers.

  4. Logitech G502 Hero Feet Replacement: adım 4, 3 resimden 1. Logitech G502 Hero Feet Replacement: adım 4, 3 resimden 2. Logitech G502 Hero Feet Replacement: adım 4, 3 resimden 3.
    • Peel up and remove the foot.

    • If the rubber layer separates from its adhesive pad, use the same process to remove the pad.

  5. Logitech G502 Hero Feet Replacement: adım 5, 3 resimden 1. Logitech G502 Hero Feet Replacement: adım 5, 3 resimden 2. Logitech G502 Hero Feet Replacement: adım 5, 3 resimden 3.
  6. Logitech G502 Hero Feet Replacement, Reassembly information: adım 6, 3 resimden 1. Logitech G502 Hero Feet Replacement, Reassembly information: adım 6, 3 resimden 2. Logitech G502 Hero Feet Replacement, Reassembly information: adım 6, 3 resimden 3.
    • To install a new foot:

    • If any of the feet got damaged during removal or separated from their adhesive pads, replace them.

    • Use a spudger to carefully scrape up and remove any remaining adhesive bits.

    • Use isopropyl alcohol and a microfiber cloth to thoroughly clean all adhesive residue from the foot recesses. Allow the surface to completely dry.

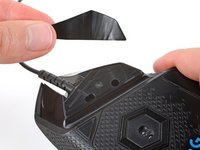
    • Remove the feet from their backing and firmly press them into place.

Sonuç

Repair didn’t go as planned? Try some basic troubleshooting, or ask our Answers community for help.

Spencer Day

Üyelik tarihi: 09/14/22

95.993 İtibar

662 adet Kılavuz yazıldı

Ekip

iFixit iFixit üyesi

Staff

119 Üyeler

19.657 adet Kılavuz yazıldı

0Kılavuz Yorumları

Yorum Ekle

İstatistikleri Görüntüle:

Son 24 Saat: 10

Son 7 gün: 78

Son 30 gün: 438

Her zaman: 1,171