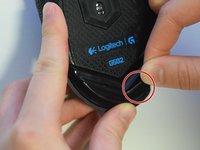
Ana içeriğe geç

Logitech G502 Proteus Core Mouse Feet Replacement

Neye ihtiyacın var

  1. Logitech G502 Proteus Core Mouse Feet Replacement, Mouse Feet: adım 1, 3 resimden 1. Logitech G502 Proteus Core Mouse Feet Replacement, Mouse Feet: adım 1, 3 resimden 2. Logitech G502 Proteus Core Mouse Feet Replacement, Mouse Feet: adım 1, 3 resimden 3.
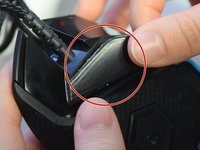
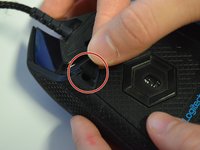
    • Use your fingers or a nylon spudger to peel the old feet off all three corners where the screw holes are exposed.

  2. Logitech G502 Proteus Core Mouse Feet Replacement: adım 2, 3 resimden 1. Logitech G502 Proteus Core Mouse Feet Replacement: adım 2, 3 resimden 2. Logitech G502 Proteus Core Mouse Feet Replacement: adım 2, 3 resimden 3.
    • Peel the backing off the new mouse feet to reveal the adhesive.

  3. Logitech G502 Proteus Core Mouse Feet Replacement: adım 3, 3 resimden 1. Logitech G502 Proteus Core Mouse Feet Replacement: adım 3, 3 resimden 2. Logitech G502 Proteus Core Mouse Feet Replacement: adım 3, 3 resimden 3.
    • Apply the new mouse feet to their designated areas based on shape.

  4. Logitech G502 Proteus Core Mouse Feet Replacement: adım 4, 1 resimden 1.
    • Apply even pressure across the mouse feet to ensure adherence.

  5. Logitech G502 Proteus Core Mouse Feet Replacement: adım 5, 1 resimden 1.
    • Let adhesive sit for about 5-10 minutes with applied pressure.

Sonuç

To reassemble your device, follow these instructions in reverse order.

4 farklı kişi bu kılavuzu tamamladı.

Sage Farray

Üyelik tarihi: 04/10/17

541 İtibar

3 adet Kılavuz yazıldı

Ekip

UW Tacoma, Team S3-G1, Liner Spring 2017 UW Tacoma, Team S3-G1, Liner Spring 2017 üyesi

UWT-LINER-S17S3G1

4 Üyeler

11 adet Kılavuz yazıldı

Bir Yorum

You completely omitted half of the feet located on the mouse. The ones left out are the 3 located on the removable panel: there are 2 “v” shaped ones around the sensor and the one to the right of the “v” shapes.

Robert - Yanıt

Yorum Ekle

İstatistikleri Görüntüle:

Son 24 Saat: 1

Son 7 gün: 7

Son 30 gün: 38

Her zaman: 10,907