Ana içeriğe geç

Bu kılavuzda güncel değişiklikler var. En son onaylanmamış sürüme geçin.

Logitech G700s Left /Right Click Switches Replacement

Neye ihtiyacın var

  1. Logitech G700s Left /Right Click Switches Replacement, Top Case Replacement: adım 1, 1 resimden 1.
    • Remove the batteries from the mouse.

    • Use a plastic opening tool to peel up the four mouse feet.

  2. Logitech G700s Left /Right Click Switches Replacement: adım 2, 2 resimden 1. Logitech G700s Left /Right Click Switches Replacement: adım 2, 2 resimden 2.
    • Remove the five 5.5mm Phillips #00 screws found underneath the mouse feet.

  3. Logitech G700s Left /Right Click Switches Replacement: adım 3, 3 resimden 1. Logitech G700s Left /Right Click Switches Replacement: adım 3, 3 resimden 2. Logitech G700s Left /Right Click Switches Replacement: adım 3, 3 resimden 3.
    • Pull the top of the mouse off of the bottom half.

    • There's a wire connecting the two halves.

    • Unplug the programmable buttons from the motherboard.

    • The white pin housing on the motherboard may come off while unplugging. In that case, use tool to pry between at location indicated to separate them and insert the housing back onto the motherboard.

  4. Logitech G700s Left /Right Click Switches Replacement, Scroll Wheel: adım 4, 3 resimden 1. Logitech G700s Left /Right Click Switches Replacement, Scroll Wheel: adım 4, 3 resimden 2. Logitech G700s Left /Right Click Switches Replacement, Scroll Wheel: adım 4, 3 resimden 3.
    • Remove the black pin that holds the scroll wheel to the motherboard.

    • The protrusion on the bottom side of the pin clicks into the dimple on the base.

    • I find the easiest way to remove the pin is to use the pointy end of the spudger to push on this end of the pin.

  5. Logitech G700s Left /Right Click Switches Replacement: adım 5, 3 resimden 1. Logitech G700s Left /Right Click Switches Replacement: adım 5, 3 resimden 2. Logitech G700s Left /Right Click Switches Replacement: adım 5, 3 resimden 3.
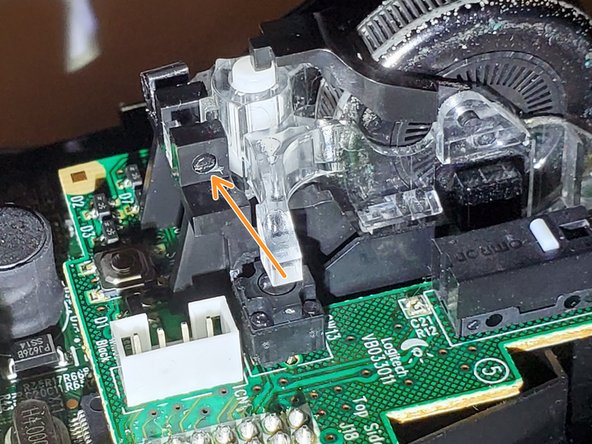
    • First, lift the assembly from the back (green arrow), while keeping the front clear plastic part resting on the springs (red circle).

    • Then, while pulling it toward the back very slightly, carefully lift the front part off the springs.

    • It might jump a little bit from the springs.

    • The clear front part has a hole that attaches onto a clear nibble just below the bracket (blue arrow in second picture) for the scrollwheel to pivot left and right for the left and right scroll function.

    • Though the pivot point isn't attached too deeply. When reassembling, align the circular marks in the front to the springs, then press the back side down into the holder and it will self align.

    • Be careful not to lose the two small springs! They are magnetic and could attach to any magnetic tip screw driver!

    • Leaving a magnet on the metal clip might help to retain the springs, though I haven't tried it.

    • Remove the springs and keep them safe.

  6. Logitech G700s Left /Right Click Switches Replacement, Left /Right Click Switches: adım 6, 2 resimden 1. Logitech G700s Left /Right Click Switches Replacement, Left /Right Click Switches: adım 6, 2 resimden 2.
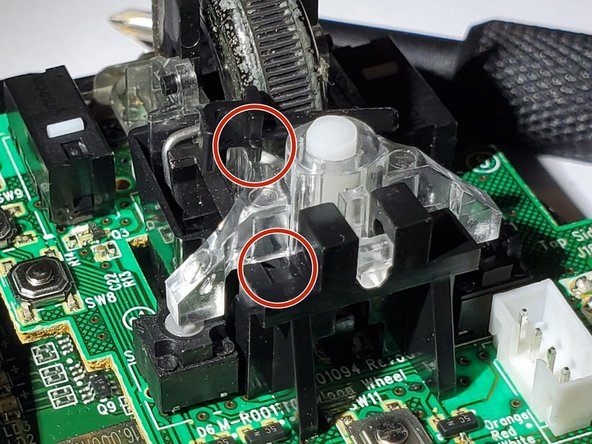
    • Remove the small black pin and two Phillips #00 screws to free up the scroll wheel.

    • Next, remove the plastic mount that holds the scroll wheel in place.

  7. Logitech G700s Left /Right Click Switches Replacement: adım 7, 3 resimden 1. Logitech G700s Left /Right Click Switches Replacement: adım 7, 3 resimden 2. Logitech G700s Left /Right Click Switches Replacement: adım 7, 3 resimden 3.
    • Remove the two small springs and two Phillips #00 screws from the motherboard.

    • Upper PCB must be de-soldered to remove.

  8. Logitech G700s Left /Right Click Switches Replacement: adım 8, 2 resimden 1. Logitech G700s Left /Right Click Switches Replacement: adım 8, 2 resimden 2.
    • Desolder the switches from the circuit board and remove them.

Sonuç

To reassemble your device, follow these instructions in reverse order.

6 farklı kişi bu kılavuzu tamamladı.

Chase Tisinger

Üyelik tarihi: 02/14/18

687 İtibar

5 adet Kılavuz yazıldı

Ekip

USF Tampa, Team S2-G3, Nance Spring 2018 USF Tampa, Team S2-G3, Nance Spring 2018 üyesi

USFT-NANCE-S18S2G3

4 Üyeler

15 adet Kılavuz yazıldı

9 Yorum

Please note, the top PCB can only be removed by desoldering the connections to the lower PCB. Otherwise you risk breaking the top PCB itself, as can be seen in Step 6. Which is far from ideal in restoring this mouse to working order.

Youri - Yanıt

lol, you broke the PCB and kept it covered with your thumb all the time as if you don’t need to desolder 14 pins before step 6…

juliusukanis - Yanıt

Yes. I wonder why they excluded that part ^^,

Thomas Vestly Andersen -

What Youri said. Plus be warned de-soldering the pins is extremely difficult to do without the proper tools, or you risk ripping the copper solder pads of the upper board when doing so (sadly that happened to me). I’d suggest trying solder wick rather than a solder sucker as its a fiddly job.

You are also going to need some fine soldering skills when replacing the board.

Peter Wise - Yanıt

Wonderful. Just skip the hardest part. Desodering the two PCBs by breaking them apart.

Thomas Vestly Andersen - Yanıt

Yorum Ekle

İstatistikleri Görüntüle:

Son 24 Saat: 2

Son 7 gün: 5

Son 30 gün: 22

Her zaman: 6,659