Giriş
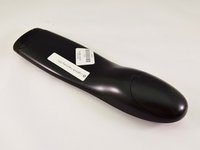
This guide shows you how to begin the disassembly of the Logitech Harmony 650 Universal Remote. It is recommended that you have the iFixit ProTech Toolkit.
Neye ihtiyacın var
-
-
Remove the battery cover by applying pressure to the indented area and pushing the cover toward the rear of the device.
 FixBot'a Sor
-
-
-
Using a J000 Philips head screwdriver remove the four 5mm screws around the rim of the battery chamber.
-
-
-
Bu adımda kullanılan alet:Flathead 3/32" or 2.5 mm Screwdriver$5.49
-
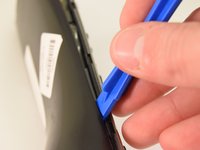
Remove the small plastic cover beneath the plastic LED housing by using a 3.0 flathead screwdriver and a spudger to pry it off. It is glued to the case. If you are having trouble removing it try applying some heat to loosen the glue.
-
-
-
Remove the two 5mm screws located underneath the cover using a J000 Philips screwdriver bit.
-
-
-
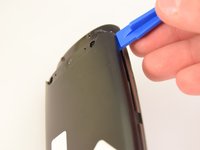
Using a plastic opening tool, pry the case off starting from the top of the device (nearest the transmitter). There are 3 tabs along the side of the case and one at the back.
-
The top led protector plastic cover will also be freed once back is removed.
-


To reassemble your device, follow these instructions in reverse order.
İptal et: Bu kılavuzu tamamlamadım.
5 farklı kişi bu kılavuzu tamamladı.
Ekip

Eastern Washington University, Team 1-2, Rowley Winter 2016 Eastern Washington University, Team 1-2, Rowley Winter 2016 üyesi
EWU-ROWLEY-W16S1G2
4 Üyeler
5 adet Kılavuz yazıldı
1Rehber Yorum
Thanks for the fix. Now I can get on replacing the corroded battery contacts. Many thanks.