Ana içeriğe geç

Logitech Harmony 950 Case Replacement

Neye ihtiyacın var

  1. Logitech Harmony 950 Case Replacement, Battery: adım 1, 2 resimden 1. Logitech Harmony 950 Case Replacement, Battery: adım 1, 2 resimden 2.
    • Make sure the remote control is powered off before starting.

    • Use the Opening Tool to open the port cover at the bottom of the remote control.

    • Bend the cover back to gain easy access to the screws.

  2. Logitech Harmony 950 Case Replacement: adım 2, 3 resimden 1. Logitech Harmony 950 Case Replacement: adım 2, 3 resimden 2. Logitech Harmony 950 Case Replacement: adım 2, 3 resimden 3.
    • Use the Phillips #0 Screwdriver to remove the (2) two 6mm screws.

    • Pull the bottom cover off of the remote control.

  3. Logitech Harmony 950 Case Replacement: adım 3, 3 resimden 1. Logitech Harmony 950 Case Replacement: adım 3, 3 resimden 2. Logitech Harmony 950 Case Replacement: adım 3, 3 resimden 3.
    • Use the Phillips #1 Screwdriver to remove the (2) two 6mm screws.

    • There should be a gap on each side to fit the Opening Tool. Use the Opening Tool to open the back cover (Soft Touch cover) using the gap.

  4. Logitech Harmony 950 Case Replacement: adım 4, 3 resimden 1. Logitech Harmony 950 Case Replacement: adım 4, 3 resimden 2. Logitech Harmony 950 Case Replacement: adım 4, 3 resimden 3.
    • Use the Opening Tool to lift the battery out of the case.

    • Gently pull the cable out of the socket to unplug the battery.

    • Be careful not to damage any part of the remote when pulling the cable out.

  5. Logitech Harmony 950 Case Replacement, Case: adım 5, 3 resimden 1. Logitech Harmony 950 Case Replacement, Case: adım 5, 3 resimden 2. Logitech Harmony 950 Case Replacement, Case: adım 5, 3 resimden 3.
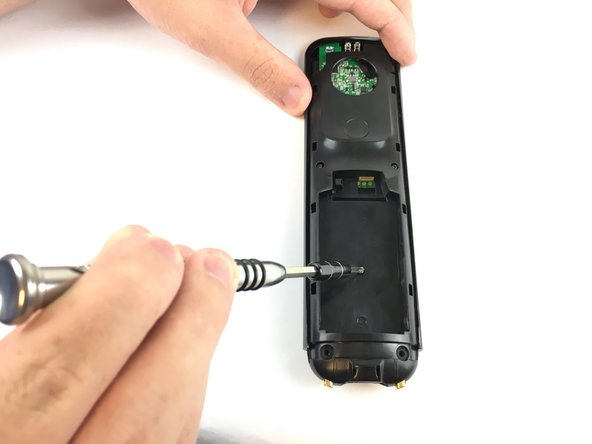
    • Use the Phillips #1 screwdriver to remove the (3) three 6mm screws.

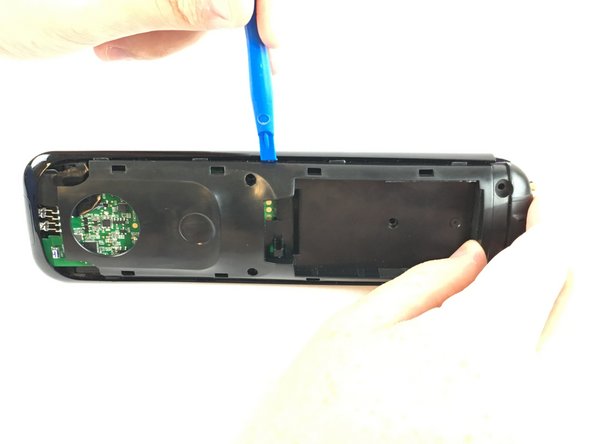
    • Push the opening tool into the gap along the side of the remote, then slide it across until you hear clicking sounds.
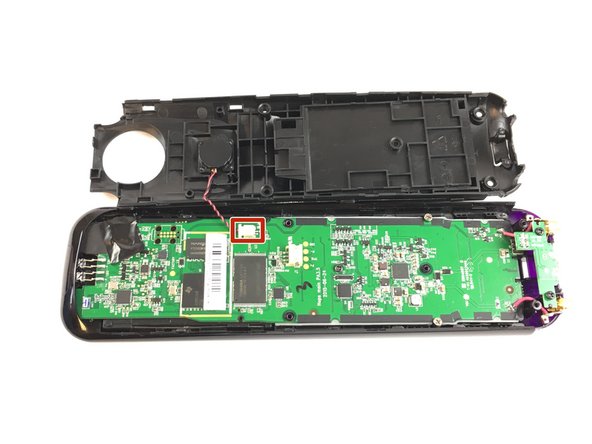
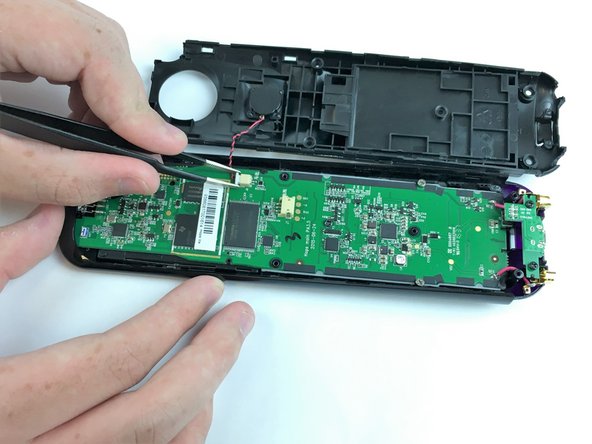
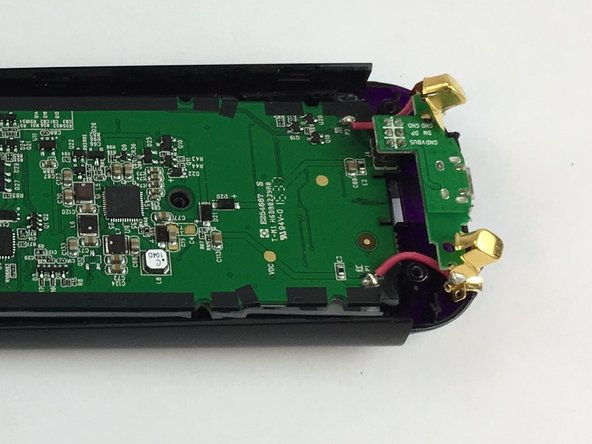
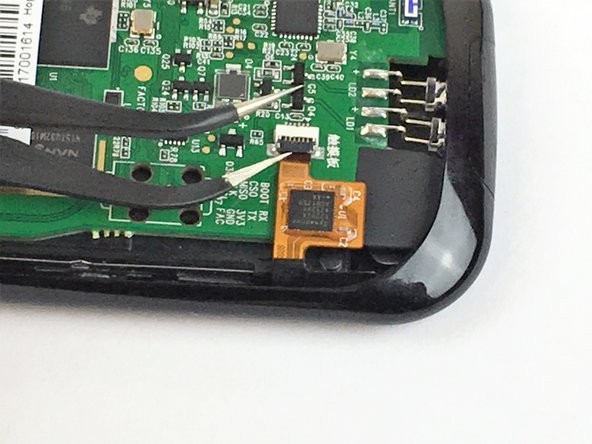
    • You need to repeat this process for both sides of the remote.

  6. Logitech Harmony 950 Case Replacement: adım 6, 3 resimden 1. Logitech Harmony 950 Case Replacement: adım 6, 3 resimden 2. Logitech Harmony 950 Case Replacement: adım 6, 3 resimden 3.
    • Carefully remove the back cover and place it next to the remote. Be careful not to detach the wire during this process.

    • Use the Angled Tweezers to carefully pull the white cable end off of the remote and disconnect it.

  7. Logitech Harmony 950 Case Replacement: adım 7, 3 resimden 1. Logitech Harmony 950 Case Replacement: adım 7, 3 resimden 2. Logitech Harmony 950 Case Replacement: adım 7, 3 resimden 3.
    • Use the Phillips #0 screwdriver to remove the (5) five 6mm screws. Keep in mind that once the screws are off, the circuit board will be completely separate from the case.

    • Be careful not to damage or disconnect the pink wires when removing the gold charging conductors from the case.

  8. Logitech Harmony 950 Case Replacement: adım 8, 3 resimden 1. Logitech Harmony 950 Case Replacement: adım 8, 3 resimden 2. Logitech Harmony 950 Case Replacement: adım 8, 3 resimden 3.
    • Remove the black tape to fully access the cable underneath.

    • This cable has a locking mechanism. Use the Angled Tweezers to lift the black part (lock).

    • Slide the yellow cable to disconnect it from the circuit board.

  9. Logitech Harmony 950 Case Replacement: adım 9, 2 resimden 1. Logitech Harmony 950 Case Replacement: adım 9, 2 resimden 2.
    • Pull the circuit board off of the case. Start from the bottom, and lift up to completely detach it from the cover.

  10. Logitech Harmony 950 Case Replacement: adım 10, 3 resimden 1. Logitech Harmony 950 Case Replacement: adım 10, 3 resimden 2. Logitech Harmony 950 Case Replacement: adım 10, 3 resimden 3.
    • Use the Blunt Tweezers to carefully remove the keypad from the cover of the remote.

Sonuç

To reassemble your device, follow these instructions in reverse order.

3 farklı kişi bu kılavuzu tamamladı.

Shiba Kandel

Üyelik tarihi: 09/26/17

149 İtibar

1 Kılavuz yazıldı

Ekip

USF Tampa, Team S2-G2, Passmore Fall 2017 USF Tampa, Team S2-G2, Passmore Fall 2017 üyesi

USFT-PASSMORE-F17S2G2

4 Üyeler

4 adet Kılavuz yazıldı

3 Yorum

where can this casing be purchased?

Sharonda Bailey - Yanıt

Parts are required obviously!!

larrybud2004 - Yanıt

Is the usb bottom cap part of the replacement case? If not can u get one?

jmorrissette - Yanıt

Yorum Ekle

İstatistikleri Görüntüle:

Son 24 Saat: 1

Son 7 gün: 11

Son 30 gün: 49

Her zaman: 3,513