Giriş
white spots appear on television screen, first only a few and within weeks too many to view the picture comfortably. replacing the dlp chip will resolve this issue.
with only a couple of simple tools and an extra set of hands, you can replace this part and save yourself some money in the process.
if you can handle a screw driver, have a little time and some patience then you can do this.
Neye ihtiyacın var
-
-
remove the back panel at bottom of tv it's nine screws, number 2 phillips.
-
the panel off, this is the back of tv with the focus on the area we're working on. this is the formatter board housing, under here is the formatter board and on the under side of that is the dlp chip. along the top you see the green, that's the formatter board;
-
-
-
-
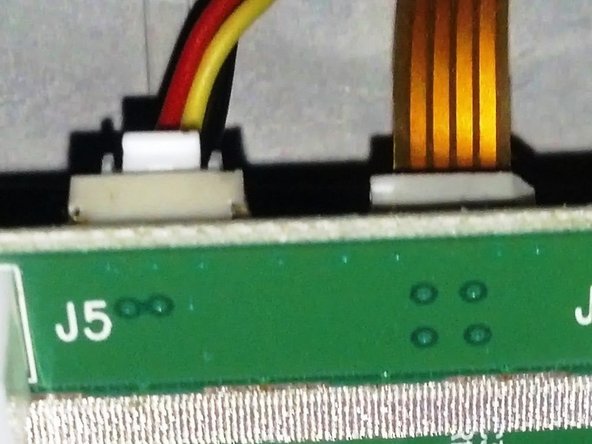
close up of the front upper right corner of the board sitting in it's mounting spot.
-
there is a bk/rd/yw wire plugged into the back of the board.
-
on the right there is a 'gold' ribbon cable also plugged into the back.
-
the bk/rd/yw wire is a snap in clip as usual
-
the ribbon cable slides, silver edge revealed down, into a slot. it does not clip in or lock in any manner.
-
the ribbon cable is rigid, it is somewhat flexible, but difficult to damage. if you crimp it, that would probably be the worst thing and may break it.
-
-
-
this is a pic of the underside of the board.
-
the second pic is a close up of these two connections sticking out of the mounting bracket after i disconnected them from the board. the white thing on the ribbon cable is just a sticker. funny thing is, it's the only thing keeping it from dropping back into that hole.
-
these do not stick out far, there is not a lot of play here.
-
-
-
at this point, i disconnected the wire connector and ribbon cable from the board, and laid it down to remove the chip and insert the new one.
-
i'm somewhat used to dealing with ribbon cables and it took me about 10 minutes to get it back in the slot with someone holding the flashlight.
-
looking back on it, if that person were around prior to me having to remove the chip i would have had them hold the board as you can see my hand in the pic
-
removing the chip with the board still connected and someone holding it should be easy.
-
-
-
lay the new chip in the socket, lining up the plastic edges of the chip with the plastic guides of the socket.
-
there is only one way for the chip to lay flat in the socket. there is nothing to push or force here.
-
once it's resting flat in the socket, turn the locking mechanism a quarter turn to the right to lock the chip down.
-
the slot on the top of the locking mechanism should be parallel to the edge of the chip again.
-


To reassemble your device, follow these instructions in reverse order.
To reassemble your device, follow these instructions in reverse order.
İptal et: Bu kılavuzu tamamlamadım.
5 farklı kişi bu kılavuzu tamamladı.
4 Yorum
Steps were pretty straight forward… only had an issue/slow down with the gold ribbon cable on the back of the formatter board. Didn’t realize the white connector part you could see was not part of the ribbon and that the ribbon just slid into the white part… but, once figured that out, all went according to the steps. Turned the set back on and pnly sound, no picture at all. I am sure the chip is seated and installed correctly. Neither the lamp nor the fan turn on. I verified all the connections we secure (especially the fan), no clue why the lamp does not light since it was not touched during these steps.
ANy troubleshooting suggestions? I’m out of ideas.
Replaced the DLP chip without much of an issue at all except for the confusing part withthe ribbon cable on the back of the formatter board. Didn’t realize it was litterally just a cable and the white connector part was part of the formatter board. Once I figured that out, all went according to the instructions. Turned the set on and had sound but no picture - black screen. The fan did not start nor did the lamp light. I have verified all connectors in place and secure. Thoughts on troubleshooting?
I replaced it and a week later it started again what else can it be this is killing me
I got the same problem mitsubishi wd62327 dlp wont turn on yellow blinking light then shuts off dont know what to do. Should i fix the ballast. Or check the fans before it turn off i think it said something on screen about lamp but im think ing fan of the lamp not sure it never turn back on again