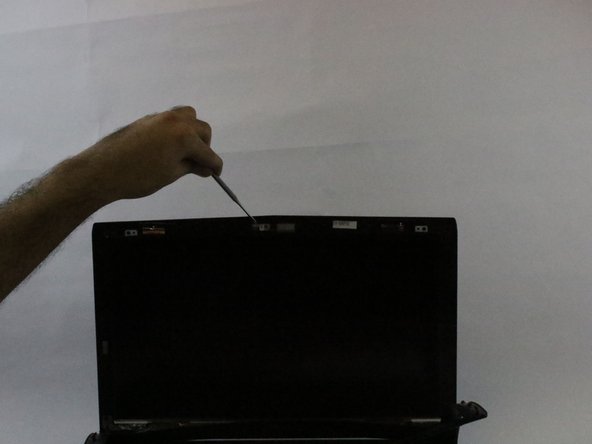
Ana içeriğe geç

MSI GE62 Apache Pro 004 Web Camera Replacement

Neye ihtiyacın var

  1. MSI GE62 Apache Pro 004 Web Camera Replacement, Battery: adım 1, 1 resimden 1.
    • Start with the bottom of the laptop facing up.

  2. MSI GE62 Apache Pro 004 Web Camera Replacement: adım 2, 2 resimden 1. MSI GE62 Apache Pro 004 Web Camera Replacement: adım 2, 2 resimden 2.
    • Remove the 15 screws from the bottom of the laptop with a PH1 screwdriver.

    • Remove the bottom plate

    • Keep track of all the screws and which slot they came from, as they slightly differ. We recommend this system: lay out on a piece of paper and pretending the paper is the device. Place the screws on the paper approximately where they would go

  3. MSI GE62 Apache Pro 004 Web Camera Replacement: adım 3, 3 resimden 1. MSI GE62 Apache Pro 004 Web Camera Replacement: adım 3, 3 resimden 2. MSI GE62 Apache Pro 004 Web Camera Replacement: adım 3, 3 resimden 3.
    • Remove the screw holding down the battery with a PH1 screwdriver.

    • Pull out the battery.

  4. MSI GE62 Apache Pro 004 Web Camera Replacement, Web Camera: adım 4, 1 resimden 1.
    • Flip over the laptop and open it.

  5. MSI GE62 Apache Pro 004 Web Camera Replacement: adım 5, 3 resimden 1. MSI GE62 Apache Pro 004 Web Camera Replacement: adım 5, 3 resimden 2. MSI GE62 Apache Pro 004 Web Camera Replacement: adım 5, 3 resimden 3.
    • Slide a metal opener tool along the outside edges of the front screen panel to start to separate it from the back screen panel.

    • You may need to apply some firm pressure to get it started.

  6. MSI GE62 Apache Pro 004 Web Camera Replacement: adım 6, 2 resimden 1. MSI GE62 Apache Pro 004 Web Camera Replacement: adım 6, 2 resimden 2.
    • Once it has started to separate, gently pull off the screen panel by working along the edge, and set it aside.

  7. MSI GE62 Apache Pro 004 Web Camera Replacement: adım 7, 2 resimden 1. MSI GE62 Apache Pro 004 Web Camera Replacement: adım 7, 2 resimden 2.
    • Locate the WebCam on the middle of the device.

    • Slide a metal opener tool to remove the Webcam

Sonuç

To reassemble your device, follow these instructions in reverse order.

Majid Al Hashmi

Üyelik tarihi: 02/13/18

283 İtibar

2 adet Kılavuz yazıldı

Ekip

USF Tampa, Team S15-G5, Boczar Spring 2018 USF Tampa, Team S15-G5, Boczar Spring 2018 üyesi

USFT-BOCZAR-S18S15G5

4 Üyeler

5 adet Kılavuz yazıldı

0 Yorum

Yorum Ekle

İstatistikleri Görüntüle:

Son 24 Saat: 0

Son 7 gün: 3

Son 30 gün: 4

Her zaman: 821