Giriş
Use this guide to completely replace your mini's hard drive.
Neye ihtiyacın var
-
-
Place your thumbs in the depressions cut into the bottom cover.
-
Rotate the bottom cover counter-clockwise until the white dot painted on the bottom cover is aligned with the ring inscribed on the outer case.
 FixBot'a Sor
-
-
-
Tilt the mini enough to allow the bottom cover to fall away from the outer case.
-
Remove the bottom cover and set it aside.
-
-
-
Remove the two 11.3 mm T6 Torx screws securing the fan to the logic board near the antenna plate.
-
-
-
Lift the ear of the fan nearest the RAM up off the standoff secured to the outer case.
-
-
-
Lift the fan out of the mini for enough clearance to access its connector.
-
Grab all the wires at once and gently pull straight up to disconnect the fan from the logic board.
-
Remove the fan.
-
-
-
Remove the single 3.5 mm T6 Torx screw securing the cowling to the heat sink.
-
-
-
Lift the cowling from the end nearest the antenna plate.
-
Rotate the cowling away from the outer case and remove it from the mini.
-
-
-
-
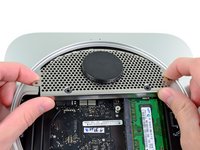
Remove the following screws securing the antenna plate to the mini:
-
Two 6.6 mm T8 Torx screws
-
Two 5.0 mm T8 Torx or 2.0 mm Hex screws (either screwdriver will work)
-
When putting back together:
-
-
-
Slightly lift the antenna plate from the end closest to the RAM.
-
Carefully pull the antenna plate away from the circular rim of the outer case.
-
-
-
Use the tip of a spudger to carefully pry the antenna connector up from its socket on the AirPort/Bluetooth board.
-
-
-
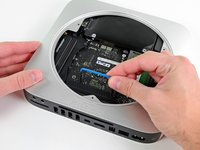
Use the flat end of a spudger to pry the hard drive connector up from its socket on the logic board.
-
-
-
Use the tip of a spudger to lift the IR sensor connector up and out of its socket on the logic board.
-
-
-
Remove the following three screws:
-
One 5.0 mm T8 Torx or 2.0 mm Hex screw (either screwdriver will work)
-
One 16.2 mm T6 Torx screw
-
One 26 mm T6 Torx standoff
-
-
Bu adımda kullanılan alet:Mac mini Logic Board Removal Tool$4.99
-
Insert the Mac mini Logic Board Removal Tool into the two holes highlighted in red. Be sure it makes contact with the top side of outer case below the logic board before proceeding.
-
Carefully pull the tool toward the I/O board. The logic board and I/O board assembly should slightly slide out of the outer case.
-
Remove the Mac mini Logic Board Removal tool.
-
-
-
Simultaneously push the two plastic clips on the far left and right sides of the I/O board toward the middle of the I/O board and pull the I/O board away from the outer case.
-
Only pull the logic board assembly out of the outer case until the edge of the I/O board is about .5" away from the edge of the aluminum outer case.
-
-
-
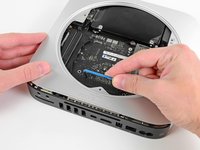
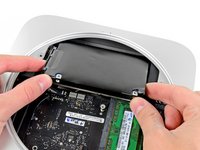
Pull the hard drive away from the front edge of the mini and remove it from the outer case.
-
-
-
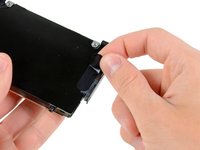
Remove the strip of tape connecting the hard drive cable to the hard drive.
-
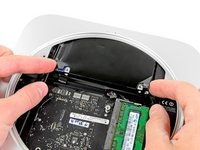
Remove the hard drive cable by pulling its connector straight away from the hard drive.
-
-
-
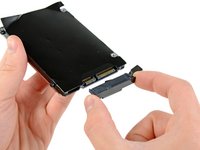
Remove the hard drive cable.
-
Remove the two 6.2 mm T8 Torx screws from the side of the hard drive.
-
-
-
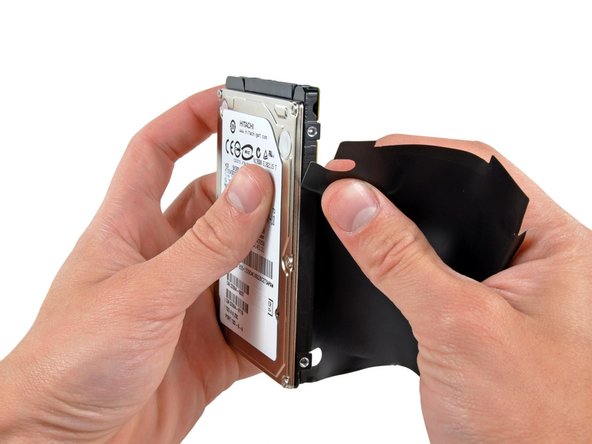
Carefully peel the hard drive cover off the hard drive.
-
Hard drive remains.
-
If you are installing a new hard drive, we have an OS X install guide to get you up and running.
-


To reassemble your device, follow these instructions in reverse order.
İptal et: Bu kılavuzu tamamlamadım.
556 farklı kişi bu kılavuzu tamamladı.


81Kılavuz Yorumları
no need to remove the logic board! the disk comes out after step 12.
Also you do not really need to disconnect the antenna. Just be carefull no to break the wire.
i replaced 5400 rpm hdd with Samsung SSD 840 Pro
I did it Rober's way - thanks - no disconnecting antenna in step 10
Stopping after step 12 and replacing hard drive there without removing logic board
I put the sheet that was around the old hard drive over the new one - not sure if its needed?
After it is all done i did Command + R to do internet recovery and get OS X mountain lion on the blank drive
Last thing to do is go here to enable trim: http://www.groths.org/?page_id=322
Very helpful guide, thanks! As many have said before, I would not detach the fan or antenna, just move it out of the way.
One very trivial tip: slide a piece of paper over the logic board as soon as you've removed the fan, as a protection against accidentally touching the components with your fingers or tools.
I did not reinstall the plastic cover on the HDD. This is only to protect the logic board of the HDD, which ofcourse is very well protected in SSD's.
That depends which position the hard drive is in. If it's in the upper slot (ie at the 'top' of the enclosure when it's in use) then you will need to remove the logic board.
Dismantling the Mini was simple, but the two hardest steps when installing a new hard drive were sliding the drive back in aligned correctly, and replacing the antenna grill.
Even with the logic board pushed out, I found it difficult to line up the screws on the hard drive and get it seated properly. As for the grill, it would not line up with the screw holes. I had to use the Mac Mini tool hooked into a hole in the grill as a lever to lift it up and in towards the lip of the rim it was sitting on. There was an audible snap as it settled into place.