Ana içeriğe geç

Mac mini Mid 2010 PRAM Battery Replacement

Neye ihtiyacın var

  1. Mac mini Mid 2010 PRAM Battery Replacement, Bottom Cover: adım 1, 2 resimden 1. Mac mini Mid 2010 PRAM Battery Replacement, Bottom Cover: adım 1, 2 resimden 2.
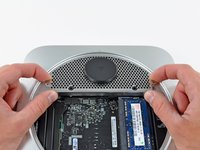
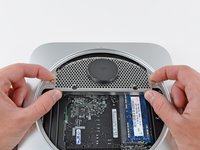
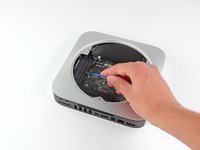
    • Place your thumbs in the depressions cut into the bottom cover.

    • Rotate the bottom cover counter-clockwise until the white dot painted on the bottom cover is aligned with the ring inscribed on the outer case.

  2. Mac mini Mid 2010 PRAM Battery Replacement: adım 2, 1 resimden 1.
    • Tilt the mini enough to allow the bottom cover to fall away from the outer case.

    • Remove the bottom cover and set it aside.

  3. Mac mini Mid 2010 PRAM Battery Replacement, Fan: adım 3, 1 resimden 1.
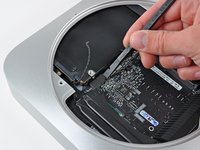
    • Remove the two 11.3 mm T6 Torx screws securing the fan to the logic board near the antenna plate.

  4. Mac mini Mid 2010 PRAM Battery Replacement: adım 4, 1 resimden 1.
    • Lift the ear of the fan nearest the RAM up off the standoff secured to the outer case.

    • If the fan doesn't separate from the standoff screw with a moderate amount of force, you can use a T6 Torx driver to simply remove this screw.

  5. Mac mini Mid 2010 PRAM Battery Replacement: adım 5, 1 resimden 1.
    • Lift the fan out of the mini for enough clearance to access its connector.

    • Carefully pull the fan cables upward to lift the fan connector up out of its socket on the logic board.

    • Remove the fan.

  6. Mac mini Mid 2010 PRAM Battery Replacement, Cowling: adım 6, 1 resimden 1.
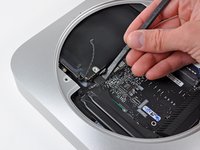
    • Remove the single 3.5 mm T6 Torx screw securing the cowling to the heat sink.

  7. Mac mini Mid 2010 PRAM Battery Replacement: adım 7, 1 resimden 1.
    • Lift the cowling from the end nearest the antenna plate.

    • Rotate the cowling away from the outer case and remove it from the mini.

  8. Mac mini Mid 2010 PRAM Battery Replacement, Antenna Plate: adım 8, 1 resimden 1.
    • Remove the following screws securing the antenna plate to the mini:

    • Two 6.6 mm T8 or T9 Torx screws

    • Two 5.0 mm T8 Torx or 2.0 mm Hex screws (either will work)

  9. Mac mini Mid 2010 PRAM Battery Replacement: adım 9, 2 resimden 1. Mac mini Mid 2010 PRAM Battery Replacement: adım 9, 2 resimden 2.
    • Slightly lift the antenna plate from the end closest to the RAM.

    • Carefully pull the antenna plate straight away from the circular rim of the outer case.

    • Do not remove the antenna plate yet. It is still attached to the AirPort/ Bluetooth board.

  10. Mac mini Mid 2010 PRAM Battery Replacement: adım 10, 1 resimden 1.
    • Use the tip of a spudger to carefully pry the antenna connector up off the AirPort/Bluetooth board.

  11. Mac mini Mid 2010 PRAM Battery Replacement: adım 11, 1 resimden 1.
    • Remove the antenna plate from the mini.

  12. Mac mini Mid 2010 PRAM Battery Replacement, Logic Board: adım 12, 1 resimden 1.
    • Remove the following three screws:

    • One 5.0 mm T8 Torx or 2.0 mm Hex screw (either will work)

    • One 16.2 mm T6 Torx screw

    • One 26 mm T6 Torx standoff

  13. Mac mini Mid 2010 PRAM Battery Replacement: adım 13, 2 resimden 1. Mac mini Mid 2010 PRAM Battery Replacement: adım 13, 2 resimden 2.
    • Carefully pull the wires for both hard drive thermal sensors upward to lift their connectors up and out of the sockets on the logic board.

  14. Mac mini Mid 2010 PRAM Battery Replacement: adım 14, 2 resimden 1. Mac mini Mid 2010 PRAM Battery Replacement: adım 14, 2 resimden 2.
    • Use the flat end of a spudger to pry both the hard drive and optical drive connectors up out of their sockets on the logic board.

  15. Mac mini Mid 2010 PRAM Battery Replacement: adım 15, 1 resimden 1.
    • To disconnect the optical drive thermal sensor, pinch its cables between your thumb and a spudger and pry the spudger upward to lift the connector up and out of its socket on the logic board.

  16. Mac mini Mid 2010 PRAM Battery Replacement: adım 16, 1 resimden 1.
    • Use the tip of a spudger to lift the IR sensor connector up and out of its socket on the logic board.

  17. Mac mini Mid 2010 PRAM Battery Replacement: adım 17, 3 resimden 1. Mac mini Mid 2010 PRAM Battery Replacement: adım 17, 3 resimden 2. Mac mini Mid 2010 PRAM Battery Replacement: adım 17, 3 resimden 3.
    Bu adımda kullanılan alet:
    Mac mini Logic Board Removal Tool
    $4.99
    Satın Al
    • To remove the logic board, two cylindrical rods must be inserted into the holes highlighted in red. Inserting instruments into any logic board holes other than the ones highlighted in red may destroy the logic board.

    • Insert a Mac mini Logic Board Removal Tool into the two holes highlighted in red. Be sure it makes contact with the outer case below the logic board before proceeding.

    • If you don't have a Logic Board Removal Tool handy, you can use two tools having a maximum diameter of 2.5 mm instead. Just insert one into each of the highlighted holes.

    • Carefully pull the tool toward the I/O board. The logic board and I/O board assembly should slightly slide out of the outer case.

    • Cease prying when the I/O board is visibly separated from the outer case. Remove the Mac mini Logic Board Removal tool.

  18. Mac mini Mid 2010 PRAM Battery Replacement: adım 18, 1 resimden 1.
    • Simultaneously push the two plastic clips on the far left and right sides of the I/O board toward the middle of the I/O board and pull the I/O board away from the outer case.

  19. Mac mini Mid 2010 PRAM Battery Replacement: adım 19, 1 resimden 1.
    • Pull the I/O board/logic board assembly out of the outer case enough to access the power connector.

    • Use a pair of tweezers to disconnect the power cable from the logic board.

    • Pull the power cable connector toward the optical drive opening.

  20. Mac mini Mid 2010 PRAM Battery Replacement: adım 20, 1 resimden 1.
    • Carefully slide the logic board assembly out of the mini, minding any cables that may get caught.

  21. Mac mini Mid 2010 PRAM Battery Replacement, PRAM Battery: adım 21, 1 resimden 1.
    • Use the tip of a spudger to carefully pry the PRAM battery up and out of its holder on the logic board.

  22. Mac mini Mid 2010 PRAM Battery Replacement: adım 22, 1 resimden 1.
    • Remove the PRAM battery from the logic board.

    • The PRAM battery is a commonly available BR2032 coin-cell.

Sonuç

To reassemble your device, follow these instructions in reverse order.

23 farklı kişi bu kılavuzu tamamladı.

3 Yorum

I believe Apple COULD have buried the battery a little deeper....yes?

tonycirocco - Yanıt

All of my elderly Mini 2,1 still are running correctly with their original PRAM batteries.

I still have three Mini 2,1 models in use as DVR’s using EyeTV running OS X10.75 because the last version of EyeTV to still use the free TitanTV guide doesn’t work with 10.8 or higher and the TV Guide program guide was a subscription service until it was discontinued. Further development in North America was probably dropped due to legal issues since the last version allowed you to record and edit HDTV programs in full HD 1080 resolution and burn them to DVD in Blu-ray format if the original file was less than 90 minutes with a dual layer DVD while longer files could be burned to recordable Blu-ray. The DVD with Blu-ray content plays on every Blu-ray player I have tried them on.

cmfic1 - Yanıt

These instructions were perfect and I am sure glad I ordered the Mac mini logic board remover tool along with the angled forceps they also sell in the store. Replacing the PRAM took care of all the weird gremlins I was experiencing trying to boot from a 1TB SATA 3 Samsung SSD. Now its like a new computer!

jwatford - Yanıt

Yorum Ekle

İstatistikleri Görüntüle:

Son 24 Saat: 5

Son 7 gün: 24

Son 30 gün: 104

Her zaman: 25,791