Bu sürüm, hatalı düzenlemeler içerebilir. En son doğrulanmış bellek kopyası dönün.
Neye ihtiyacın var
-
Bu adım çevrilmemiş. Çevrilmesine yardım edin
-
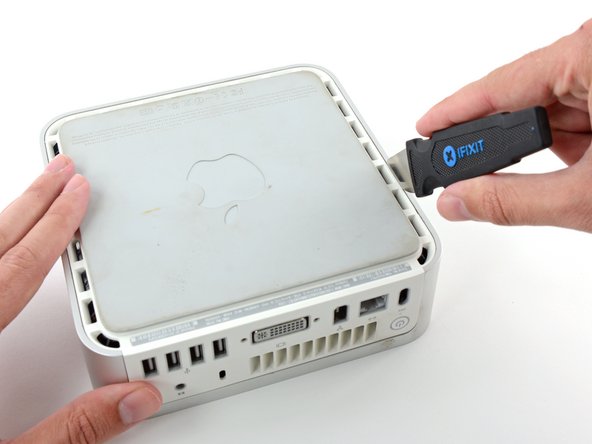
Power down your Mac mini, disconnect all of the cables, and flip it over.
-
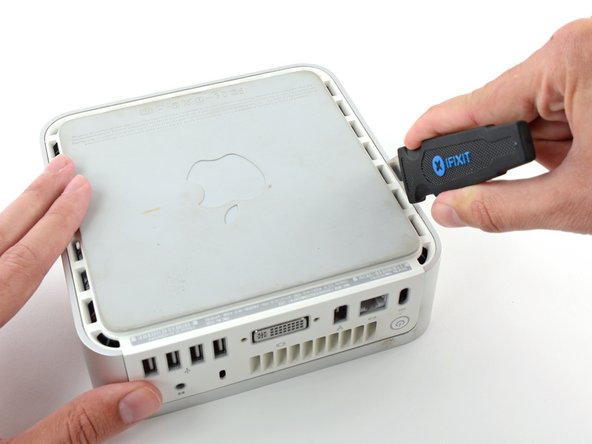
Insert the Jimmy into the crack between the aluminum top housing and the plastic lower housing.
-
The Jimmy should reach a stop about 3/8" down.
-
-
Bu adım çevrilmemiş. Çevrilmesine yardım edin
-
Gently bend the Jimmy outwards to pry the crack open a little larger and lift the lower housing up a small amount.
-
-
Bu adım çevrilmemiş. Çevrilmesine yardım edin
-
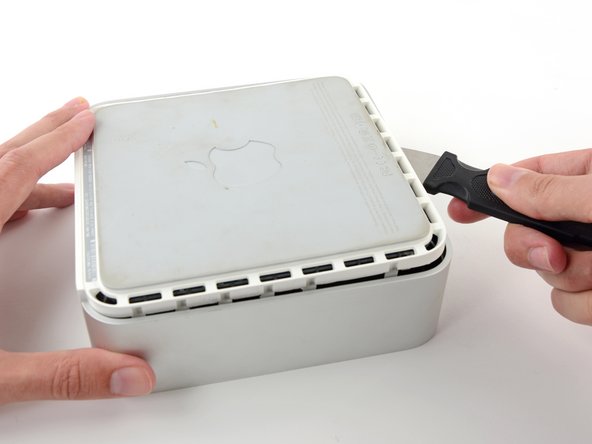
Once you have the first side free, rotate the Mac mini and start prying up on the front edge.
-
Use the same prying motion to both bend the clips inward and lift the lower housing up out of the top housing.
-
-
Bu adım çevrilmemiş. Çevrilmesine yardım edin
-
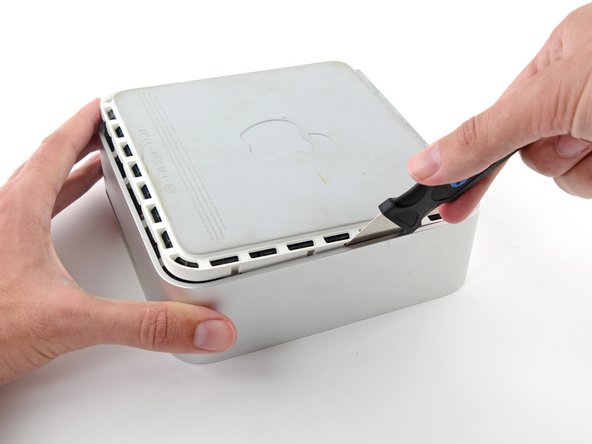
You may need to move the Jimmy along the edge to pry up all of the clips. Be patient and do a little bit at a time.
-
-
Bu adım çevrilmemiş. Çevrilmesine yardım edin
-
Keep working around the perimeter, freeing the clips along the final edge.
-
-
Bu adım çevrilmemiş. Çevrilmesine yardım edin
-
Flip the Mac mini back over and lift the top housing off of the lower housing.
-
-
Bu adım çevrilmemiş. Çevrilmesine yardım edin
-
We will first remove the AirPort antenna, located in the lower left corner of this picture.
-
-
Bu adım çevrilmemiş. Çevrilmesine yardım edin
-
Slightly squeeze the two retaining arms toward each other and lift the AirPort antenna off its post.
-
-
-
Bu adım çevrilmemiş. Çevrilmesine yardım edin
-
Grab the Bluetooth antenna nearest the port side of the computer by the edges of the board and pull it straight up off the internal frame.
-
-
Bu adım çevrilmemiş. Çevrilmesine yardım edin
-
Remove the antenna board near the front of the mini by pulling it straight up off the internal frame.
-
If necessary, remove the piece of tape securing the antenna leads to the internal frame.
-
-
Bu adım çevrilmemiş. Çevrilmesine yardım edin
-
Use the flat end of a spudger to pry the audio ribbon cable connector up off the audio board.
-
-
Bu adım çevrilmemiş. Çevrilmesine yardım edin
-
Remove the following four screws securing the internal frame to the bottom housing:
-
Three 6.7 mm Phillips #00 screws
-
One 9.5 mm Phillips #00 screw
-
-
Bu adım çevrilmemiş. Çevrilmesine yardım edin
-
Lift the internal frame off the bottom housing, starting at the rear edge, until you feel the concealed edge connector on the motherboard disconnect. Then lift straight off, minding the bluetooth and 802.11 antenna cables.
-
-
Bu adım çevrilmemiş. Çevrilmesine yardım edin
-
Use the tip of a spudger to remove the black electrical tape spanning the interconnect board and optical drive.
-
-
Bu adım çevrilmemiş. Çevrilmesine yardım edin
-
Use the flat end of a spudger to disconnect the audio ribbon cable from the interconnect board.
-
-
Bu adım çevrilmemiş. Çevrilmesine yardım edin
-
If necessary, remove the yellow kapton tape covering the internal frame and the optical drive.
-
-
Bu adım çevrilmemiş. Çevrilmesine yardım edin
-
Remove the two Phillips screws securing the optical drive to the internal frame.
-
-
Bu adım çevrilmemiş. Çevrilmesine yardım edin
-
Turn the mini 180 degrees and remove the two Phillips screws securing the optical drive to the internal frame on the other side.
-
-
Bu adım çevrilmemiş. Çevrilmesine yardım edin
-
Remove the two Phillips screws securing the interconnect board to the optical drive.
-
-
Bu adım çevrilmemiş. Çevrilmesine yardım edin
-
Insert the flat end of a spudger into the crevice between the optical drive and the interconnect board.
-
Carefully increase the crevice to disconnect the optical drive from the interconnect board.
-
-
Bu adım çevrilmemiş. Çevrilmesine yardım edin
-
Gently lift the optical drive out of the internal frame.
-
-
Bu adım çevrilmemiş. Çevrilmesine yardım edin
-
Transfer the four foam bumpers to the replacement optical drive.
-
İptal et: Bu kılavuzu tamamlamadım.
65 farklı kişi bu kılavuzu tamamladı.
6 Yorum
I found that it's entirely possible to remove the optical drive without removing the whole subframe. You can remove the four screws on the sides of the drive quite easily, remove the other end of the audio cable then unscrew the two screws on the back of the drive holding the interconnect board to the drive (the only fiddly bit as it's hard to get a a good angle onto those two screws), then gently lift the front of the drive and pull it forward.
Can anyone tell me now that I have replaced the optical drive, why if only accepts dvd's being put into it when I have first turn on the computer?? If I do it when the computer is already on, no matter how far I try and push in the DVD it doesn't grab it and pull it in properly. No trouble playing them once in.
Please help! Can anyone tell me now that I have replaced the optical drive, why if only accepts dvd's being put into it when I have first turn on the computer?? If I do it when the computer is already on, no matter how far I try and push in the DVD it doesn't grab it and pull it in properly. No trouble playing them once in.
Hi!
Is is correct about the optibay i need to replace a DVD up to SSD:
- the inside connector of this optibay is SATA 3 witch is compatible for a modern SSD, like this one - https://ru.aliexpress.com/item/Newest-Go...
- the outside that goes to a motherboard - what is it - i can't really understand - is it eSATA or it it mSATA or smth else?
Thanks for your reply in advance!
I also had n0o need to remove the frame. To use a screwdriver that is magnetized made some undesirable problems. Overall, the optical drive was replaced -that is , put in as the former drive was removed by someone else.


