Ana içeriğe geç

MacBook Air 11" Mid 2013 I/O Board Replacement

Salt Önkoşul
Bu kılavuz yalnızca diğer kılavuzlar için bir ön koşul olarak kullanılmak üzere tasarlanmıştır. Tek başına eksiktir.

Neye ihtiyacın var

  1. MacBook Air 11" Mid 2013 I/O Board Replacement, I/O Board: adım 1, 3 resimden 1. MacBook Air 11" Mid 2013 I/O Board Replacement, I/O Board: adım 1, 3 resimden 2. MacBook Air 11" Mid 2013 I/O Board Replacement, I/O Board: adım 1, 3 resimden 3.
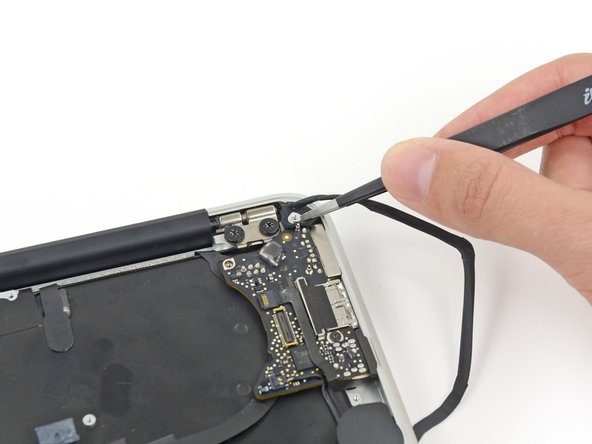
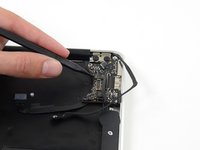
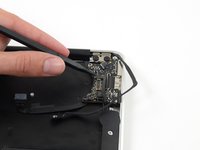
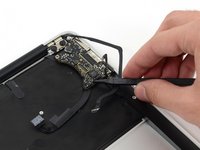
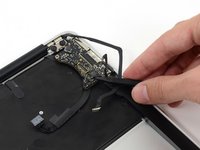
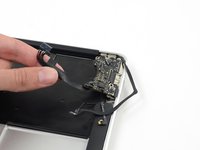
    • Remove the small rubber gasket from the corner of the upper case nearest the the I/O board.

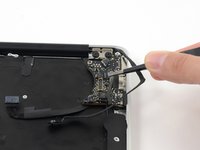
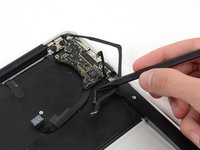
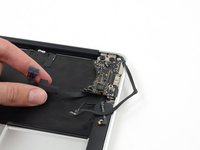
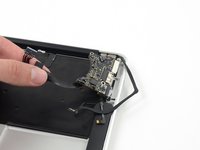
    • Remove the gasket from the corner nearest display cable connector.

  2. MacBook Air 11" Mid 2013 I/O Board Replacement: adım 2, 2 resimden 1. MacBook Air 11" Mid 2013 I/O Board Replacement: adım 2, 2 resimden 2.
    • If necessary, use tweezers to remove any tape covering the microphone cable ZIF connector.

  3. MacBook Air 11" Mid 2013 I/O Board Replacement: adım 3, 3 resimden 1. MacBook Air 11" Mid 2013 I/O Board Replacement: adım 3, 3 resimden 2. MacBook Air 11" Mid 2013 I/O Board Replacement: adım 3, 3 resimden 3.
    • Use the tip of a spudger to carefully flip up the retaining flap on the microphone cable ZIF socket.

    • Be sure you are prying up on the retaining flap, not the socket itself.

    • With a pair of tweezers, pull the microphone ribbon cable straight out of its socket.

  4. MacBook Air 11" Mid 2013 I/O Board Replacement: adım 4, 3 resimden 1. MacBook Air 11" Mid 2013 I/O Board Replacement: adım 4, 3 resimden 2. MacBook Air 11" Mid 2013 I/O Board Replacement: adım 4, 3 resimden 3.
    • Use the tip of a spudger to pry under the speaker cable near the connector, lifting it straight up from its socket.

    • De-route the cable from its notch in the logic board.

  5. MacBook Air 11" Mid 2013 I/O Board Replacement: adım 5, 1 resimden 1.
    • Remove the single 3.6 mm T5 Torx screw securing the I/O board to the upper case.

  6. MacBook Air 11" Mid 2013 I/O Board Replacement: adım 6, 3 resimden 1. MacBook Air 11" Mid 2013 I/O Board Replacement: adım 6, 3 resimden 2. MacBook Air 11" Mid 2013 I/O Board Replacement: adım 6, 3 resimden 3.
    • Carefully lift the I/O board by its power cable and pull it away from the edge of the case.

Sonuç

To reassemble your device, follow these instructions in reverse order.

Sam Goldheart

Üyelik tarihi: 10/18/12

465.762 İtibar

538 adet Kılavuz yazıldı

Ekip

iFixit iFixit üyesi

Staff

135 Üyeler

16.817 adet Kılavuz yazıldı

0 Yorum

Yorum Ekle

İstatistikleri Görüntüle:

Son 24 Saat: 0

Son 7 gün: 0

Son 30 gün: 0

Her zaman: 88