Bu sürüm, hatalı düzenlemeler içerebilir. En son doğrulanmış bellek kopyası dönün.
Neye ihtiyacın var
-
Bu adım çevrilmemiş. Çevrilmesine yardım edin
-
Power on your Mac and launch Terminal.
-
Copy and paste the following command (or type it exactly) into Terminal:
-
sudo nvram AutoBoot=%00
-
Press [return]. If prompted, enter your administrator password and press [return] again. Note: Your return key may also be labeled ⏎ or "enter."
-
sudo nvram AutoBoot=%03
-
-
Bu adım çevrilmemiş. Çevrilmesine yardım edin
-
Use a P5 Pentalobe driver to remove the six screws securing the lower case:
-
Two 6.2 mm screws
-
Two 5.3 mm screws
-
Two 3.4 mm screws
-
-
Bu adım çevrilmemiş. Çevrilmesine yardım edin
-
Apply a suction handle to the lower case near the front-center area of the MacBook Pro.
-
Lift the suction handle to create a slight separation between the lower case and the chassis.
-
-
Bu adım çevrilmemiş. Çevrilmesine yardım edin
-
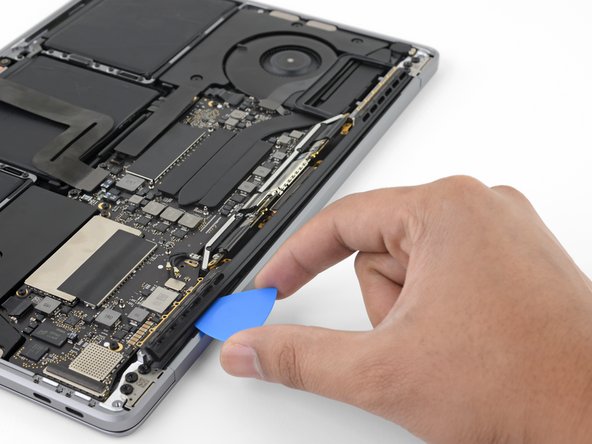
Insert one corner of an opening pick into the space between the lower case and the chassis.
-
Slide the opening pick around the nearest corner and halfway up the side of the case.
-
-
Bu adım çevrilmemiş. Çevrilmesine yardım edin
-
Repeat the previous step on the opposite side, sliding your opening pick under the lower case and up the side to pop the second clip free.
-
-
Bu adım çevrilmemiş. Çevrilmesine yardım edin
-
Insert your opening pick once again under the front edge of the lower case, near one of the two centermost screw holes.
-
Give the pick a firm twist to pop free the third clip securing the lower case to the chassis.
-
Repeat this procedure near the other of the two centermost screw holes, popping the fourth clip free.
-
-
Bu adım çevrilmemiş. Çevrilmesine yardım edin
-
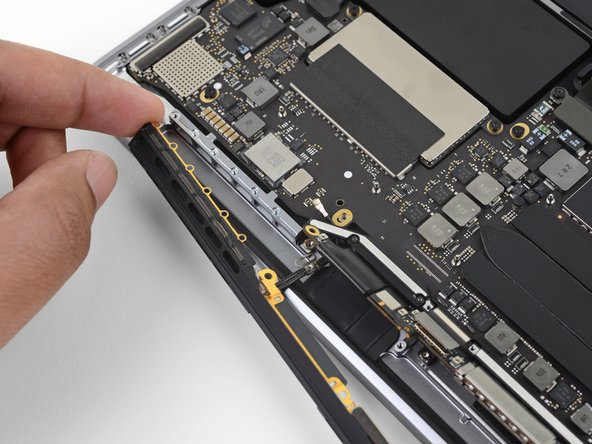
Pull the lower case firmly towards the front of the MacBook (away from the hinge area) to separate the last of the clips securing the lower case.
-
-
Bu adım çevrilmemiş. Çevrilmesine yardım edin
-
Carefully peel up the large piece of tape covering the battery connector, on the edge of the logic board nearest the battery.
-
Remove the tape.
-
-
Bu adım çevrilmemiş. Çevrilmesine yardım edin
-
Gently peel back the small piece of tape covering the battery board data cable connector.
-
-
-
Bu adım çevrilmemiş. Çevrilmesine yardım edin
-
Use the tip of a spudger to flip up the small black locking tab securing the cable in its connector.
-
-
Bu adım çevrilmemiş. Çevrilmesine yardım edin
-
Disconnect the battery board data cable by sliding it out from its socket.
-
Slide parallel to the logic board, in the direction of the cable.
-
-
Bu adım çevrilmemiş. Çevrilmesine yardım edin
-
Fold the battery board data cable back and out of the way.
-
-
Bu adım çevrilmemiş. Çevrilmesine yardım edin
-
Use a T5 Torx driver to remove the 3.7 mm pancake screw securing the battery power connector.
-
-
Bu adım çevrilmemiş. Çevrilmesine yardım edin
-
Use a spudger to gently lift the battery power connector, disconnecting the battery.
-
Lift the connector high enough so that it stays separated from its socket. If it accidentally makes contact during the course of your repair, it could damage your MacBook Pro.
-
-
Bu adım çevrilmemiş. Çevrilmesine yardım edin
-
Remove the four 1.9 mm T3 Torx screws securing the plastic covers on top of the display hinges.
-
Remove both plastic hinge covers.
-
-
Bu adım çevrilmemiş. Çevrilmesine yardım edin
-
Remove the two 2.9 mm T3 Torx screws securing the aluminum cover on top of the main display cable.
-
Remove the cover.
-
-
Bu adım çevrilmemiş. Çevrilmesine yardım edin
-
Remove the two 1.7 mm T3 Torx screws securing the aluminum cover on top of the display cable flex connector.
-
Remove the cover.
-
-
Bu adım çevrilmemiş. Çevrilmesine yardım edin
-
Pry the display board flex cable straight up from its socket to disconnect it from the display board.
-
-
Bu adım çevrilmemiş. Çevrilmesine yardım edin
-
Remove the four 1.5 mm T3 Torx screws securing the two aluminum covers on top of the two display cables.
-
Use a pair of tweezers to remove the two aluminium covers.
-
-
Bu adım çevrilmemiş. Çevrilmesine yardım edin
-
Remove the two 3.3 mm T5 Torx screws (one from each side) securing the antenna cable assembly.
-
Also remove the two 4.1 mm T5 Torx screws (one from each side).
-
Remove the twelve 1.1 mm P2 pentalobe screws (six from each side) securing the rest of the antenna cable assembly.
-
-
Bu adım çevrilmemiş. Çevrilmesine yardım edin
-
Carefully disconnect the two antenna coax cables by prying them straight up from the logic board.
-
Slide your tweezers or spudger underneath each cable until it's near the socket, and then gently twist or pry up to disconnect it.
-
-
Bu adım çevrilmemiş. Çevrilmesine yardım edin
-
Remove the 2.8 mm T5 Torx screw securing the two antenna coax cables to the main board.
-
-
Bu adım çevrilmemiş. Çevrilmesine yardım edin
-
Use an opening pick to lever out the antenna cable assembly in the areas shown.
-
-
Bu adım çevrilmemiş. Çevrilmesine yardım edin
-
Carefully remove the antenna assembly, while simultaneously feeding the antenna cable bundle through the hole in the chassis.
-
-
Bu adım çevrilmemiş. Çevrilmesine yardım edin
-
Remove the four 3.9 mm T3 Torx screws securing the cover springs on the two display cables.
-
-
Bu adım çevrilmemiş. Çevrilmesine yardım edin
-
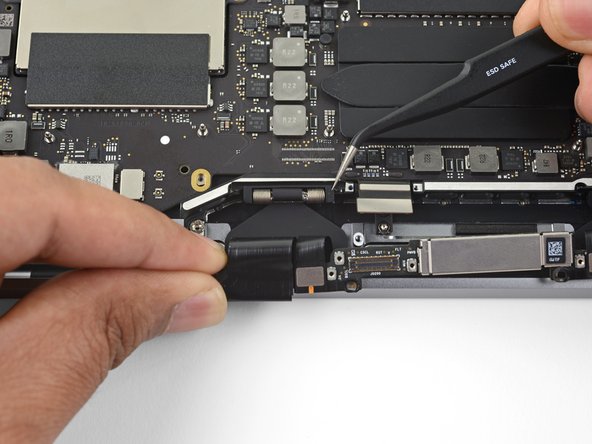
Grab the left side of the display cable assembly and pull it towards the bottom end of the MacBook and away from the cover spring.
-
Use a pair of tweezers to pull the cover spring on the display cable out of its recess.
-
Repeat this step with the right cover spring.
-
-
Bu adım çevrilmemiş. Çevrilmesine yardım edin
-
While steadying the MacBook pro with your free hand, remove the three T8 Torx screws from the lower display hinge.
-
Remove the remaining three T8 Torx screws from the upper display bracket.
-
-
Bu adım çevrilmemiş. Çevrilmesine yardım edin
-
Push both halves of the MacBook Pro together so that the hinge brackets can be lifted clear of their recesses in the chassis.
-
Push the main body of the MacBook Pro away from you while pulling the screen toward you to separate it.
-
Remove the display/screen assembly, being careful not to snag it on any cables.
-


İptal et: Bu kılavuzu tamamlamadım.
28 farklı kişi bu kılavuzu tamamladı.

3 Yorum
this helped so much, thank you!
This guide helped me so much and also saved some $$$ on repair from Apple store. Thank you so much!
This is so awesome steps and procedure, are helpful for every technician.