Bu sürüm, hatalı düzenlemeler içerebilir. En son doğrulanmış bellek kopyası dönün.
Neye ihtiyacın var
-
Bu adım çevrilmemiş. Çevrilmesine yardım edin
-
Remove the following ten screws securing the lower case to the upper case:
-
Two 2.3 mm P5 Pentalobe screws
-
Eight 3.0 mm P5 Pentalobe screws
-
-
Bu adım çevrilmemiş. Çevrilmesine yardım edin
-
Wedge your fingers between the upper case and the lower case.
-
Gently pull the lower case away from the upper case.
-
Remove the lower case and set it aside.
-
-
Bu adım çevrilmemiş. Çevrilmesine yardım edin
-
The lower case is connected to the upper case at the center, with two plastic clips.
-
-
-
Bu adım çevrilmemiş. Çevrilmesine yardım edin
-
Remove the plastic cover adhered to the battery contact board.
-
-
Bu adım çevrilmemiş. Çevrilmesine yardım edin
-
Remove the following screws securing the battery connector board to the logic board:
-
Two 2.8 mm T6 Torx screws
-
One 7.0 mm T6 Torx shouldered screw
-
-
Bu adım çevrilmemiş. Çevrilmesine yardım edin
-
Use tweezers to remove the small plastic cover located near the bottom right of the battery connector board.
-
-
Bu adım çevrilmemiş. Çevrilmesine yardım edin
-
Remove the wide head 6.4 mm T6 Torx screw securing the battery connector to the logic board assembly.
-
-
Bu adım çevrilmemiş. Çevrilmesine yardım edin
-
Carefully lift the battery connector board up off the logic board.
-
It is recommended to bend the battery cables just slightly, to keep the board suspended up above the logic board and out of the way.
-
-
Bu adım çevrilmemiş. Çevrilmesine yardım edin
-
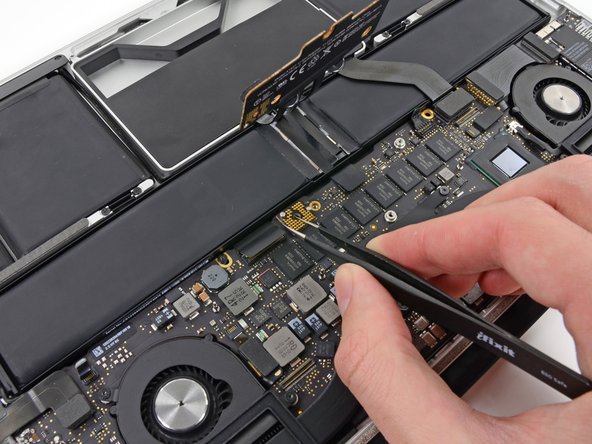
Grasp the Interposer with tweezers.
-
Lift the Interposer off the logic board and remove it.
-
İptal et: Bu kılavuzu tamamlamadım.
4 farklı kişi bu kılavuzu tamamladı.
Bir Yorum
when i charge my mac it will not charge and when i plug it off it will die and now show no battery status again when I plug it back and when I leave it uncharged for a while the indicator light will still be on
And it will come on
what can be the problem?


