Ana içeriğe geç

MacBook Pro 13" Retina Display Late 2012 Right Speaker Replacement

Neye ihtiyacın var

  1. MacBook Pro 13" Retina Display Late 2012 Right Speaker Replacement, Lower Case: adım 1, 1 resimden 1.
    Bu adımda kullanılan alet:
    Magnetic Project Mat
    $19.95
    Satın Al
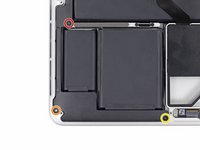
    • Remove the following ten screws securing the lower case to the upper case:

    • Two 2.3 mm P5 Pentalobe screws

    • Eight 3.0 mm P5 Pentalobe screws
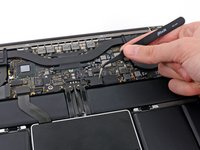
    • Throughout this repair, keep track of each screw and make sure it goes back exactly where it came from to avoid damaging your device.

  2. MacBook Pro 13" Retina Display Late 2012 Right Speaker Replacement: adım 2, 1 resimden 1.
    • Wedge your fingers between the upper case and the lower case.

    • Gently pull the lower case away from the upper case.

    • Remove the lower case and set it aside.

  3. MacBook Pro 13" Retina Display Late 2012 Right Speaker Replacement: adım 3, 3 resimden 1. MacBook Pro 13" Retina Display Late 2012 Right Speaker Replacement: adım 3, 3 resimden 2. MacBook Pro 13" Retina Display Late 2012 Right Speaker Replacement: adım 3, 3 resimden 3.
    • During reassembly, gently push down the center of the lower case to reattach the two plastic clips.

    • The lower case is connected to the upper case at the center, with two plastic clips.

  4. MacBook Pro 13" Retina Display Late 2012 Right Speaker Replacement, Battery Connector: adım 4, 1 resimden 1.
    • Remove the plastic cover adhered to the battery contact board.

  5. MacBook Pro 13" Retina Display Late 2012 Right Speaker Replacement: adım 5, 1 resimden 1.
    • Remove the following screws securing the battery connector board to the logic board:

    • Two 2.8 mm T6 Torx screws

    • One 7.0 mm T6 Torx shouldered screw

  6. MacBook Pro 13" Retina Display Late 2012 Right Speaker Replacement: adım 6, 2 resimden 1. MacBook Pro 13" Retina Display Late 2012 Right Speaker Replacement: adım 6, 2 resimden 2.
    • Use tweezers to remove the small plastic cover located near the bottom right of the battery connector board.

  7. MacBook Pro 13" Retina Display Late 2012 Right Speaker Replacement: adım 7, 1 resimden 1.
    • Remove the wide head 6.4 mm T6 Torx screw securing the battery connector to the logic board assembly.

  8. MacBook Pro 13" Retina Display Late 2012 Right Speaker Replacement: adım 8, 2 resimden 1. MacBook Pro 13" Retina Display Late 2012 Right Speaker Replacement: adım 8, 2 resimden 2.
    • Carefully lift the battery connector board up off the logic board.

    • It is recommended to bend the battery cables just slightly, to keep the board suspended up above the logic board and out of the way.

    • Do not fold the board completely over, or crease the cables, as this may damage the battery.

  9. MacBook Pro 13" Retina Display Late 2012 Right Speaker Replacement, Battery Contact Board: adım 9, 2 resimden 1. MacBook Pro 13" Retina Display Late 2012 Right Speaker Replacement, Battery Contact Board: adım 9, 2 resimden 2.
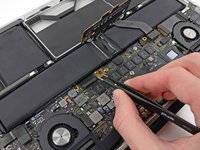
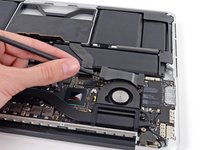
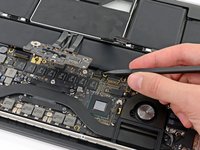
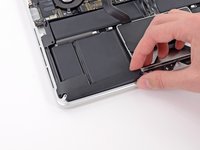
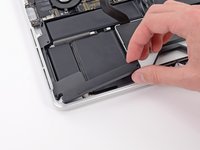
    • Grasp the Interposer with tweezers.

    • An interposer is the name for an interface that links one electrical connection to another. In this repair, it is the board connecting the battery to logic board.

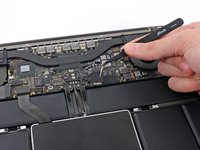
    • Lift the Interposer off the logic board and remove it.

    • Removing this board will ensure that the battery remains disconnected throughout your repair, preventing your computer from accidentally powering on. It's also a good idea to take it out so it doesn't fall out unexpectedly.

  10. MacBook Pro 13" Retina Display Late 2012 Right Speaker Replacement, I/O Board Data Cable: adım 10, 2 resimden 1. MacBook Pro 13" Retina Display Late 2012 Right Speaker Replacement, I/O Board Data Cable: adım 10, 2 resimden 2.
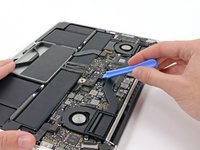
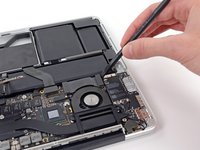
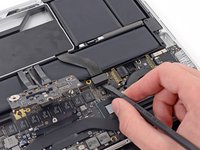
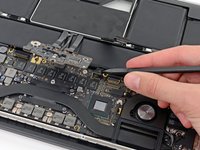
    • Use the flat end of a spudger to pry the right side of the I/O board data cable connector up off its socket on the I/O board.

    • When prying the I/O board data cable connector from its socket, make sure to pry the connector itself and not the socket. Prying the socket may cause irreversible damage to the I/O board.

  11. MacBook Pro 13" Retina Display Late 2012 Right Speaker Replacement: adım 11, 2 resimden 1. MacBook Pro 13" Retina Display Late 2012 Right Speaker Replacement: adım 11, 2 resimden 2.
    • Wedge the flat end of a spudger beneath the left side of the I/O board data cable connector.

    • Gently twist the spudger to disconnect the I/O board data cable connector from its socket on the logic board.

  12. MacBook Pro 13" Retina Display Late 2012 Right Speaker Replacement: adım 12, 1 resimden 1.
    • Lift and remove the I/O board data cable from the MacBook Pro.

  13. MacBook Pro 13" Retina Display Late 2012 Right Speaker Replacement, Right Speaker: adım 13, 3 resimden 1. MacBook Pro 13" Retina Display Late 2012 Right Speaker Replacement, Right Speaker: adım 13, 3 resimden 2. MacBook Pro 13" Retina Display Late 2012 Right Speaker Replacement, Right Speaker: adım 13, 3 resimden 3.
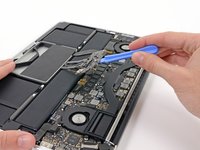
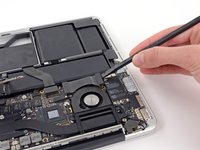
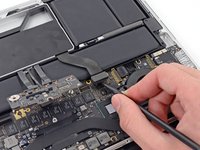
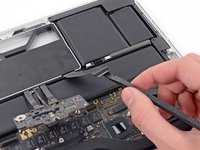
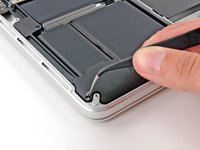
    • Use the flat end of a spudger to pry the SSD cable connector up from its socket on the logic board.

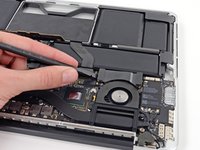
    • Move the SSD cable connector out of the way.

  14. MacBook Pro 13" Retina Display Late 2012 Right Speaker Replacement: adım 14, 2 resimden 1. MacBook Pro 13" Retina Display Late 2012 Right Speaker Replacement: adım 14, 2 resimden 2.
    • Wedge the pointed end of a spudger beneath the right speaker cable connector.

    • Gently pry the right speaker cable connector up off from its socket on the logic board.

    • Be sure you are prying up on the connector, not the socket itself.

  15. MacBook Pro 13" Retina Display Late 2012 Right Speaker Replacement: adım 15, 2 resimden 1. MacBook Pro 13" Retina Display Late 2012 Right Speaker Replacement: adım 15, 2 resimden 2.
    • Use a T5 Torx driver to remove the following screws securing the right speaker to the upper case:

    • One black 6.8 mm screw

    • One silver 6.3 mm screw

    • One black 4.9 mm screw

    • The silver screw (in the corner) may be covered with a foam pad. If so, use your tweezers to peel it up and remove it.

  16. MacBook Pro 13" Retina Display Late 2012 Right Speaker Replacement: adım 16, 2 resimden 1. MacBook Pro 13" Retina Display Late 2012 Right Speaker Replacement: adım 16, 2 resimden 2.
    • Lift and remove the right speaker out of the upper case.

    • If necessary, de-route the right speaker cable from its channel in the upper case.

Sonuç

To reassemble your device, follow these instructions in reverse order.

33 farklı kişi bu kılavuzu tamamladı.

5 Yorum

Thanks for the steps, it worked. But now I am getting Wi-Fi- No hardware installed and Bluetooth Not available error

Divakar Jayaraman - Yanıt

it worked but the cam is not working now :(

Divakar Jayaraman - Yanıt

I was able to fix the right speaker using the solvent used to remove the battery provided by iFixit.

Peter-Paul van Beekum - Yanıt

Thank you very much for the walkthrough. No problems to follow at all. Everything worked as a charm.

timofej.se - Yanıt

Thanks very much for the walkthrough. No problems at all. Everything working fine afterwards.

Vaughan Butler - Yanıt

Yorum Ekle

İstatistikleri Görüntüle:

Son 24 Saat: 9

Son 7 gün: 37

Son 30 gün: 125

Her zaman: 22,993