Ana içeriğe geç

MacBook Pro 13" Retina Display Late 2013 Right Speaker Replacement

Neye ihtiyacın var

  1. MacBook Pro 13" Retina Display Late 2013 Right Speaker Replacement, Lower Case: adım 1, 1 resimden 1.
    Bu adımda kullanılan alet:
    Magnetic Project Mat
    $19.95
    Satın Al
    • Remove the following ten screws securing the lower case to the upper case:

    • Two 2.3 mm P5 Pentalobe screws

    • Eight 3.0 mm P5 Pentalobe screws

    • Throughout this repair, keep track of each screw and make sure it goes back exactly where it came from to avoid damaging your device.

  2. MacBook Pro 13" Retina Display Late 2013 Right Speaker Replacement: adım 2, 1 resimden 1.
    • Wedge your fingers between the upper case and the lower case.

    • Gently pull the lower case away from the upper case to remove it.

  3. MacBook Pro 13" Retina Display Late 2013 Right Speaker Replacement: adım 3, 2 resimden 1. MacBook Pro 13" Retina Display Late 2013 Right Speaker Replacement: adım 3, 2 resimden 2.
    • The lower case is connected to the upper case with two plastic clips near its center.

    • During reassembly, gently push down the center of the lower case to reattach the two plastic clips.

  4. MacBook Pro 13" Retina Display Late 2013 Right Speaker Replacement, Battery Connector: adım 4, 1 resimden 1.
    • If necessary, remove the plastic cover adhered to the battery contact board.

  5. MacBook Pro 13" Retina Display Late 2013 Right Speaker Replacement: adım 5, 2 resimden 1. MacBook Pro 13" Retina Display Late 2013 Right Speaker Replacement: adım 5, 2 resimden 2.
    • Use the flat end of a spudger to lift the battery connector straight up out of its socket on the logic board.

    • Be sure you lift up only on the connector itself, not the socket, or you risk permanent damage to the logic board.

  6. MacBook Pro 13" Retina Display Late 2013 Right Speaker Replacement: adım 6, 1 resimden 1.
    • Bend the battery connector up out of the way to prevent accidental contact with its socket during your repair.

  7. MacBook Pro 13" Retina Display Late 2013 Right Speaker Replacement, Right Speaker: adım 7, 1 resimden 1.
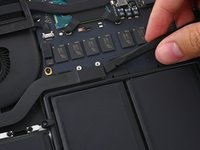
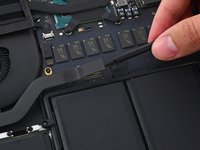
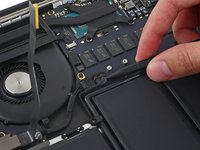
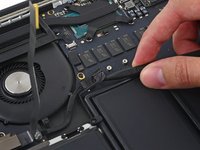
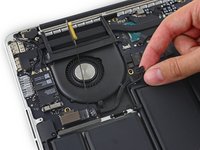
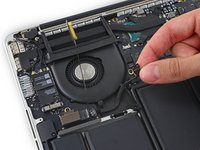
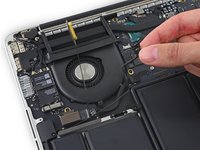
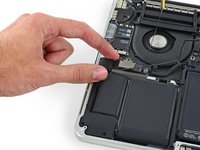
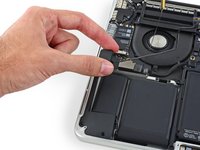
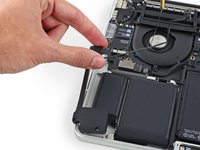
    • Remove the two 2.1 mm T5 Torx screws securing the logic board end of the I/O board cable bracket.

  8. MacBook Pro 13" Retina Display Late 2013 Right Speaker Replacement: adım 8, 1 resimden 1.
    • Grasp the I/O board cable bracket with a pair of tweezers and remove it from the MacBook.

  9. MacBook Pro 13" Retina Display Late 2013 Right Speaker Replacement: adım 9, 2 resimden 1. MacBook Pro 13" Retina Display Late 2013 Right Speaker Replacement: adım 9, 2 resimden 2.
    • Use the flat end of a spudger to pop the I/O board connector straight up off its socket on the logic board.

    • Be careful to only pry up on the I/O board cable, not on the socket itself or you risk damaging your logic board.

  10. MacBook Pro 13" Retina Display Late 2013 Right Speaker Replacement: adım 10, 2 resimden 1. MacBook Pro 13" Retina Display Late 2013 Right Speaker Replacement: adım 10, 2 resimden 2.
    • Lift the logic board end of the I/O board cable straight up to bend it out of the way.

    • To avoid damage to the cable, fold only at the bend in the I/O board end of the cable.

  11. MacBook Pro 13" Retina Display Late 2013 Right Speaker Replacement: adım 11, 2 resimden 1. MacBook Pro 13" Retina Display Late 2013 Right Speaker Replacement: adım 11, 2 resimden 2.
    • Carefully tuck the tip of a spudger under the right speaker cable near the connector and lift it up out of its socket on the logic board.

  12. MacBook Pro 13" Retina Display Late 2013 Right Speaker Replacement: adım 12, 3 resimden 1. MacBook Pro 13" Retina Display Late 2013 Right Speaker Replacement: adım 12, 3 resimden 2. MacBook Pro 13" Retina Display Late 2013 Right Speaker Replacement: adım 12, 3 resimden 3.
    • Carefully peel the right speaker cable off the upper case.

  13. MacBook Pro 13" Retina Display Late 2013 Right Speaker Replacement: adım 13, 1 resimden 1.
    • Remove the following screws securing the right speaker to the upper case:

    • One 5.7 mm T5 Torx screw

    • One 6.5 mm T5 Torx screw

    • One 3.8 mm T5 Torx screw

  14. MacBook Pro 13" Retina Display Late 2013 Right Speaker Replacement: adım 14, 3 resimden 1. MacBook Pro 13" Retina Display Late 2013 Right Speaker Replacement: adım 14, 3 resimden 2. MacBook Pro 13" Retina Display Late 2013 Right Speaker Replacement: adım 14, 3 resimden 3.
    • Lift the right speaker from the cable end and pull it free from the case.

Sonuç

To reassemble your device, follow these instructions in reverse order.

64 farklı kişi bu kılavuzu tamamladı.

Sam Goldheart

Üyelik tarihi: 10/18/12

465.656 İtibar

538 adet Kılavuz yazıldı

Ekip

iFixit iFixit üyesi

Staff

135 Üyeler

16.734 adet Kılavuz yazıldı

8 Yorum

Easy to follow guide! completed the installation within half an hour. Thanks guys :)

Jeevan Kumar - Yanıt

Parfait. Comptez 30 min au total. Merci

Jacques Krief - Yanıt

I bought all the suggested tools and parts and changed both the left and the right speaker on my wifes Mac Book Pro in 30 minutes. Fantastic guide and site for fixing things. I will come back to this site in the future for DIY repairs. Thank you.

Jodel Manning - Yanıt

On point, simple and complete, thanks

sintobeanrv - Yanıt

Waaay too easy — thx!

Bruce Coffman - Yanıt

Yorum Ekle

İstatistikleri Görüntüle:

Son 24 Saat: 3

Son 7 gün: 30

Son 30 gün: 180

Her zaman: 44,478