Giriş
Use this guide to replace a broken display on your MacBook Pro Unibody.
Neye ihtiyacın var
-
-
With the case closed, place the Unibody top-side down on a flat surface.
-
Depress the grooved side of the access door release latch enough to grab the free end. Lift the release latch until it is vertical.
-
-
-
Grab the translucent plastic tab and pull the battery up and out of the Unibody.
-
If the latch is depressed it will lock the battery in place.
-
-
-
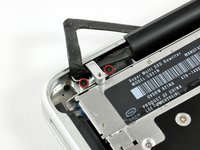
Remove the following eight screws securing the lower case to the chassis:
-
One 5.4 mm Phillips screw.
-
Three 14 mm Phillips screws.
-
Four 3.5 mm Phillips screws.
-
-
-
-
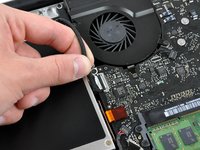
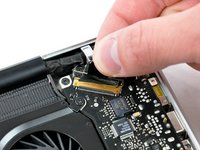
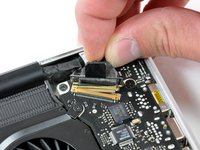
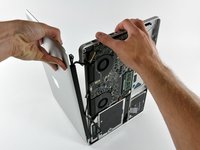
Disconnect the camera cable by pulling the male end straight away from its socket toward the optical drive opening.
-
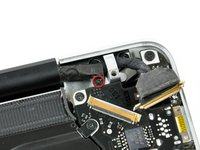
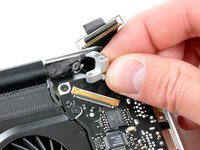
Deroute the camera data cable from the channel in the optical drive.
-
-
-
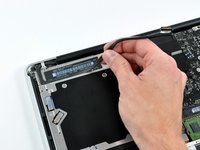
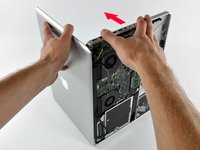
Grab the upper case with your right hand and rotate it slightly toward the top of the display so the upper display bracket clears the edge of the upper case.
-
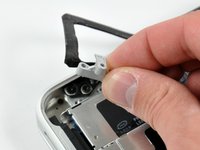
Rotate the display slightly away from the upper case.
-
Lift the display away from the upper case, minding any brackets or cables that may get caught.
-


To reassemble your device, follow these instructions in reverse order.
To reassemble your device, follow these instructions in reverse order.
İptal et: Bu kılavuzu tamamlamadım.
61 farklı kişi bu kılavuzu tamamladı.

6Kılavuz Yorumları
I used this guide to replace my hinges, but I noticed that the real problem was that the display was separating from the case. I Googled it and found a few reports like (https://discussions.apple.com/thread/371...) indicating that Apple has a replacement program in place addressing this as a latent defect.
I took my machine to the local Apple store, and even though I bought it at the end of 2008, they replaced the display for free.
If you're having a display separation issue it's worth seeing what Apple says before digging into it.
This thread is now "not authorized" for viewing. I think Apple doesn't want anyone to know about this issue!
This is a great guide. I also read the guide pertaining to the 2.53 GHz Mid-2009 MacBook Pro Display Assembly.
I wanted to report that I successfully removed the display assembly from a Mid-2009 MacBook Pro (2.53 GHz - no discrete graphics) and installed it on the Late-2008 MacBook Pro (2.53 GHz with dual graphics).
Everything appears to be identical, except (strangely) the screws, that are generally captive in the camera cable and the LVDS cable, need to stay with their original MacBook Pro. Meaning, keep all the screws with the same MacBook Pro. The other screws did appear to be identical though.
Bottom line, keep the screws to the same MacBook. That's easy enough, just remove the captive screws from the cables to keep them with the same MacBook Pro they were from.
(Also, the camera cable where it attaches the logic board was slightly closer to the optical drive and seemed to overlap it slightly when transferring the Mid-2009 display to the Late-2008 MacBook Pro. This didn't seem to pose a problem.)
I have to add to my previous comment about switching a mid-2009 15 inch MacBook Pro display to a late 2008 MacBook Pro. The reed switch that causes the computer to sleep when closing the display is on the other side. I tested this by holding a broken display (which has lots of magnets across the top) near the right side and this 2.53 GHz late-2008 Unibody MacBook Pro went to sleep. The magnet for the reed switch on the mid-2009 display is about halfway up the left side of the display. So I didn't notice this until I tried to close the MacBook and the backlight stayed on.
So while the display works perfectly and the hinges, camera cable, and LVDS cable match, the reed switch magnet is on the left side now (that meets the ExpressCard/34 slot, instead of the SD Card slot) instead of on the right (near the security slot) where the actual reed switch is for the late-2008 MacBook Pros.
I can just choose sleep from the Apple Menu every time, or put a tiny "refrigerator" magnet on the right side of the display.
gatortpk -