Bu sürüm, hatalı düzenlemeler içerebilir. En son doğrulanmış bellek kopyası dönün.
Neye ihtiyacın var
-
Bu adım çevrilmemiş. Çevrilmesine yardım edin
-
Use your fingers to push both battery release tabs away from the battery and lift the battery out of the computer.
-
-
Bu adım çevrilmemiş. Çevrilmesine yardım edin
-
Remove the four identical Phillips 3.4 mm screws from the memory door. These screws have 4 mm diameter heads rather than the 3 mm heads on the body screws.
-
-
Bu adım çevrilmemiş. Çevrilmesine yardım edin
-
Lift the memory door up enough to get a grip on it, and slide it toward you, pulling it away from the casing.
-
-
Bu adım çevrilmemiş. Çevrilmesine yardım edin
-
Remove the three Phillips screws in the battery compartment near the latch. Apple was nice enough to tilt these screws at a slight angle to make them easier to remove. On the A1261 these screws have 4 mm diameter heads rather than the 3 mm heads on the body screws.
-
-
Bu adım çevrilmemiş. Çevrilmesine yardım edin
-
Remove the following six screws:
-
Two 14.5 mm T6 Torx screws on either side of the RAM slot.
-
Four 3.4 mm Phillips screws along the hinge.
-
-
Bu adım çevrilmemiş. Çevrilmesine yardım edin
-
Remove the four 3.4 mm Phillips screws on the port side of the computer.
-
-
Bu adım çevrilmemiş. Çevrilmesine yardım edin
-
Rotate the computer 90 degrees and remove the two Phillips screws from the rear of the computer.
-
-
-
Bu adım çevrilmemiş. Çevrilmesine yardım edin
-
Rotate the computer 90 degrees again and remove the four Phillips screws from the side of the computer.
-
-
Bu adım çevrilmemiş. Çevrilmesine yardım edin
-
Lift up the back of the case and work your fingers along the sides, freeing the case as you go. Once you have freed the sides, you may need to rock the case up and down to free the front of the upper case.
-
-
Bu adım çevrilmemiş. Çevrilmesine yardım edin
-
Disconnect the trackpad and keyboard ribbon cable from the logic board.
-
Remove the upper case.
-
-
Bu adım çevrilmemiş. Çevrilmesine yardım edin
-
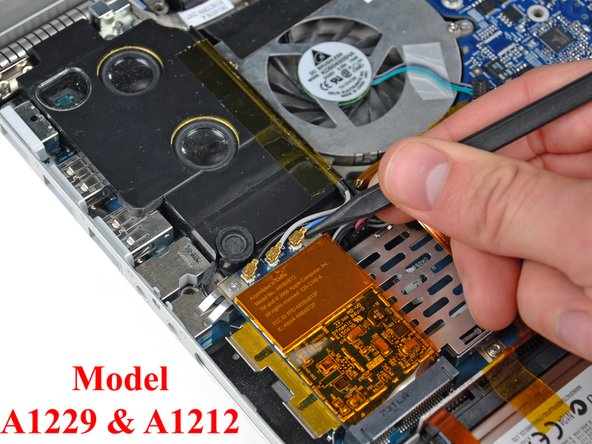
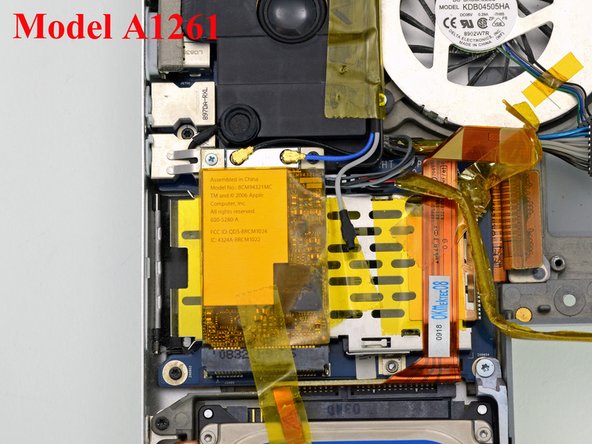
Disconnect the two antenna cables attached to the AirPort Extreme card.
-
-
Bu adım çevrilmemiş. Çevrilmesine yardım edin
-
Remove the single black T6 Torx screw from the top right corner of the AirPort Extreme card.
-
-
Bu adım çevrilmemiş. Çevrilmesine yardım edin
-
Lift the AirPort Extreme card up and slide it out of its connector.
-
-
Bu adım çevrilmemiş. Çevrilmesine yardım edin
-
Remove the two silver T6 Torx screws from the top left and bottom right corners of the left speaker assembly.
-
-
Bu adım çevrilmemiş. Çevrilmesine yardım edin
-
Lift up the left speaker assembly with one hand and deroute the inverter cable from the top right corner of the speaker assembly.
-
-
Bu adım çevrilmemiş. Çevrilmesine yardım edin
-
Disconnect the pink and black left speaker assembly cable from the left I/O board. Be sure to pull only on the white connector and not on the speaker wires.
-
Disconnect the microphone cable connector from the left I/O board.
-
Remove the left speaker/microphone assembly from the lower case.
-
-
Bu adım çevrilmemiş. Çevrilmesine yardım edin
-
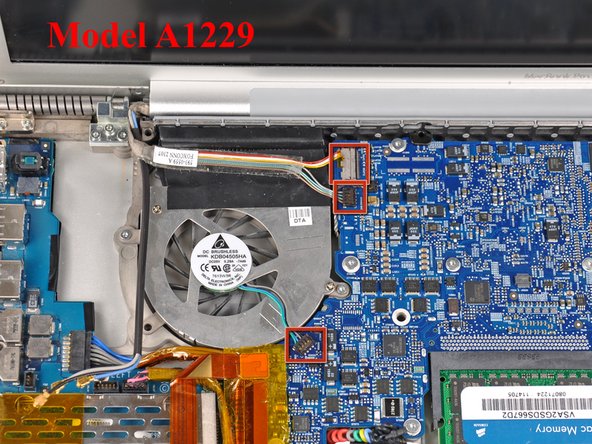
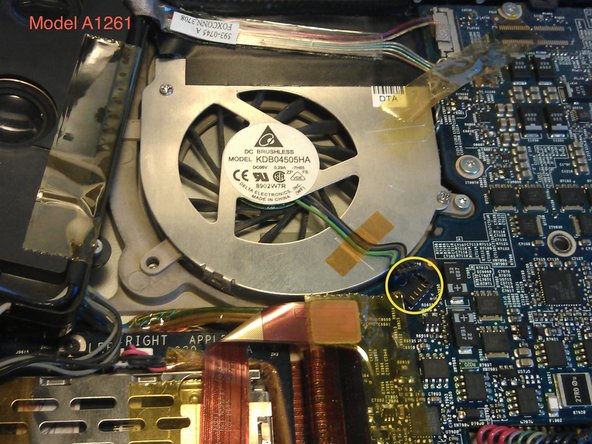
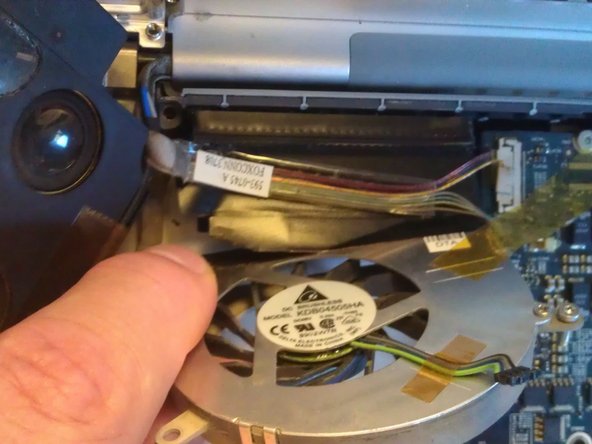
Disconnect the iSight, inverter, and left fan cables from the left side of the logic board.
-
-
Bu adım çevrilmemiş. Çevrilmesine yardım edin
-
Peel up the iSight and inverter cables which are attached with a mild adhesive above the left fan.
-
-
Bu adım çevrilmemiş. Çevrilmesine yardım edin
-
Remove the two silver T6 Torx screws securing the left fan to the lower case.
-
-
Bu adım çevrilmemiş. Çevrilmesine yardım edin
-
Lift the left fan and its metal bracket out of the computer.
-


İptal et: Bu kılavuzu tamamlamadım.
81 farklı kişi bu kılavuzu tamamladı.

6 Yorum
incredibly difficult. easy times unscrewing things but no guide as to "disconnecting.. cables..". used a jewelers loop & a flash light to see "push" on the connector, but that's it. Push down to connect? ..or up to disconnect.. slide it out- squeeze the something. nothing. I ended up breaking it off the logic board accidentally, rendering my computer irreparable, unless i could solder the wires to the board. yeah right. My advise do do it.
Sorry to hear that, I made almost the same experience as you. I was lucky to find out by my own, how to disconnect the cables on my A1212 and added a comment to step 17.
MBPTom -
Instead of replacing the fans completly, you may be able to repair them.
Once you removed the fan, there is a screw that you not yet have to touch. Unscrew it and carefuly open the housing. After that, you can pull the fan wheel with the shaft out. Clean everything (avoid water), including the hole that holds the shaft. Put a drop of oil (10W-40 syntetic motoroil works pretty well) on a piece of tissue and oil the shaft. Reasseble the whole thing and check that it moves.
This may not work if the mechanical damage is too extensive or when the electronic is broken. If it works, you spared 50 bucks, otherwise the nice folks at ifix can help you out ... I did this to both of the fans after they got rather noisy, and they worked another two years since.
While disassembling my A1261 to replace the right speaker I decided to keep going and give the computer a thorough cleaning. The fans and heat sink had collected a lot of dust. As I was removing one of the fans from its motor two of the blades fell off in my hand. Does anyone know if there is somewhere can get just the fan without the motor?