Giriş
This guide will show you how to remove the hard drive cable from your laptop.
Aletler
Parçalar
-
With the case closed, place the Unibody top-side down on a flat surface.
-
Depress the grooved side of the access door release latch enough to grab the free end. Lift the release latch until it is vertical.
-
The access door should now be raised enough to lift it up and out of the Unibody.
-
Grab the white plastic tab and pull the battery up and out of the Unibody.
-
Remove the following eight screws securing the lower case to the chassis:
-
One 3 mm Phillips screw.
-
Three 13.5 mm Phillips screws.
-
Four 3.5 mm Phillips screws.
-
Make sure you have a good quality Phillips screwdriver. Mine had removable tips and had a small play at the connection. As a result I didn't have a good feel and damaged my screws (those securing the fan and the top left in step 23). Game over for me installing new thermal paste...
Be very carefull with your screws! Especially those on the inside.
-
Using both hands, lift and remove the lower case off the upper case.
-
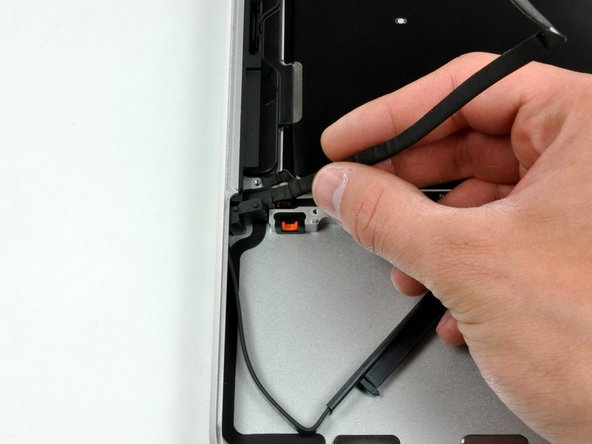
Using the flat end of a spudger, pry the subwoofer connector straight up off the logic board.
Me, too, broke the subwoofer connector from the motherboard. I'd suggest removing the padding first so that you can see what kind of connector it is, then pry it loose (insert spudger where the cables enter the connector).
DO NOT REMOVE THE SUBWOOFER CONNECTION. Step 6 IS NOT NESCESSARY.
You can complete this guide without doing step 6 just BE CAREFUL as you already should be.
Oops, I followed Step-6 and my subwoofer connector came off from the motherboard!!! Please suggest me what needs to be done now?
Happened the same to me ... step 6 is a @%#$$. You should put now a way to repair the damage done. I just have four small tin marks on the board ...
Happened the same problem to me ... step 6 is a @%#$$**%%#. You should put now a way to repair the damage done. I just have four small tin marks on the board ... and looking to sky for help
There are two variants of this connector. In one, there are pins that come up from the motherboard and the connector can be pried directly up without damage.
The other variant of the connector that everyone commenting here has is soldered to the motherboard. To repair this type, first pull off the small square of foam padding on top of the connector. Then gently pull out the four black and red wires, leaving the soldered connector attached to the logic board. After you have installed the new speaker and subwoofer, you will remove the connector on the replacement component and carefully feed the red and black wires into the connector that is still attached to the motherboard (paying careful attention to their correct order). Then replace the square of black foam.
If you have removed the soldered on the connector, your two options are to solder it on yourself or to find a repair shop that can do that for you. There are instructables online for soldering tiny components that can help you.
-
Disconnect the camera cable by pulling the male end straight away from its socket.
-
Use a spudger to pry the optical drive connector straight up off the logic board.
-
Remove the two Phillips screws securing the subwoofer to the upper case.
-
Lift the subwoofer off the optical drive, and set it above the computer.
-
Remove the two Phillips screws securing the camera cable bracket to the upper case.
-
Remove the three 2.5 mm Phillips screws securing the optical drive to the upper case.
-
Lift the optical drive from its right edge and pull it out of the computer.
-
Remove the single Phillips screw securing the hard drive bracket to the upper case.
-
Lift the hard drive by its plastic pull tab and remove the freed hard drive bracket.
-
Lift the hard drive out of its supports and disconnect the SATA cable by pulling the connector straight away from the hard drive.
-
Remove the four 10.3 mm Phillips screws securing the mid wall to the upper case.
-
Lift the mid wall out of the upper case.
-
Use a spudger to pry the hard drive cable connector straight up off the logic board.
-
Peel the hard drive cable from the adhesive securing it to the upper case, and maneuver the plastic retaining block out of the upper case.
To reassemble your device, follow these instructions in reverse order.
İptal et: Bu kılavuzu tamamlamadım.
19 başka kişi bu kılavuzu tamamladı.