Giriş
Use this guide to replace a broken LCD.
Neye ihtiyacın var
-
-
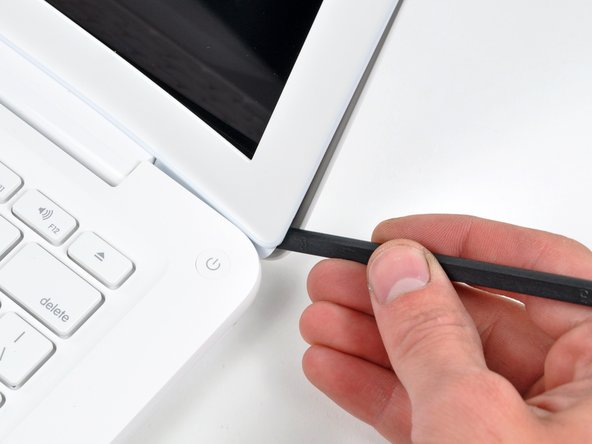
Insert the flat end of a spudger between the thin rubber strip surrounding the front display bezel and the rear display bezel.
-
Use the flat end of your spudger to carefully pry the front display bezel away from the adhesive securing it to the rear display bezel.
-
Continue prying until the front display bezel is free along the right side of the display and behind the right clutch hinge.
-
-
-
-
Slowly work your way across the lower edge of the front display bezel until it is free from the display assembly.
-
When you get about half way across, pry up from the other side of the front display bezel's lower edge to ease the process.
-
Remove the front display bezel from the display assembly.
-
-
-
Remove following six screws securing the LCD to the rear display bezel:
-
Four 3.4 mm Phillips.
-
Two 3 mm Phillips.
-
Hold the display vertically and tip it enough to grab the top edge of the LCD and rotate it slightly out of the display assembly, being careful not to break the circuitry off its lower edge.
-
-
-
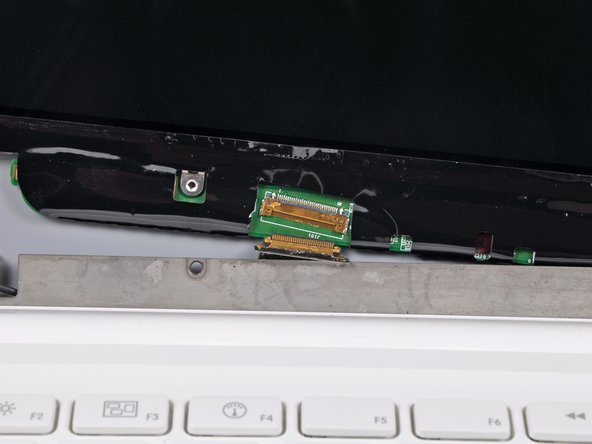
Use the tip of a spudger to flip up the thin steel retaining clip securing the display data cable to its socket on the LCD.
-
While holding the display data cable by the retaining clip, pull the LCD straight up and away from its socket.
-
Lift the LCD out of the display assembly and set it aside.
-


To reassemble your device, follow these instructions in reverse order.
To reassemble your device, follow these instructions in reverse order.
İptal et: Bu kılavuzu tamamlamadım.
167 farklı kişi bu kılavuzu tamamladı.

24 Yorum
I thought exactly the same thing: towards the end, it gets really tricky and there should be a lot more details in the repair guide. I somehow figured out myself how to do it, but i think i wouldn't have dared to do the whole thing, if i had known how difficult it would be at the end. you need a lot of patience and sensitivity to fit the cable into the little socket.
great news.
I had a little accident to my Mac yesterday, just ordered the new LCD. I have a question though:
what is the little black cable for on the upper right? Cuz' mine teared apart...
The thin black cables that go up the right side of the screen are your Airport antenna wires and the one running up the left side goes to the iSight camera.
Hello Everyone!
I'm done with the repair. My MacBook looks beautiful with the new Anti-Glare iFixit LCD screen I love it. Getting the display data cable into the socket wasn't that bad. I could solve it in 5 minutes. But needed 4 hands :)
Everybody should try if the screen break and iFixit guys are really really helpful!! Thank you once again!!
agreed: getting the display data cable into the new lcd is borderline impossible. I finally got it to fit in (by mere chance) after nearly 2 hours of maddening attempts. To be honest, i don't know if i would have tried this myself if I knew it would be so difficult. Anyway, it worked out in the end. Just be warned
Here's how to get the cable back on:
1. Open the ifixit guide on how to remove the Clutch Cover and follow steps 20-22 for getting the clutch cover off.
2. Flip up the connector bar on the video cable so it's not in the way.
3. Using a spudger stick, hold the video cable in place (so it doesn't move) by pushing down on the cable at the place that was exposed by removing the clutch cover.
4. While holding the cable in place. Use your other hand to hold the screen parallel to the video cable's end and slide the screen onto the cable's end.
5. With the screen slid onto the cable, push down the connector bar to lock the cable into the connector on the screen.
Oh yea,
6. don't forget to put the piece of black tape back over the cable connector.
7. snap the clutch cover back on and screw it down.
As for getting the bezel off, it can be easier to remove if you heat up the adhesive before prying the bezel off. I use a heat gun on a low setting. Move the heat gun around the bezel for about a minute, to warm up the adhesive on the back side of the bezel, and then pull the bezel off. Don't get the heat gun too close and don't hold it in any one place for too long, otherwise you'll melt the plastics and be in a world of hurt.
Sorry, Step 6a - Be cautious of the cable routing as you don't want to pinch any wires when snapping the clutch cover back on.
Another cable/connector/socket trick:
Turn the device upside down (screen at keyboard position; keyboard at screen position), put connector and socket close to each other (by repositioning the whole LCD) then use both hands, two pairs of tweezers and pull both ends of the steel clip carefully into the socket until its in place; then use the tip of the spudger and push left/right/left/right/.. end of the connector until your done. Finally close/secure the clip.
No need for going mad, no need for 4 hands.
yep , keyboard position for connecting LVDS cable is superb, done in 2 minutes . Do not forget to close clip, apply Kapton tape and then black tape . Carefully fit lcd to right position.
milos -
Good instructions, thank you ifixit, but I too struggled with the display data cable reconnection the first time. Here's some video from my second broken screen fix http://www.youtube.com/watch?v=10_Y2nwEu...
I totally agree Dave and Stephanie. I was able to finally get the display data cable into the socket, but I was lucky that I didn't break something trying. Also the tape that was on the socket was tough to get off and I actually broke the old socket in the process. Other than that it wasn't all that difficult to do. You just need to use the spudger and take your time with the removal of the bezel. Don't pay someone $450 or more to do this. Do it yourself.
Thanks to petar for the connector trick. No problem with connecting the cable even with only one pair of tweeters. One thing to remember before fixing the front display bezel: Remove the plastic cover from the display! It is almost invisible until you turn the MacBook on afterwards. If you forget it, you have to detach the front display bezel once more.
My screen was fading to white, unless I put pressure on the side of the screen. So, I replaced my LCD with a new anti-glare LCD (IF163-024-4) on my Macbook (A1342). The instructions were helpful. However, a little more detail at the end regarding the video cable would have been nice.
My LCD works, except now the keyboard brightness controls do not work and the backlight doesn't come back on once the computer goes to sleep. I have turned off sleep mode for now. No sleep mode is still better than the screen constantly fading to white.
Very nice and useful tutorial here
Does anyone know if I can replace the screen of this MB unibody A1342 with an LCD from a 13.3 macbook pro A1278? tnx
No you can’t because the connectors for the MB and the MacBook Pro LCD screens are different from each other and especially with the model numbers being different.
Great guide! I followed step by step and was able to replace my LCD display. I would recommend carefully using a heat gun or hair dryer to release the adhesive tape from the edges.
Also, I did the whole thing with a second pair of hands. Much easier than doing it alone.
How the !&&* am I going to do that if I need my macbook to follow instructions??? DUUUHHH!!!
You can pre-heat with hot-air , but only at 100-120 Celsius , higher temperatures could deform plastic frame . Best practice is unglue part of frame with spudger and preheat just opened part beween bezel and frame .
milos - Yanıt
Thanks to milos for the idea, I purposely melted my plastic a bit, since the previous owner somehow deformed it a little bit, enough to make a gap. I knew I was going to upgrade soon, so I thought “What the heck”. It’s a solution. Maybe not the best one, but it is one.
Kyan - Yanıt