Ana içeriğe geç

Makita Chain Saw EA6100PR 2017 Clutch Drum Replacement

Neye ihtiyacın var

  1. Makita Chain Saw EA6100PR 2017 Clutch Drum Replacement, Remove the sprocket guard plate: adım 1, 1 resimden 1.
    • Use a 13 mm socket to remove the two nuts securing the sprocket guard plate.

  2. Makita Chain Saw EA6100PR 2017 Clutch Drum Replacement: adım 2, 1 resimden 1.
    • Remove the sprocket guard plate.

  3. Makita Chain Saw EA6100PR 2017 Clutch Drum Replacement, Remove the chain and guide bar: adım 3, 1 resimden 1.
    • If the chainsaw has a chain and guide bar installed, follow the manufacturer's instructions and remove them before proceeding.

    • During reassembly, if you are reinstalling the chain and guide bar, follow the manufacturers instructions on proper chain tensioning techniques.

  4. Makita Chain Saw EA6100PR 2017 Clutch Drum Replacement, Release the chain brake: adım 4, 2 resimden 1. Makita Chain Saw EA6100PR 2017 Clutch Drum Replacement, Release the chain brake: adım 4, 2 resimden 2.
    • Pull the hand guard towards the tubular handle until you hear a click to release the chain brake.

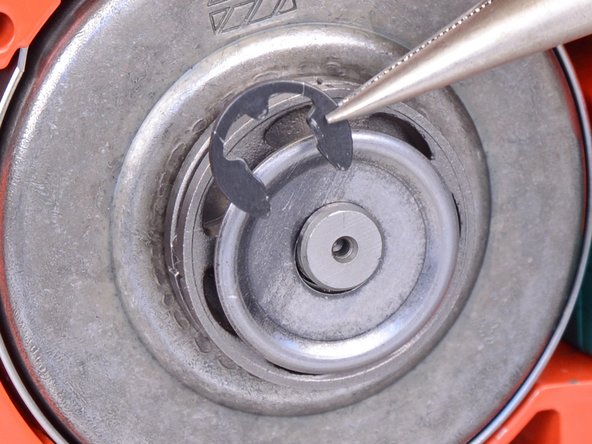
  5. Makita Chain Saw EA6100PR 2017 Clutch Drum Replacement, Remove the stop ring: adım 5, 2 resimden 1. Makita Chain Saw EA6100PR 2017 Clutch Drum Replacement, Remove the stop ring: adım 5, 2 resimden 2.
    • Use a small flathead screwdriver or snap ring pliers to pry and remove the stop ring from the axle.

  6. Makita Chain Saw EA6100PR 2017 Clutch Drum Replacement, Remove the flat washer: adım 6, 1 resimden 1.
    • Slide the flat washer off of the axle and remove it.

    • Re-assembly tip—be sure to re-install the washer in the correct orientation as shown in the picture.

  7. Makita Chain Saw EA6100PR 2017 Clutch Drum Replacement, Remove the rim sprocket: adım 7, 1 resimden 1.
    • Slide the rim sprocket off of the axle and remove it.

    • Re-assembly tip—be sure to re-install the rim sprocket in the correct orientation as shown in the picture.

  8. Makita Chain Saw EA6100PR 2017 Clutch Drum Replacement, Remove the clutch drum: adım 8, 1 resimden 1.
    • Slide the clutch drum off of the axle and remove it.

    • During re-assembly, lubricate all moving surfaces, such as the axle.

Sonuç

To reassemble your device, follow these instructions in reverse order.

2 farklı kişi bu kılavuzu tamamladı.

Arthur Shi

Üyelik tarihi: 01/03/18

252.726 İtibar

526 adet Kılavuz yazıldı

Ekip

iFixit iFixit üyesi

Staff

135 Üyeler

16.817 adet Kılavuz yazıldı

0 Yorum

Yorum Ekle

İstatistikleri Görüntüle:

Son 24 Saat: 1

Son 7 gün: 3

Son 30 gün: 8

Her zaman: 2,326