Ana içeriğe geç

Melitta Caffeo Solo Heater Replacement

Neye ihtiyacın var

  1. Melitta Caffeo Solo Heater Replacement, Open the Melitta Caffeo Solo: adım 1, 1 resimden 1.
    • Pull out the power cord!

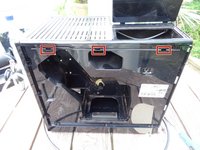
    • Remove the water tank and drainage tray.

    • Remove the side cover and remove the brewing unit.

    • Remove all coffee beans.

  2. Melitta Caffeo Solo Heater Replacement: adım 2, 1 resimden 1.
    • Unscrew and remove six Torx T10 on the rear.

    • Lever the rear cover off. It will most likely be quite stuck and you will need to apply some force. You must use plastic lever tools to prevent damaging the cover.

  3. Melitta Caffeo Solo Heater Replacement: adım 3, 2 resimden 1. Melitta Caffeo Solo Heater Replacement: adım 3, 2 resimden 2.
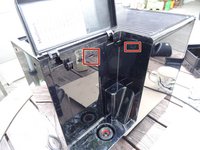
    • Press carefully into the slits on the sides using a minus screwdriver or a flat metal spatula, to release the clasps on the upper surface. These may be well tight and you have to use some force.

    • You should have created a separation between the upper surface and side panels. Now lever the upper covering away using a plastic tool. This may be quite stuck and you may apply some force.

  4. Melitta Caffeo Solo Heater Replacement: adım 4, 1 resimden 1.
    • Place a plastic tool in the crack between front panel and left side panel and widen it. Then push the side panel to the back. The side panel will be quite stuck and you may apply some force to do this.

    • Remove the hose from the water tank to the pump.

    • Remove the side panel.

  5. Melitta Caffeo Solo Heater Replacement: adım 5, 1 resimden 1.
    • Place a plastic tool into the crack between the front panel and the right side panel and widen it. Then push the side panel to the back. This may be quite stuck and you may need to apply some force.

    • Remove the side panel.

  6. Melitta Caffeo Solo Heater Replacement, Heater: adım 6, 1 resimden 1.
    • The photo shows the old and the new heater next to each other. Mostly you have to transfer add-on parts (cable sleeve, screws, and clamping plates) from the old part to the new part.

  7. Melitta Caffeo Solo Heater Replacement: adım 7, 2 resimden 1. Melitta Caffeo Solo Heater Replacement: adım 7, 2 resimden 2.
    • Unscrew three Torx T20 screws.

    • Remove the clamping plates of the thermal fuses and the grounding lug on the green/yellow cable.

    • The screws and the clamping plates must be transferred to the new part.

    • Carefully pull off the two flat plugs at the heater connection.

    • Later, also transfer the black rubber grommet - if present - at the heating connection to the new part.

  8. Melitta Caffeo Solo Heater Replacement: adım 8, 1 resimden 1.
    • Loosen the retaining screw of the instantaneous water heater with a 4 mm Allen key.

    • The lock nut of the screw sits loosely in the black plastic housing and can fall away to the rear. If you pull on the screw while unscrewing it, this will not happen easily.

    • Carefully pull the thermoblock out to the front. Do not remove it completely yet, it is still connected to the thermosensor and the pressure hoses.

  9. Melitta Caffeo Solo Heater Replacement: adım 9, 1 resimden 1.
    • Pull out the clips on the two pressure hoses and remove the two connections.

    • The two connections are sealed with an O-ring. Replace them during reassembly.

  10. Melitta Caffeo Solo Heater Replacement: adım 10, 1 resimden 1.
    • Now the thermoblock is only attached to the thermosensor. Unscrew it with an open-end wrench SW8. Make sure that the fragile cables are not twisted and torn off.

Sonuç

Repeat the steps in reverse order to reassemble your device.

Bir başkası bu kılavuzu tamamladı.

Bu çevirmenlere özel teşekkürler:

de en

100%

Bu çevirmenler dünyayı onarmamıza yardım ediyor! Katkıda bulunmak ister misiniz?
Çeviriye Başlayın ›

VauWeh

Üyelik tarihi: 10/19/15

201.734 İtibar

246 adet Kılavuz yazıldı

Ekip

Repair is War on Entropy Repair is War on Entropy üyesi

Community

25 Üyeler

1.097 adet Kılavuz yazıldı

2 Yorum

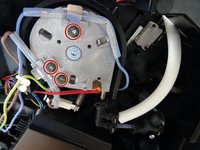
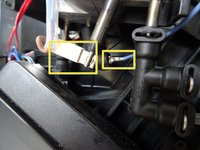
Sehr schöne Anleitung! Stehe gerade vor der selben Maschine und prüfe gerade warum kein Wasser herauskommt.

Schläuche wurden geprüft, Flowmeter geprüft, ist alles freigängig. Pumpe drückt Wasser bis zum Erhitzer. Ich denke dieser ist verkalkt.

Schöne Anleitung, enthält alles was man braucht!

Dapper - Yanıt

Zum Prüfen einfach reinblasen. Muss ziemlich leicht gehen.

VauWeh -

Yorum Ekle

İstatistikleri Görüntüle:

Son 24 Saat: 0

Son 7 gün: 6

Son 30 gün: 32

Her zaman: 2,227