Giriş
Follow this guide to replace the screen on a Microsoft Surface Pro 4.
There is a significant chance that you may break the unreinforced and fragile display panel during this procedure. Be sure to apply adequate heat and be extremely careful while slicing through the adhesive. Wear safety glasses in case the glass shatters.
Neye ihtiyacın var
-
-
If your screen glass is cracked, keep further breakage contained and prevent bodily harm during your repair by taping the glass.
-
Lay overlapping strips of clear packing tape over the Surface’s screen until the whole face is covered.
-
Do your best to follow the rest of the guide as described. However, once the glass is broken, it will likely continue to crack as you work, and you may need to use a metal prying tool to scoop the glass out.
-
-
-
Heat an iOpener and apply it to the right edge of the Surface's screen for two minutes.
I have done dozens of Surface Pro tablet repairs; if your screen is cracked or chipped AT ALL, you WILL make it worse. Plan on replacing it. Even if it's not cracked or chipped, the likely hood of removing this screen without damage (LCD separation or heat marks in the corners) is very low. Ive tried everything from hot plates to heat mats and the iOpener and nothing is reliable enough. I found that using my Warner heat gun set at 800*c and working on half an edge at a time with a LOT of 91% alcohol in a drip bottle along the edge, along with a very thin guitar pick (not the ones sold here, they are too thick) is the trick to loosening the glue. Work on the side and bottom first. The top is going to be the hardest as the adhesive will stick to the wifi/bluetooth antenna and you WILL tear them (Ive had to replace a fair amount of them). There's a delicate trick to doing it, but it's too hard to describe. If you've never done this repair before, I do not recommend it; find a professional.
Hi, thanks for the information, Very valuable.
I'm about to do this because my battery and fan aren't working.
There's no way anybody can fix it properly near me. Got any other tip to try not to break the screen and or any flex?
I've done works like this on small tablets and phones, but never this pc. I'll try to go slow.
Thanks again for your experience information.
-
-
-
Take note of the screen adhesive layout before continuing:
-
These areas only contain adhesive and are safe to cut.
-
The display board and flex cables sit here close to the edge. Cut carefully and don't insert the pick more than 1/8 inch (3 mm).
-
Fragile antenna cables lie under this part of the screen. Carefully follow the procedure in step 13 to avoid damaging them. The adhesive is also the thickest here.
The bottom red section is narrow and not as thick as the bevel indicates. I went too deep with my tool and cut through a ribbon thinking that I could send my tool as deep as the black bevel edge. its like half that.
I did a screenshot of this image to always see it while progressing through the steps and did exactly the same mistake. I read every comment in the steps below but yours only now :( On my device it's 5mm from the edge of the screen glass to the ribbon.
I cut through as well, but was able to carefully solder the edges together enough to make a connection - works fine.
-
-
-
Insert an opening pick into the top-right speaker cutout on the screen and slide the pick between the glass and speaker grille.
-
-
-
Slide the pick down the right edge of the Surface to slice through the adhesive under the screen.
-
Leave this opening pick in the right edge to prevent the adhesive from resealing.
-
-
-
Reheat your iOpener and apply it to the bottom edge of the Surface's screen for two minutes.
-
-
-
Insert a new opening pick into the bottom-right corner and slide it around the corner toward the bottom edge.
-
Slide the pick along the bottom edge of the Surface to cut through the screen adhesive.
-
Leave this pick in the bottom edge to prevent the adhesive from resealing.
Yep. I scratched the corner of the LCD with the pick. Take the warning seriously folks! It’s really easy to do.
The warning says to not insert it more than 12mm but it should be not more than 5mm. There is a ribbon/display connection at the bottom and i damaged it.
-
-
-
Reheat your iOpener and apply it to the left edge of the Surface's screen for two minutes.
-
-
-
-
Reheat your iOpener and apply it to the top edge of the Surface's screen for two minutes.
-
-
-
Round the left corner with the opening pick and slide it along the top edge of the Surface. Stop when the pick is 2.75 inches (70 mm) away from the left edge.
The right antenna is kind of P shaped (rotated 90° to the right) with the small end facing the middle. I'd suggest to stop at the middle when loosening the left antenna and to do the same thing coming from the right.
-
-
-
Insert the point of a pick under the screen where you just stopped cutting. Don't insert the pick deeper than the edge of the bezel.
-
Carefully roll the pick to the right, pressing the long edge of the pick into the screen adhesive underneath the bezel, cutting the adhesive as you go. Don't slide the pick along the edge of the Surface.
-
Repeat this motion of inserting the point of the pick where you just cut, and rolling to the right all along the top edge of the Surface, until the pick is 2.5 inches (64 mm) from the right edge of the Surface.
Bij mijn exemplaar bleek het onmogelijk om de bovenrand volgens de aanwijzingen los te maken. Ik heb de boel vele keren opgewarmd en ben meerdere malen met het plectrum langs de rand gegaan. Maar er beleef iets hardnekking vastplakken. Ik moest uiteindelijk de lijmverbindingen los maken zoals bij de andere randen. Achteraf bleek dat bij het gedeelte waar de antennes zaten het frame en het scherm volledig met elkaar verlijmd zaten met de antennes er tussen. Dat kostte me uiteindelijk de antennes. Gelukkig geen schade aan andere zaken. Niet zo'n grote ramp want ik kon nog antennes bestellen. Maar hou er rekening mee.
-
-
-
Very slowly lift the screen assembly away from the Surface case. If you encounter any resistance, stop and check that all the adhesive is separated.
-
Use an opening pick to cut through any remaining adhesive.
-
-
-
Use one tip of a pair of angled tweezers to pry up the EMI shield from the gaps between the "teeth."
-
Repeat this procedure at different points around the perimeter of the shield until it is free.
-
-
-
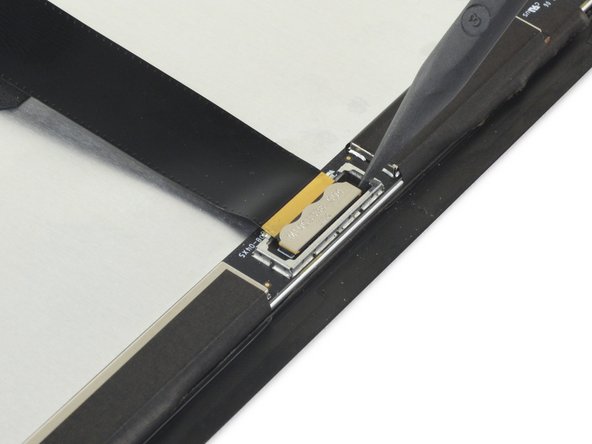
Use your tweezers to remove the two EMI shields covering the display cable connectors.
-
-
-
Remove the screen from the Surface.
-
During reassembly, pause here and follow this guide to replace the screen adhesive.
-
-
-
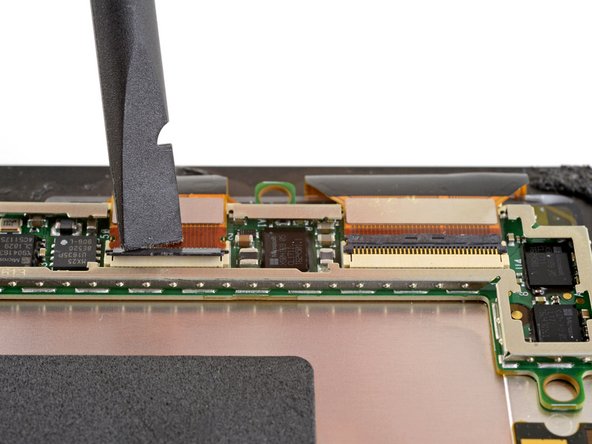
Use an opening pick to pry up one edge of the EMI shield covering the display board.
-
-
-
Use a spudger to flip up the small locking flaps on the display cable ZIF connectors.
-
-
-
Slide an opening pick under the display board to separate the adhesive holding it onto the back of the screen.
-
-
-
Remove the display board.
Que tipo de adesivo se recomienda? Se necesita que conduzca la electricidad?
-
-
-
Only the screen remains.
Hallo das Display auf der Rückseite hat ca. 4 kreisförmige schwarze runde matten/gumipolster und vier große.
rund herum ist auf der kanne ebenfalls ein Klebestreifen angebracht. wo bekomme ich diese teile oder Klebestreifen?
Welche auswirkungen kann es haben wenn das Display hinten dies nicht aufweist?
Ein Link wäre sehr hilfreich.
Danke
-


To reassemble your device, follow the above steps in reverse order.
Take your e-waste to an R2 or e-Stewards certified recycler.
Repair didn’t go as planned? Try some basic troubleshooting, or ask our Answers community for help.
To reassemble your device, follow the above steps in reverse order.
Take your e-waste to an R2 or e-Stewards certified recycler.
Repair didn’t go as planned? Try some basic troubleshooting, or ask our Answers community for help.
İptal et: Bu kılavuzu tamamlamadım.
106 farklı kişi bu kılavuzu tamamladı.

60 Yorum
Thank you for your guide.
I've removed the cracked screen from my Surface Pro 4 and hope to replace it with a new screen I bought on eBay. Unfortunately, the new screen doesn't seem to have the NTrig board attached to it.
Is it possible to remove that little board from the old screen? If so, how?
I'm also interested on this. as I can't find a screen seller that includes the NTrig board. Did you manage to do it, Alex?
Yes you can heat up the board and remove it and move it over to the new screen. However my problem is that now I have a vertical dead spot about 2 inches wide from the "J" key to the "L" key up and down the screen. I can't find any damage to the cables or boards... I have replaced the screen twice now and nothing.
Same problem as the guy above, moved the n-trig board over, touch is unresponsive in certain spots, anyone find a solution to this?
I'll be moving the board over as well, I am told to make sure the cables are completely connected, Check and Re-Check. This seemed to have fixed most problems with the touch being unresponsive in some area's.
hi guys, i have the same issue with the touchscreen after replacement. have you find a solution? I checked a couple of times but touch screen doesn't work. Instead if I use the pen, there are some dead spot.
Ok, So all fine in theory, but unless you broke your screen, like I did, it is IMPOSSIBLE to remove the screen without breaking it. Even with a full I Fix It toolbox and an I opener it took me 90 mins to get the screen off. The central parts come away quite easily but separated from the edges, but the glue tape is so strong it left sharp glass around the edge where the tape is.
This screen is less than 1/10th of a mm thick in places, you've got no chance of getting it off.
You need to heat it a lot. I used heat gun at 280°C and applied heat to the edges and kept it moving around the edges for 15 min. Then the edge was too hot to touch (around 120-150°C) and then it was easy to remove the screen. Be careful for the top antenna’s mine were stuck to the display instead of the bar below and I needed a new antenna.
Henri -
I i got mine apart by heating the edges, and then applying some painters tape loosly from the back cover to the front of the screen to prevent it fom dropping and then blowing air from my air compressor through the back panel air vents. Screen popped right away from the warm adhesive and the painters tape kept it from breaking any cables or the glass, took about 5 minutes.
On the plusside, at least I can now upgrade the hard disk.. Yay.. 1TB here I come!!
I am unable to find a replacement glass anywhere? How did you guys find it on ebay?
Amazon is the only place I have found a screen....
What adhesive should i use to replace the screen?
Some of this might do the trick for you gentleman. https://www.amazon.com/NIUTOP-Double-Adh...
Tesa 4965, Tesa 61395 or Hi-bond VHB tape.
should i save my files to an external drive before replacing the screen?
You should always backup your data for any repairs you may do.
note that you need to be very careful when prying the top left side of the display off: it's very easy to damage the wifi antenna!
more so in top middle across 6", I replaced mine with aluminum tape and it worked really well
Does anyone have a link to buy the actual replacement screen for Surface pro 4. The replacement screen in this video. Thank you in advance
At the top of the unit there is some very thin copper ribbon that tore when removing the adhesive, what is it? I need to replace it.
It's the wifi/bluetooth antenna. You can not buy this part anywhere. I recreated the antenna using aluminum tape and I think the wifi is better than before!!
The Surface Pro 4 antennas are now widely available on Amazon and Ebay.
David S. -
Anyone have the issue of the screen being offset after reattaching? Anyone know which one of the connectors controls this?
I am not quite sure what you mean by offset but what this sounds like is that the N Trig board is not quite in the right position. The N Trig board is the L shaped board that you need to take from the old screen and stick it on the new screen. If you look at the opened tablet, on the bottom left area, as you look at the inside of the tablet, there is an L shaped space. The N Trig board must fit properly into this space or the screen will be skew or even stand proud. There is enough space for the N Trig board but not much space. If possible try lifting the screen again and repositioning the N Trig board. If that is not possible or may cause more damage than its worth you may have to live with the screen being offset. As a good ‘lesson learnt’ for this it is to position the new screen with all the bits connected in place before actually sticking it down so that you can make sure it sits correctly. That said I am not implying that you did not do that. ;o)
This guide made it seem roughly 10 times easier to do than it turned out to be. Sunk ~$200 into fixing the screen on a $500 computer, and broke the screen when reinstalling it, and spent easily a couple hours frustratedly picking broken glass off the edges when taking off the old screen. I’m not blaming you for me being bad at computer repair, but maybe consider raising the difficulty?
Ouch, sorry to hear that. I haven’t worked on the Surface Pro much, but usually the challenge is to avoid breaking the screen when taking it off, as opposed to installing it. I agree with you about the difficulty level and bumped it up accordingly—there is nothing easy about working on a Surface Pro. Better luck on your next repair…
All Right: where to buy screen - phoneremedies.com, comes with tools. If, like I did, you tear a ribbon cable, can find replacement at ipartexperts.com
My glass was shattered, so the big center part came out easily, too easily, before I knew it I’d torn a ribbon cable. I’m using a heating pad to warm the adhesive around the edges. This is a long monotonous process. Take extra care in the middle third section at the top. There is delicate antenna in this area. Moving the NTrig board will be the next joy. If anyone is wondering, no this isn’t easy…not for the faint of heart. Prying off the little aluminium cable pin covers is also nerve racking. You will bend them, but they can be bent back.
I think there should be a part for putting it back together, it’s not always as simple as ‘just do it in reverse’ for instance, what is the best adhesive to use and how much should you use? Those parts are not listed either. Maybe a new display bought from Ifixit has adhesive already applied but what if you are using a used display?
No mention of the antenae???? assembly at the top of the screen, that you can cut right through with a pick (near the camera and N-trig assemblies),
This is a really lame procedure that ends up giving false confidence to people you should just remove it if you can’t put all the important details on here
There are little round gaskets around at least 3 of the sensors/cameras on the sensor array area, and there are 3 antennae glued between the screen and the case on either side of the camera. THIS IS PRETTY IMPORTANT INFORMATION TO LEAVE OUT OF what is essentially a ‘teardown’ instruction posing as ‘replacement’ instructions. I really expected more form this web site, and anyone reading this should peruse youtube and watch MULTIPLE videos because a great deal of those don’t show these things either. The iOpener is for $@$*,you need a heat gun set to just below 200 F and once you get a pick in, heat in front of it, detach it while it’s easy, heat again, etc, and the top edge is much thicker and contains all the sensors. this has a lot of glue almost the whole thickness of the bezel. I haven’t found a way to separate without snagging one of the antennae but on the next try I will use more heat and go even slower. I would love to post a photo showing the exact position but see no way to…
Glen, this is a user-submitted guide. Your comments are fair, but rather than just criticizing, I would suggest using iFixit the way it’s meant to be used—as a wiki—and submit your own improvements to the guide. We generally allow any user to submit a repair guide, even if it’s imperfect, in the hopes that folks will use it and improve on it over time. Looking through the guide I can see some of your complaints are addressed in the comments, so I will go through and copy some of that info over to the steps where it’s a little more visible. Thanks for your feedback.
I’m researching reasons my touch screen doesn’t work. I found this site, after I removed the old screen. I wished it was before my attempt, I would have had more insight into the process. But, I think I did okay, considering. The new screen is connected to the cables and I tested it, before the final “glue down”. However, the touch screen does not work and I’ve tried to re-seat the cables from the Ntrig assembly to the new screen many, many times and still, nothing. Is it possible the screen I purchased from an Amazon supplier can be defective? Has anyone had an issue with a defective screen? I’m considering purchasing another screen from a different supplier and try the connections, again, to rule this out. But, If you guys think it’s me and not the screen, I’ll gladly listen to any suggestions. Thanks, in advance, for any comments.
Linda Lewis
I t can be two different things:
1) You have a bad screen
2) You damaged the N-Trig Board or it was damaged when the screen was originally damaged which can happen. Unless you try a combination both both you may not know. It you are doing these Surface Pro 4 repairs in bulk, it is a good idea to keep both those parts in stock.
Abdullah -
after replacing my display the screen would not turn on. i confirmed the surface still worked by pluging in an external monitor. the device would respond to touch but it would not display anything on the new monitor
Awesome repair guide.
Have removed the screen only to find it is not a Pro 4 screen on the Pro 4. A little confused but having done research on the LCD connector it is saying it is the LG screen not the Samsung one! I did not realise there were two different screens for this model until this point.
The removed screen is the same as the Pro 5 (2017) screen. But it came off the Pro 4…….
The LCD connector on the Pro 4 screen is shorter than the connector for the Pro 5 (2017). So a Pro 4 screen can not be connected to this Pro 4.
So my question is this. Can the Pro 5 screen be fitted to this Pro 4 safely ?
Would a 1796 screen work as replacement for a Microsoft Surface Pro 4 1724? Would that solve the flickering problem?
i have the same question… did you fix it?
So my problem is that the touch doenst work in all parts (right 2cm of screen wont work) and also the pen stopped working. But the display is in ggood shape and it didnt shatter. My question is: IF (which after reading this doesnt seem too likely) i manage to get the display off without breaking it can changing the N-trig board help? Like does it have all the touchscreen/pen components or could it also be a display problem?
Hi iFixit
I want to ask about surface pro screen part. I have customer surface pro 4 screen flickering and want to replace the LED Screen. Someone said, surface pro 4 screen only last about 1 year before it will start flickering again and he suggested using Surface pro 5 screen, since they are the same.
Is this true? What about camera holes? Are the placed exactly to fit both surface pro 4 and 5?
If the screen is already broken and you’re not worried about breaking it more is this repair really that hard seems like it’s really similar to an iPad digitizer/lcd replacement which really isn’t that difficult
needs help please so im pretty sure i bought the wrong type of screen seeing that the connector at the bottom of the screen doesnt snap in that flex is bit thinner than the connectore at the bottom my problem is i dont know how to tell if i have a v1 and need a v1 or if i have a v2 and need a v2 screen and dont tell me to count the pins cause they small and this is my first time so be gentle
Hi. Is there anyway to know whether my surface has 25 pin 1.0 samsung display or 32 pin 2.0 lg display without opening the surface?
I have Surface Pro 4 i7 Processor, 16 GB RAM, 1 TB SSD model and it’s touch is not working.
Someone please help me to order the right display for my model.
Thanks in anticipation!
Hi,
I have the LG 32-pin version of the display, and I noticed the flex cable between display and motherboard has 32 pin on the display side and 25 on the motherboard side. I assume the samsung version has 25 pins on each side, does this mean seven of the pins on the LG display is redundant? I don’t know if a diagram for what each pin is for exists, so I can’t verify if this is indeed the case.
Hi. This guide is great and I was able to remove my screen flawlessly. For those who want to know which screen they have:
Go to device manager (Just search Device Manager in the search box)
Under Monitors, right click on the “Surface Display” and go to properties.
Switch to the “Details” tab, and from the drop down menu choose “Hardware IDs”.
For the Samsung display, it should be: “MONITOR\SDC3853”.
I don’t know what is the ID for LG displays, but a quick Search for this device ID shows that it’s Samsung, and the screen from iFixit was fully compatible.
Hope this helps.
I have a Surface Pro 4 purchased in December 2015. Its screen flickers and shakes when the machine is hot.
2015年12月买的Surface Pro 4。机器一热,屏幕就抖。
I ordered a Surface Pro 4 (1724 v1.0) Screen (Samsung Display) and some tools on iFixit website. I received the package on Jan 10, 2022. The tools worked fine. I have replaced the old screen with the new one following the guide on this page.
我在iFixit网站订购了SP4 (1724 v1.0)的屏幕(三星的屏幕)以及拆机工具。2022年1月1日收到货。拆机工具很好用。照着本页教程,旧屏顺利拆下,新屏成功换上。
However, the next day (Jan 11, 2022), when I was testing my new screen by repeatedly playing videos, the screen started to shake again within less than one hour. The only good news is that my old screen shakes entirely while the new screen only shakes at the lower part (about 1/5 of the screen).
然而,次日(2022年1月11日),当我使用连续播放视频的方法来测试新屏幕时,新屏幕的画面不到一小时就又开始抖起来了。唯一的好消息就是,旧屏幕是整个画面全部抖动,而新屏幕只有画面下方约五分之一的面积抖动。
How fragile are the two flexes of the screen?
I made a replacement of the battery and now the screen wont work. I can see a subtle backlight when powering on, bit i get no image and no touch response.
The tablet is working fine because i connected it to an external monitor and i found no problems.
Is it possible the flexes were damaged? On visual close inspection they seem fine to me, but i don't know.
I have a Surface Pro 4 tablet with a glass UAG screen protector that I want to replace the battery. I've removed the display on another Surface Pro 4 using a heating pad so I'm familiar with the process.
For the Surface with a screen protector, I planned on use several iOpeners to heat the edges to soften the adhesive.
Has anyone successfully performed this replacement on a Surface with a glass screen protector?
hi, i changed battery and when i turned on the tablet, half touchscreen was not working. The glass is intact and I did everything with great precision.
Now i would like to change display to fix the touchscreen problem. But which model should i buy? I got a model but it has a shorter connector and the flat cannot be inserted. Can you help? thank you
Hey Guys, I removed the screen, however jammed into the adhesive I see there is some kind of antenna. that tore in two. Impossible for the antenna not to tear.
Any recommendations of how to fit it?
Right-to-repair please MICROSOFT
γνωρίζει κάποιος να μου πει πως αποφεύγεις την θερμοκρασία πάνω στην νέα οθόνη, αφού εφαρμοστεί στο ταμπλέτ. το συγκεκριμένο μοντέλο έχω δει ότι έχει πρόβλημα με την θερμοκρασία
Hallo das Display auf der Rückseite hat ca. 4 kreisförmige schwarze runde matten/gumipolster und vier große.
rund herum ist auf der kanne ebenfalls ein Klebestreifen angebracht. wo bekomme ich diese teile oder Klebestreifen?
Welche auswirkungen kann es haben wenn das Display hinten dies nicht aufweist?
Ein Link wäre sehr hilfreich.
Danke
hello sir, i replaced the screen as per your guidelines, and i did it.......wow! thanks for your tutorial.... but i am facing new problem after replace the screen that when i use pen, at right and left top corner repel the cursor point something like magnetic effect. and while using by hand its ok in all points.. what i missed during assembling.?
If I have a screen protector on the screen should I remove it? Will it interfere with the heating process?
IronJoker - Yanıt