Bu sürüm, hatalı düzenlemeler içerebilir. En son doğrulanmış bellek kopyası dönün.
Neye ihtiyacın var
-
Adım 1
Dikkatli ol: adımlar 1-22 yapım altında olarak işaretlenen bir kılavuzdan alınmıştır.
Bu adım çevrilmemiş. Çevrilmesine yardım edin
-
If the screen's glass is cracked, keep further breakage contained and prevent bodily harm during your repair by taping over the glass. Lay overlapping strips of clear packing tape over the display until all the glass is covered. Wear safety glasses to protect your eyes.
-
Heat an iOpener and apply it to the right edge of the Surface's screen for two minutes.
-
-
Bu adım çevrilmemiş. Çevrilmesine yardım edin
-
Take note of the screen adhesive layout before continuing:
-
These areas only contain adhesive and are safe to cut.
-
The display board and flex cables sit here close to the edge. Cut very carefully and do not insert the pick as deep under the display.
-
Fragile antenna cables lie under this part of the screen. Carefully follow the procedure to avoid damaging them. The adhesive is also the thickest here.
-
-
Bu adım çevrilmemiş. Çevrilmesine yardım edin
-
Insert an opening pick into the speaker opening on the screen and slide the pick under the glass. Do not press the pick into the speaker grille, as the grille is easily torn.
-
-
Bu adım çevrilmemiş. Çevrilmesine yardım edin
-
Rotate the pick toward the bottom of the Surface to slide it underneath the lower edge of the speaker cutout.
-
-
Bu adım çevrilmemiş. Çevrilmesine yardım edin
-
Slide the pick down the right edge of the Surface to slice through the adhesive under the screen.
-
Leave this opening pick in the right edge to prevent the adhesive from resealing.
-
-
Bu adım çevrilmemiş. Çevrilmesine yardım edin
-
Reheat the iOpener and apply it to the bottom edge of the Surface's screen for two minutes.
-
-
Bu adım çevrilmemiş. Çevrilmesine yardım edin
-
Insert a new opening pick into the bottom right corner and slide it around the corner toward the bottom edge.
-
Slide the pick along the bottom edge of the Surface to cut through the screen adhesive.
-
Leave this pick in the bottom edge to prevent the adhesive from resealing.
-
-
Bu adım çevrilmemiş. Çevrilmesine yardım edin
-
Reheat the iOpener and apply it to the left edge of the Surface's screen for two minutes.
-
-
Bu adım çevrilmemiş. Çevrilmesine yardım edin
-
Insert a new opening pick into the bottom left corner and slide it around the corner toward the left edge.
-
Slide the pick along the left edge of the Surface to cut through the screen adhesive.
-
Leave this pick in the left edge to prevent the adhesive from resealing.
-
-
Bu adım çevrilmemiş. Çevrilmesine yardım edin
-
Reheat the iOpener and apply it to the top edge of the Surface's screen for two minutes.
-
-
Bu adım çevrilmemiş. Çevrilmesine yardım edin
-
Round the left corner with the opening pick and slide it along the top edge of the Surface. Stop when the pick is 2.75 inches (70 mm) away from the left edge.
-
-
Bu adım çevrilmemiş. Çevrilmesine yardım edin
-
Insert the point of a pick under the display where you just stopped cutting. Do not insert the pick deeper than the edge of the bezel.
-
Carefully roll the pick to the right, pressing the long edge of the pick into the screen adhesive underneath the bezel, cutting the adhesive as you go. Do not slide the pick along the edge of the Surface.
-
Repeat this motion of inserting the point of the pick where you just cut, and rolling to the right all along the top edge of the Surface, until the pick is 2.5 inches (64 mm) from the right edge of the Surface.
-
-
Bu adım çevrilmemiş. Çevrilmesine yardım edin
-
Once you cut the adhesive over the antennas (8.5 inches, or 22 cm, away from the left edge), slide the pick the rest of the way along the top edge of the surface and round the top right corner to slice through any remaining adhesive.
-
-
Bu adım çevrilmemiş. Çevrilmesine yardım edin
-
Very slowly lift the screen assembly away from the Surface case. If you encounter any resistance, stop and check that all the adhesive is separated.
-
Use an opening pick to cut through any remaining adhesive.
-
-
Bu adım çevrilmemiş. Çevrilmesine yardım edin
-
Lift the top of the screen assembly away from the case while sliding the bottom of the screen closer to the motherboard display connectors.
-
Gently lay the screen down on the case with the connectors facing up. Take care to avoid creasing the display cables.
-
-
Bu adım çevrilmemiş. Çevrilmesine yardım edin
-
Use an opening pick to pry up one edge of the EMI shield covering the display board.
-
Repeat this procedure at different points around the shield until it is free.
-
-
Bu adım çevrilmemiş. Çevrilmesine yardım edin
-
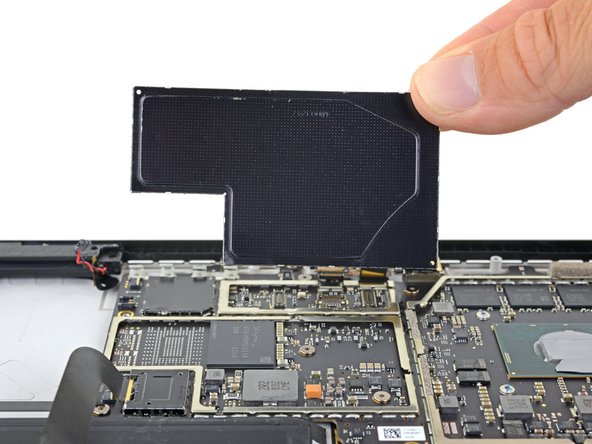
Lift the EMI shield away from the display board and remove it.
-
-
Bu adım çevrilmemiş. Çevrilmesine yardım edin
-
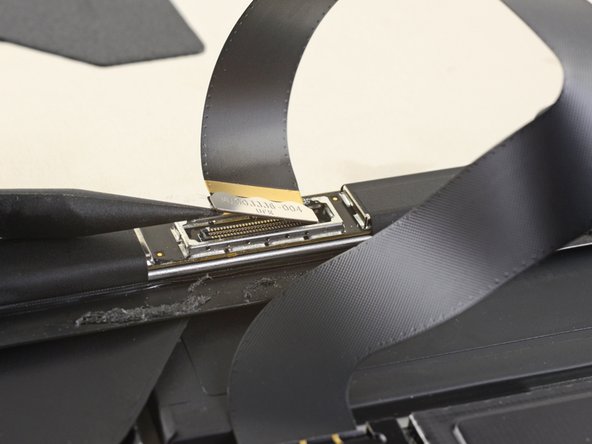
Use the flat end of a spudger to pry the display interconnect cable straight up and out of its socket on the board.
-
-
-
Bu adım çevrilmemiş. Çevrilmesine yardım edin
-
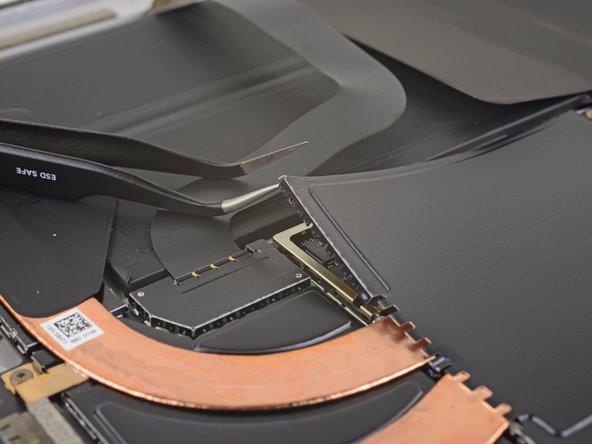
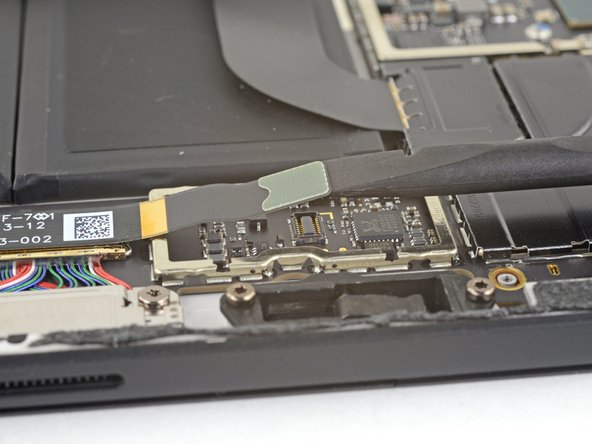
Insert one point of a pair of pointed tweezers into a gap in the edge of the EMI shield covering the digitizer connector.
-
Use the tweezers to pry the EMI shield away from the display as much as you can without bending it.
-
Repeat this procedure at different points around the shield until it is free. Remove the shield.
-
-
Bu adım çevrilmemiş. Çevrilmesine yardım edin
-
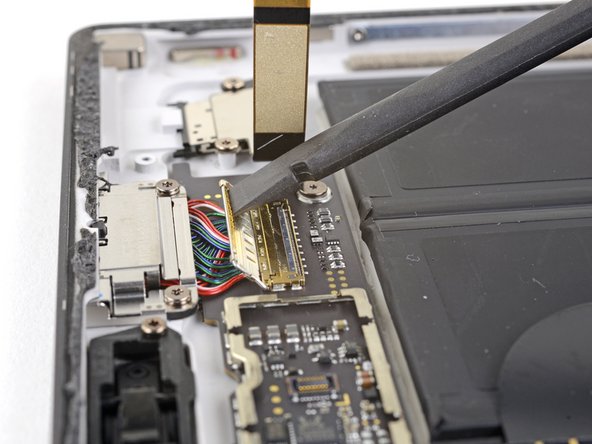
Pull the rest of the shield off of the digitizer connector and remove it.
-
-
Bu adım çevrilmemiş. Çevrilmesine yardım edin
-
Use the tip of a spudger to pry the digitizer connector straight up and out of its socket on the screen.
-
-
Bu adım çevrilmemiş. Çevrilmesine yardım edin
-
Remove the screen assembly from the Surface.
-
During reassembly, pause here and follow this guide to replace the screen adhesive.
-
-
Bu adım çevrilmemiş. Çevrilmesine yardım edin
-
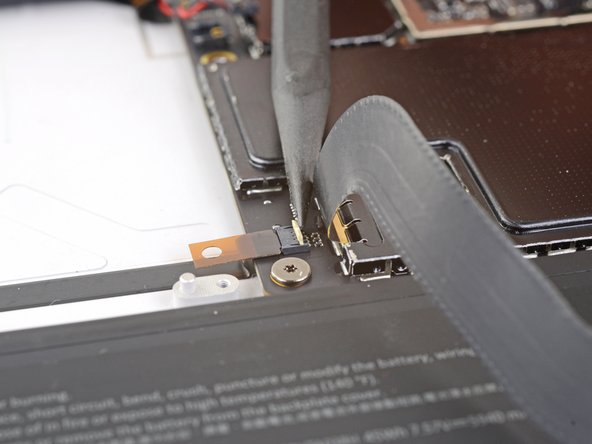
Use the point of a spudger to pry the microphone connector straight up and out of its socket on the motherboard.
-
-
Bu adım çevrilmemiş. Çevrilmesine yardım edin
-
Use a T5 Torx driver to remove the four screws securing the antenna support:
-
Three 4.5 mm screws
-
One 6 mm screw
-
-
Bu adım çevrilmemiş. Çevrilmesine yardım edin
-
Use a spudger to lift the antenna support out of its recess in the Surface.
-
Remove the antenna support.
-
-
Bu adım çevrilmemiş. Çevrilmesine yardım edin
-
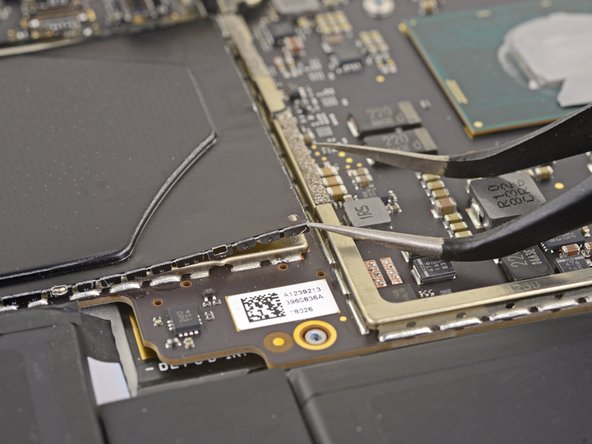
Insert one point of a pair of pointed tweezers into a gap in the corner of the EMI shield covering the heat sink.
-
Use the tweezers to pry the EMI shield away from the motherboard as much as you can without bending it. Do not remove it yet.
-
-
Bu adım çevrilmemiş. Çevrilmesine yardım edin
-
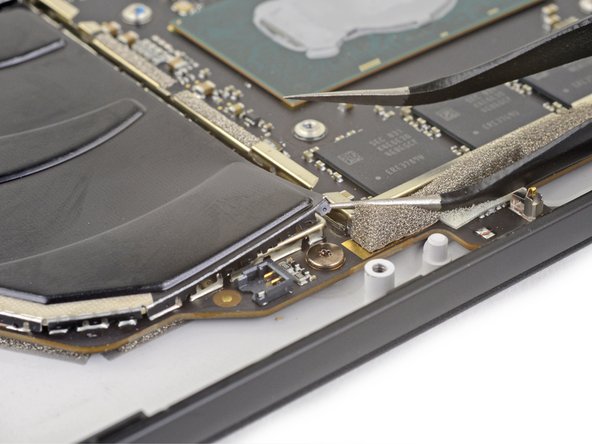
Repeat the last step for each corner of the EMI shield covering the heat sink.
-
-
Bu adım çevrilmemiş. Çevrilmesine yardım edin
-
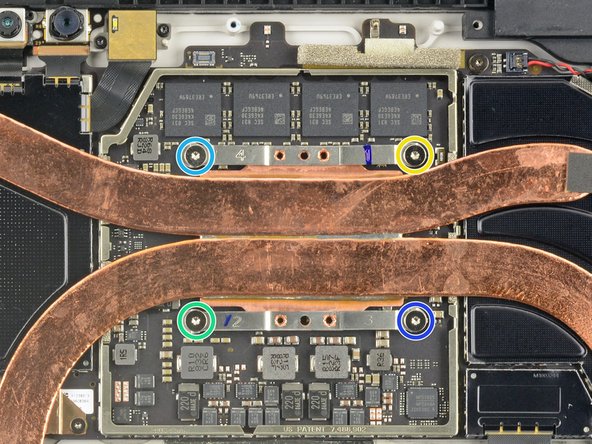
Remove the ten Torx screws securing the heat sink:
-
Five 2.6 mm-long T3 screws
-
Four 3.3 mm-long T5 screws
-
Screw 1
-
Screw 2
-
Screw 3
-
Screw 4
-
-
Bu adım çevrilmemiş. Çevrilmesine yardım edin
-
Use the flat end of a spudger to gently pry the heat sink straight up and off of the CPU.
-
-
Bu adım çevrilmemiş. Çevrilmesine yardım edin
-
Use the point of a spudger to lift the left speaker connector out of its socket on the motherboard.
-
-
Bu adım çevrilmemiş. Çevrilmesine yardım edin
-
Use the point of a spudger to flip up the small locking flap securing the volume and power button cable ZIF connector.
-
Slide the volume and power button cable straight out of its socket on the motherboard.
-
-
Bu adım çevrilmemiş. Çevrilmesine yardım edin
-
Use the point of a spudger to lift the right speaker connector out of its socket on the motherboard.
-
-
Bu adım çevrilmemiş. Çevrilmesine yardım edin
-
Use a T5 Torx driver to remove the two screws securing the right speaker:
-
One 6 mm screw
-
One 3.7 mm screw
-
-
Bu adım çevrilmemiş. Çevrilmesine yardım edin
-
Use a spudger to lift the left edge of the right speaker so that it clears the components around the speaker.
-
With the left edge lifted, slide the speaker to the left, straight out of its recess in the case.
-
-
Bu adım çevrilmemiş. Çevrilmesine yardım edin
-
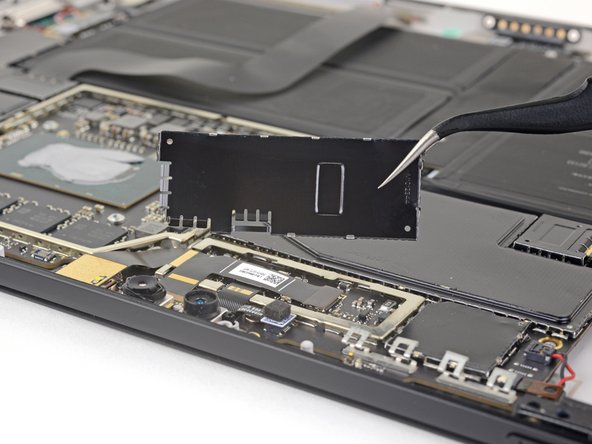
Insert one point of a pair of pointed tweezers into a gap in the corner of the EMI shield covering the camera connectors.
-
Use the tweezers to pry the EMI shield away from the motherboard as much as you can without bending it.
-
Repeat this procedure at different points around the shield until it is free. Remove the shield.
-
-
Bu adım çevrilmemiş. Çevrilmesine yardım edin
-
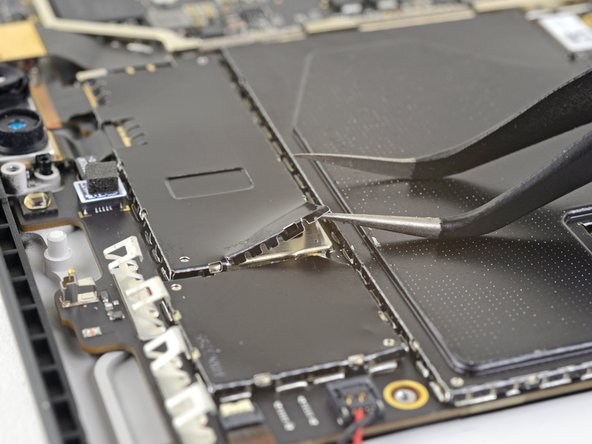
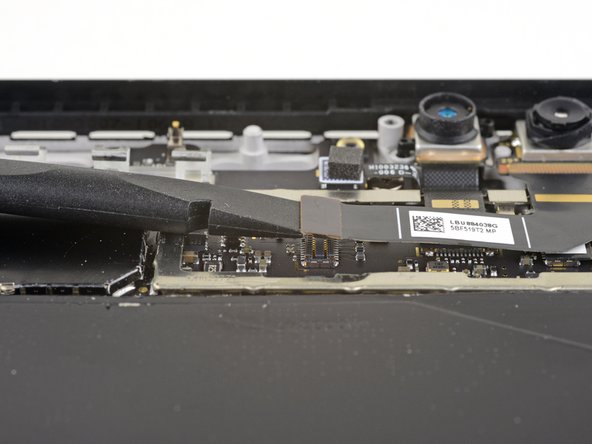
Use the flat end of a spudger to pry the front-facing camera connector up and out of its socket on the motherboard.
-
-
Bu adım çevrilmemiş. Çevrilmesine yardım edin
-
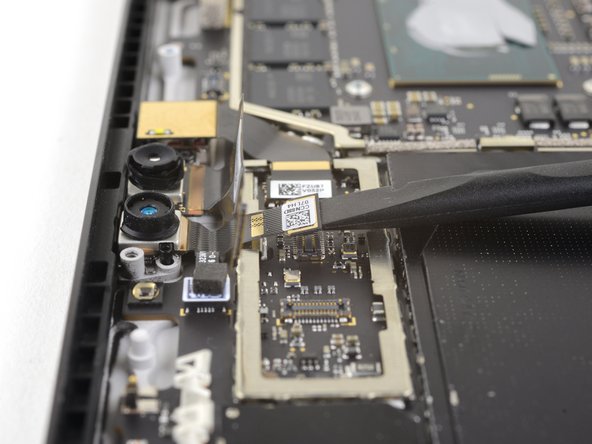
Use the flat end of a spudger to pry the face-detection camera connector up and out of its socket on the motherboard.
-
-
Bu adım çevrilmemiş. Çevrilmesine yardım edin
-
Use the flat end of a spudger to pry the rear-facing camera connector up and out of its socket on the motherboard.
-
-
Bu adım çevrilmemiş. Çevrilmesine yardım edin
-
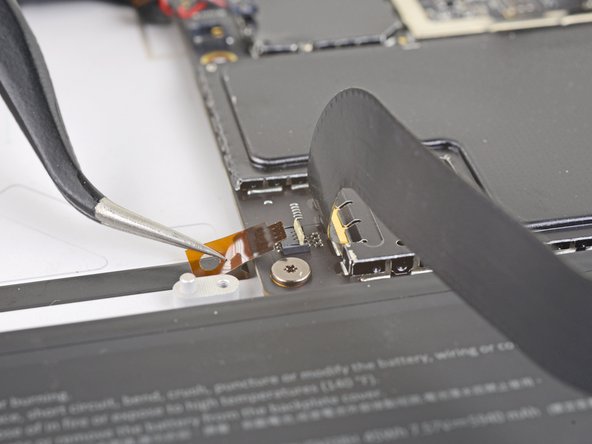
Use the flat end of a spudger to pry the microphone connector up and out of its socket on the motherboard.
-
-
Bu adım çevrilmemiş. Çevrilmesine yardım edin
-
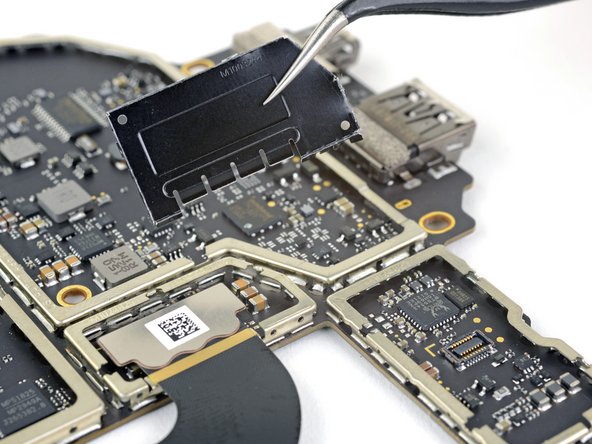
Insert one point of a pair of pointed tweezers into a gap in the corner of the EMI shield covering the microSD card reader connector.
-
Use the tweezers to pry the EMI shield away from the motherboard as much as you can without bending it.
-
Repeat this procedure at different points around the shield until it is free. Remove the shield.
-
-
Bu adım çevrilmemiş. Çevrilmesine yardım edin
-
Use the flat end of a spudger to pry the microSD card reader connector up and out of its socket on the motherboard.
-
-
Bu adım çevrilmemiş. Çevrilmesine yardım edin
-
Use the flat end of a spudger to lift the flap that sits over the SurfaceConnect port connector.
-
-
Bu adım çevrilmemiş. Çevrilmesine yardım edin
-
Slide the SurfaceConnect port connector out of its socket on the motherboard.
-
-
Bu adım çevrilmemiş. Çevrilmesine yardım edin
-
Use the point of a spudger to flip up the small locking flap securing the headphone jack cable ZIF connector.
-
Slide the headphone jack cable straight out of its socket on the motherboard.
-
-
Bu adım çevrilmemiş. Çevrilmesine yardım edin
-
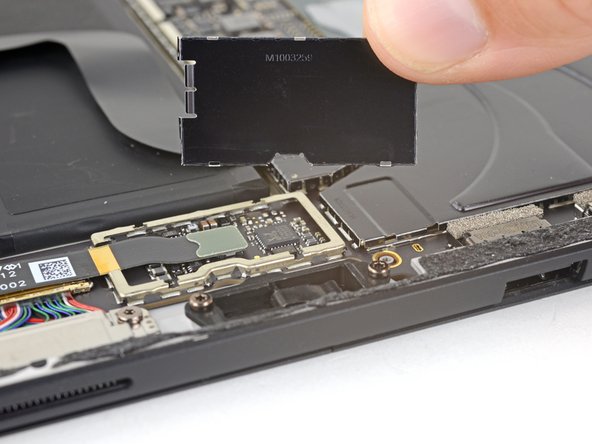
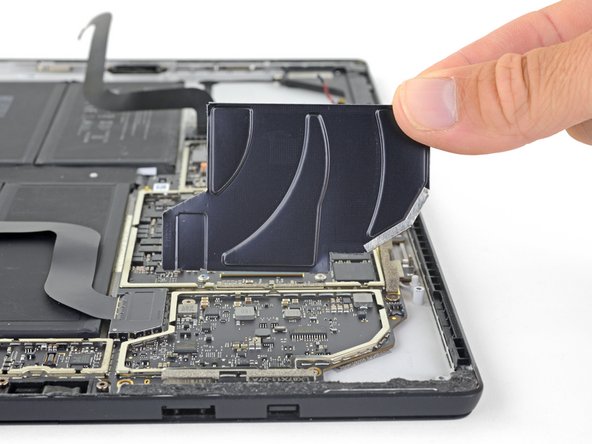
Insert one point of a pair of pointed tweezers into a gap in the corner of the left-most of the remaining large EMI shields.
-
Use the tweezers to pry the EMI shield away from the motherboard as much as you can without bending it.
-
Repeat this procedure at different points around the shield until it is free. Remove the shield.
-
-
Bu adım çevrilmemiş. Çevrilmesine yardım edin
-
Repeat the previous step to remove the remaining large EMI shield from the right side of the motherboard.
-
-
Bu adım çevrilmemiş. Çevrilmesine yardım edin
-
Use a T3 Torx driver to remove the eight 2.5 mm screws securing the motherboard.
-
-
Bu adım çevrilmemiş. Çevrilmesine yardım edin
-
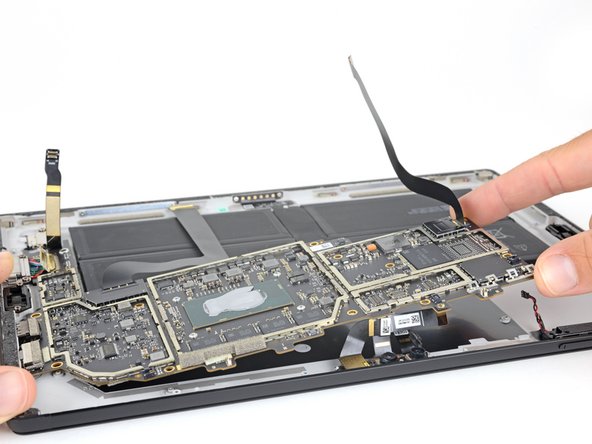
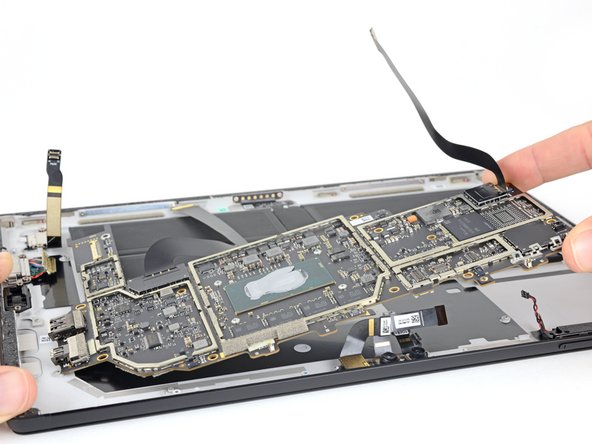
Lift the non-port-side of the motherboard up slightly, just enough so that it clears the components around it and the edge of the case.
-
Slide the motherboard away from the ports. Make sure the ports are completely out of their slots in the case before removing the motherboard.
-
Remove the motherboard.
-
-
Bu adım çevrilmemiş. Çevrilmesine yardım edin
-
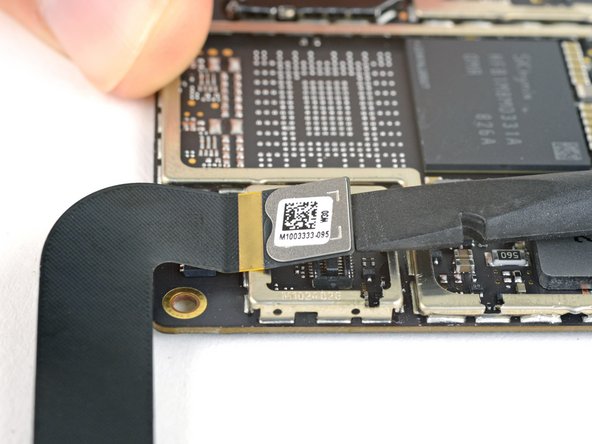
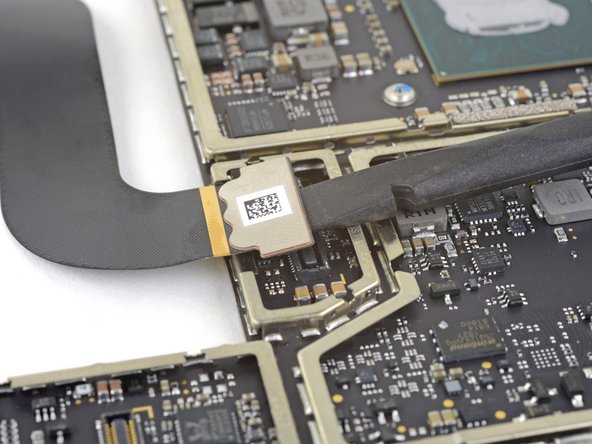
Insert one point of a pair of pointed tweezers into a gap in the corner of the EMI shield covering the display interconnect connector.
-
Use the tweezers to pry the EMI shield away from the motherboard as much as you can without bending it.
-
Repeat this procedure at different points around the shield until it is free. Remove the shield.
-
-
Bu adım çevrilmemiş. Çevrilmesine yardım edin
-
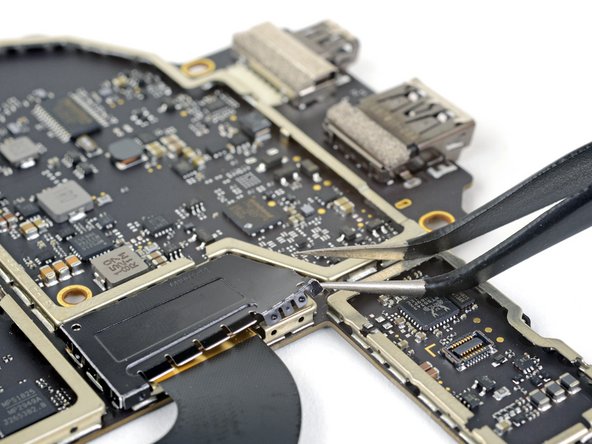
Use the flat end of a spudger to pry the display interconnect cable straight up and out of its socket on the motherboard.
-
-
Bu adım çevrilmemiş. Çevrilmesine yardım edin
-
Insert one point of a pair of pointed tweezers into a gap in the edge of the EMI shield covering the digitizer connector.
-
Use the tweezers to pry the EMI shield away from the display as much as you can without bending it.
-
Repeat this procedure at different points around the shield until it is free. Remove the shield.
-
-
Bu adım çevrilmemiş. Çevrilmesine yardım edin
-
Use the flat end of a spudger to pry the digitizer connector straight up and out of its socket on the motherboard.
-


İptal et: Bu kılavuzu tamamlamadım.
10 farklı kişi bu kılavuzu tamamladı.

Bir Yorum
Wonderful tutorial! So very glad I found it! Thank you for the through, step by step with Excellent, sequential photos of disassembly.
Thanks for taking the time to show this proceedure, it's a great service to those of us who wish to repair our own equipment ... even though Microsoft doesn't want us to be able to do so.
Excellent Tutorial!!