Ana içeriğe geç

Motherboard by why! Replace W253EU

Neye ihtiyacın var

  1. Motherboard by why! Replace W253EU, Battery from why! Remove W253EU: adım 1, 3 resimden 1. Motherboard by why! Replace W253EU, Battery from why! Remove W253EU: adım 1, 3 resimden 2. Motherboard by why! Replace W253EU, Battery from why! Remove W253EU: adım 1, 3 resimden 3.
    • Turn off the computer.

    • Before each operation it is important to start with the removal of the accumulator.

    • Take the slide unlocked into position, remove the battery.

  2. Motherboard by why! Replace W253EU, Access to RAM and CPU from why! W253EU: adım 2, 2 resimden 1. Motherboard by why! Replace W253EU, Access to RAM and CPU from why! W253EU: adım 2, 2 resimden 2.
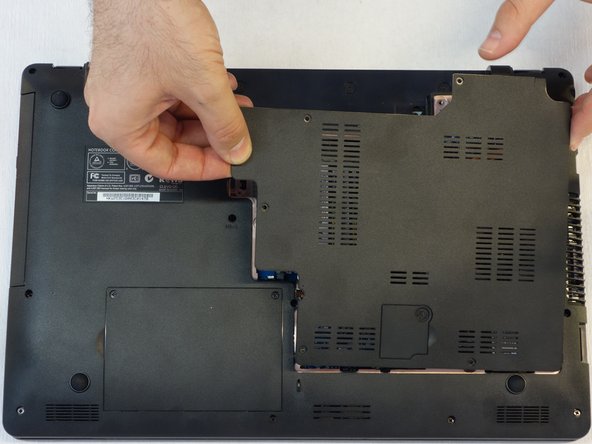
    • Using a Philips #1 screwdriver, unscrew the 5 screws securing the cover.

  3. Motherboard by why! Replace W253EU: adım 3, 3 resimden 1. Motherboard by why! Replace W253EU: adım 3, 3 resimden 2. Motherboard by why! Replace W253EU: adım 3, 3 resimden 3.
    • Push the screwdriver a few millimeters under the cover so that it can be touched with your fingers.

    • Now lift the cover carefully.

    • Attention! Disconnect the ventillator cable so that the cover can be completely removed (see next step).

  4. Motherboard by why! Replace W253EU: adım 4, 1 resimden 1.
    • Since the ventillator is mounted under the cover, its power supply cable must first be disconnected so that the cover can then be completely removed.

  5. Motherboard by why! Replace W253EU, CD / DVD RW drive: adım 5, 2 resimden 1. Motherboard by why! Replace W253EU, CD / DVD RW drive: adım 5, 2 resimden 2.
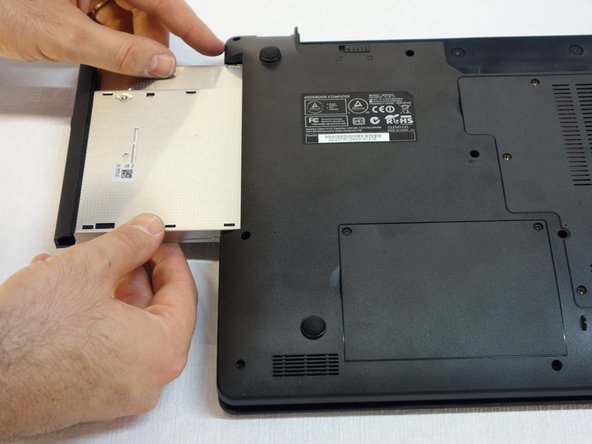
    • Use a Phillips # 1 screwdriver to screw that holds the CD / DVD drive in place.

  6. Motherboard by why! Replace W253EU: adım 6, 3 resimden 1. Motherboard by why! Replace W253EU: adım 6, 3 resimden 2. Motherboard by why! Replace W253EU: adım 6, 3 resimden 3.
    • Pull the CD / DVD drive carefully out

  7. Motherboard by why! Replace W253EU, Keyboard: adım 7, 3 resimden 1. Motherboard by why! Replace W253EU, Keyboard: adım 7, 3 resimden 2. Motherboard by why! Replace W253EU, Keyboard: adım 7, 3 resimden 3.
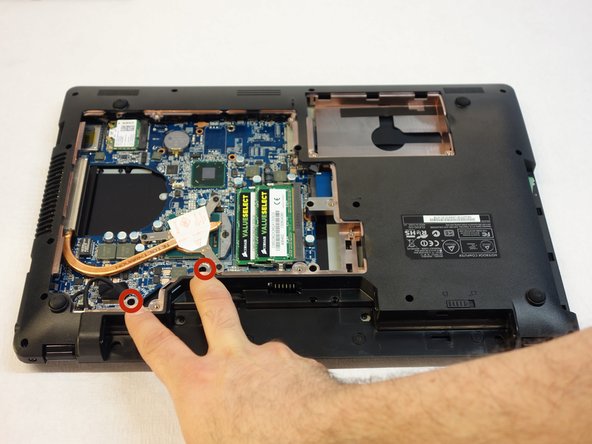
    • Use a Phillips # 1 screwdriver to remove the two screws located in the slot of the accumulator.

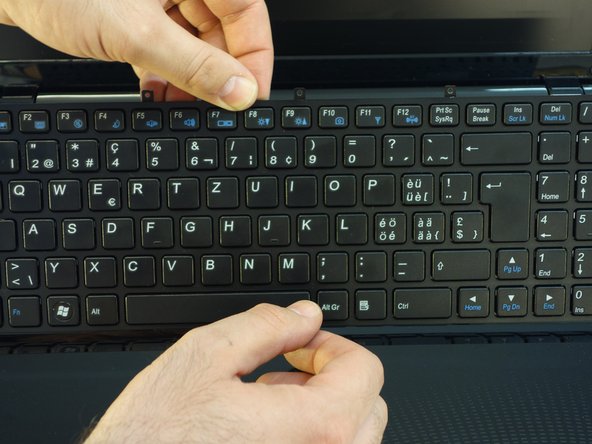
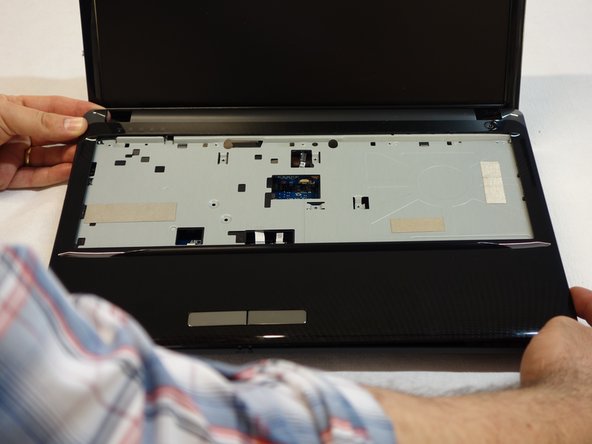
    • Insert a standard screwdriver into the slot in the cover above the keyboard.

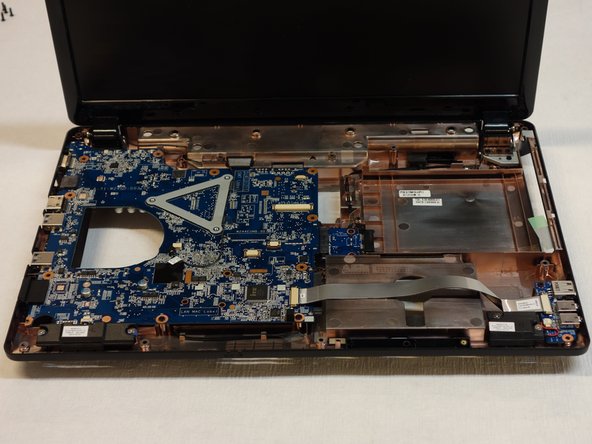
    • Lift the cover with the usual care.

  8. Motherboard by why! Replace W253EU: adım 8, 3 resimden 1. Motherboard by why! Replace W253EU: adım 8, 3 resimden 2. Motherboard by why! Replace W253EU: adım 8, 3 resimden 3.
    • Use a Phillips # 1 screwdriver to remove the four screws securing the keyboard in the upper part.

  9. Motherboard by why! Replace W253EU: adım 9, 2 resimden 1. Motherboard by why! Replace W253EU: adım 9, 2 resimden 2.
    • Turn the keyboard towards the screen.

    • Carefully remove the connection cable in the direction of the plug axis.

  10. Motherboard by why! Replace W253EU, motherboard: adım 10, 2 resimden 1. Motherboard by why! Replace W253EU, motherboard: adım 10, 2 resimden 2.
    • Disconnect plug A.

    • Disconnect plug B.

  11. Motherboard by why! Replace W253EU: adım 11, 3 resimden 1. Motherboard by why! Replace W253EU: adım 11, 3 resimden 2. Motherboard by why! Replace W253EU: adım 11, 3 resimden 3.
    • Using the Phillips # 1 screwdriver, remove the 16 screws that secure the cover.

  12. Motherboard by why! Replace W253EU: adım 12, 3 resimden 1. Motherboard by why! Replace W253EU: adım 12, 3 resimden 2. Motherboard by why! Replace W253EU: adım 12, 3 resimden 3.
    • Using a Phillips #1 screwdriver, remove all 16 screws that secure the entire cover.

  13. Motherboard by why! Replace W253EU: adım 13, 3 resimden 1. Motherboard by why! Replace W253EU: adım 13, 3 resimden 2. Motherboard by why! Replace W253EU: adım 13, 3 resimden 3.
    • Using a Phillips #1 screwdriver, remove all 16 screws that secure the entire cover.

  14. Motherboard by why! Replace W253EU: adım 14, 3 resimden 1. Motherboard by why! Replace W253EU: adım 14, 3 resimden 2. Motherboard by why! Replace W253EU: adım 14, 3 resimden 3.
    • Using a Phillips #1 screwdriver, remove all 16 screws that secure the entire cover.

  15. Motherboard by why! Replace W253EU: adım 15, 2 resimden 1. Motherboard by why! Replace W253EU: adım 15, 2 resimden 2.
    • Using a Phillips #1 screwdriver, remove the other screw located on the back.

    • Remove the connector for the touchpad.

  16. Motherboard by why! Replace W253EU: adım 16, 3 resimden 1. Motherboard by why! Replace W253EU: adım 16, 3 resimden 2. Motherboard by why! Replace W253EU: adım 16, 3 resimden 3.
    • To remove the keyboard frame, start with the upper part on the right. (Visual access to the clips through the opening of the CD/DVD drive) by inserting a small normal screwdriver or better a small guitar pick

    • Then continue with the lower part.

  17. Motherboard by why! Replace W253EU: adım 17, 3 resimden 1. Motherboard by why! Replace W253EU: adım 17, 3 resimden 2. Motherboard by why! Replace W253EU: adım 17, 3 resimden 3.
    • Proceed with the removal of the keyboard bezel in the clockwise direction.

    • Remove the keyboard frame and the motherboard appears.

  18. Motherboard by why! Replace W253EU: adım 18, 2 resimden 1. Motherboard by why! Replace W253EU: adım 18, 2 resimden 2.
    • Unplug the main connector.

    • Unplug the small connector in the middle.

  19. Motherboard by why! Replace W253EU: adım 19, 3 resimden 1. Motherboard by why! Replace W253EU: adım 19, 3 resimden 2. Motherboard by why! Replace W253EU: adım 19, 3 resimden 3.
    • Turn the computer over and unplug the connector near the processor (CPU).

    • Remove the other connector that is immediately to the right of it.

    • Using a Philips #1 screwdriver, remove the 2 mounting screws of the Wi-Fi chipset.

  20. Motherboard by why! Replace W253EU: adım 20, 3 resimden 1. Motherboard by why! Replace W253EU: adım 20, 3 resimden 2. Motherboard by why! Replace W253EU: adım 20, 3 resimden 3.
    • Unplug the plug that is positioned in the back

    • Disconnect the small connector that is right next to the first connector.

    • With a Philips #1 screwdriver, remove the screws outlined in red.

  21. Motherboard by why! Replace W253EU: adım 21, 3 resimden 1. Motherboard by why! Replace W253EU: adım 21, 3 resimden 2. Motherboard by why! Replace W253EU: adım 21, 3 resimden 3.
    • Using a Philips #1 screwdriver, remove the 10 mounting screws from the motherboard.

    • Disconnect the small connector that is located in the front.

    • With a Philips #1 screwdriver, remove the 2 screws that are crosswise and marked with blue circles.

    • Take out the motherboard.

Sonuç

For reassembly, follow the instructions in reverse order.

Bu çevirmenlere özel teşekkürler:

de en

100%

Bu çevirmenler dünyayı onarmamıza yardım ediyor! Katkıda bulunmak ister misiniz?
Çeviriye Başlayın ›

Felice Suglia

Üyelik tarihi: 06/15/13

30.884 İtibar

264 adet Kılavuz yazıldı

0 Yorum

Yorum Ekle

İstatistikleri Görüntüle:

Son 24 Saat: 0

Son 7 gün: 1

Son 30 gün: 7

Her zaman: 406