Ana içeriğe geç

Moto C Plus Daughterboard Replacement

Neye ihtiyacın var

  1. Moto C Plus Daughterboard Replacement, Back Cover: adım 1, 3 resimden 1. Moto C Plus Daughterboard Replacement, Back Cover: adım 1, 3 resimden 2. Moto C Plus Daughterboard Replacement, Back Cover: adım 1, 3 resimden 3.
    • Power off your phone before beginning disassembly.

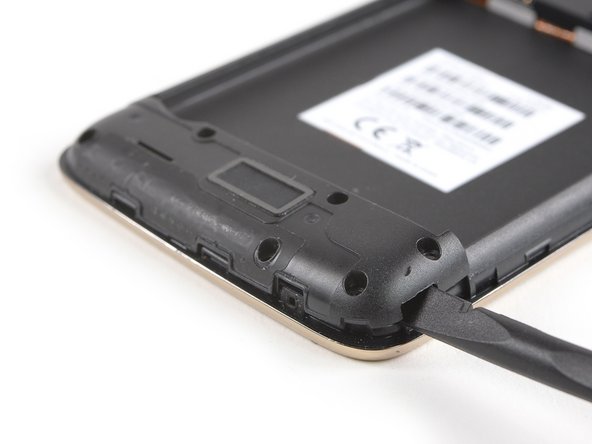
    • Insert a thumbnail, or spudger, into the notch on the bottom right to start separating the phone unit from the back cover.

    • Move to the bottom left corner and pry the phone unit out of the back cover until you can get a good grip.

  2. Moto C Plus Daughterboard Replacement: adım 2, 2 resimden 1. Moto C Plus Daughterboard Replacement: adım 2, 2 resimden 2.
    • Lift the phone out of the back cover.

  3. Moto C Plus Daughterboard Replacement, Battery: adım 3, 3 resimden 1. Moto C Plus Daughterboard Replacement, Battery: adım 3, 3 resimden 2. Moto C Plus Daughterboard Replacement, Battery: adım 3, 3 resimden 3.
    • Use a spudger or fingernail to lift the battery starting at the notch on the bottom left.

    • Lever the battery out of its recess and remove it.

  4. Moto C Plus Daughterboard Replacement, Daughterboard Cover: adım 4, 1 resimden 1.
    • Remove the six 3.1 mm Phillips #00 screws securing the daughterboard cover.

  5. Moto C Plus Daughterboard Replacement: adım 5, 3 resimden 1. Moto C Plus Daughterboard Replacement: adım 5, 3 resimden 2. Moto C Plus Daughterboard Replacement: adım 5, 3 resimden 3.
    • Apply a spudger to the right side of the daughterboard cover.

    • Twist the spudger sideways to pry up the daughterboard cover until you get a good grip.

    • Remove the daughterboard cover.

  6. Moto C Plus Daughterboard Replacement, Daughterboard: adım 6, 2 resimden 1. Moto C Plus Daughterboard Replacement, Daughterboard: adım 6, 2 resimden 2.
    • Disconnect the antenna cable and fold it out of the way.

  7. Moto C Plus Daughterboard Replacement: adım 7, 2 resimden 1. Moto C Plus Daughterboard Replacement: adım 7, 2 resimden 2.
    • Use the tip of a spudger to open the brown flap of the ZIF connector that holds the interconnect cable in its place.

    • When reassembling make sure the white line on the cable aligns with the closed flap.

  8. Moto C Plus Daughterboard Replacement: adım 8, 2 resimden 1. Moto C Plus Daughterboard Replacement: adım 8, 2 resimden 2.
    • Use a pair of tweezers to pull the interconnect flex cable out of the ZIF connector.

  9. Moto C Plus Daughterboard Replacement: adım 9, 1 resimden 1.
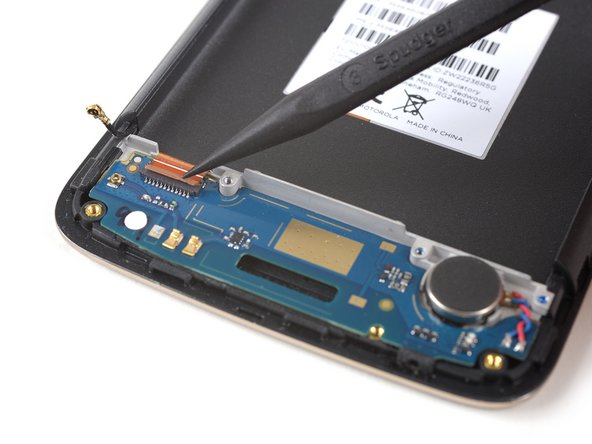
    • Prepare an iOpener and apply it to the bottom part of the display for at least two minutes to loosen the adhesive beneath the daughterboard.

  10. Moto C Plus Daughterboard Replacement: adım 10, 3 resimden 1. Moto C Plus Daughterboard Replacement: adım 10, 3 resimden 2. Moto C Plus Daughterboard Replacement: adım 10, 3 resimden 3.
    • Apply an opening pick to the bottom edge of the daughterboard.

    • Carefully slide the opening pick under the daughterboard to cut the adhesive underneath.

    • Take care to cut the adhesive underneath the vibration motor.

    • Slide the opening pick from right to left to cut all the adhesive.

  11. Moto C Plus Daughterboard Replacement: adım 11, 1 resimden 1.
    • Remove the daughterboard including the soldered-on vibration motor.

Sonuç

To reassemble your device, follow these instructions in reverse order.

Apply new adhesive where it’s necessary.

Bir başkası bu kılavuzu tamamladı.

Dominik Schnabelrauch

Üyelik tarihi: 11/23/16

204.166 İtibar

682 adet Kılavuz yazıldı

Ekip

iFixit iFixit üyesi

Staff

135 Üyeler

17.218 adet Kılavuz yazıldı

0 Yorum

Yorum Ekle

İstatistikleri Görüntüle:

Son 24 Saat: 2

Son 7 gün: 8

Son 30 gün: 12

Her zaman: 686