Giriş
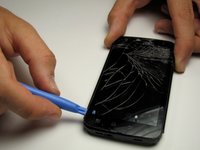
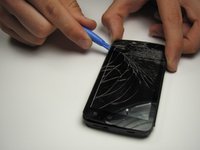
Use this guide to replace the screen of the Motorola Atrix 4G. To remove the screen you will first need to remove the battery, open the phone and remove the motherboard. Be ready to use a plastic opening tool, T5 Torx Screwdriver, spudger and head gun or hair dryer.
Neye ihtiyacın var
-
Bu adımda kullanılan alet:T5 Torx Screwdriver$5.49
-
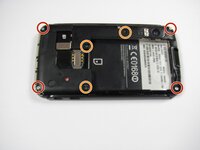
Remove the four 5.0 mm T5 Torx screws using a T5 Torx Screwdriver.
-
Remove the three 5.5 mm T5 Torx screws using a T5 Torx Screwdriver.
-
-
Bu adımda kullanılan alet:iFixit Opening Tool$1.99
-
Lift up the black rubber flap using an opening tool.
-
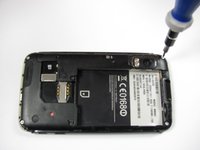
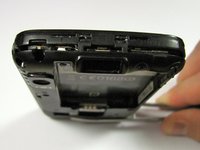
Remove the single 5.5 mm T5 Torx screw using a T5 Torx Screwdriver.
-
-
Bu adımda kullanılan alet:iFixit Opening Tool$1.99
-
Gently lift the tabs located at the top of the phone using an opening tool.
-
Gently lift the tab located at the bottom of the phone with the same tool.
-
-
Bu adımda kullanılan alet:iFixit Opening Tool$1.99
-
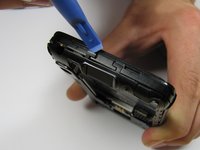
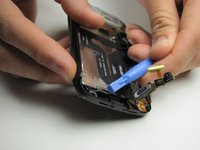
Insert an opening tool between the front and back of the case.
-
Slide the tool down the side of the phone.
-
Repeat the same process for the other side.
-
-
-
Bu adımda kullanılan alet:iFixit Opening Tool$1.99
-
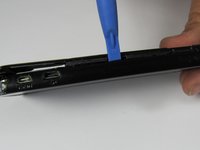
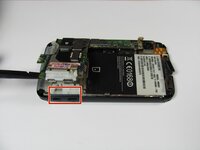
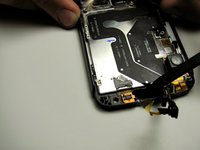
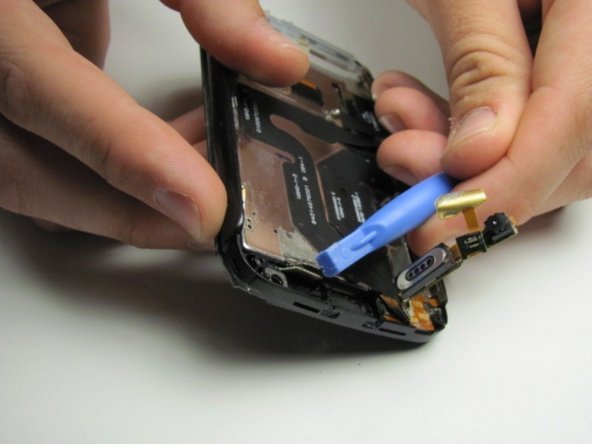
Slide an opening tool beneath the antenna and lift straight up from the motherboard.
-
-
Bu adımda kullanılan alet:Spudger$3.99
-
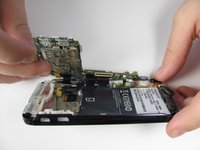
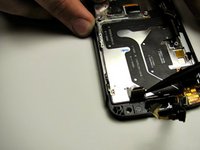
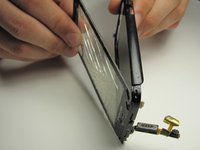
Insert a spudger between the black plastic and the motherboard.
-
Lift upwards with the spudger to dislodge the board.
-
-
-
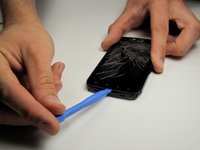
Using a heat gun or a hair dryer on high heat, soften the adhesive securing the glass screen.
-


To reassemble your device, follow these instructions in reverse order.
İptal et: Bu kılavuzu tamamlamadım.
14 farklı kişi bu kılavuzu tamamladı.
Ekip

Cal Poly, Team 9-42, Regan Spring 2012 Cal Poly, Team 9-42, Regan Spring 2012 üyesi
CPSU-REGAN-S12S9G42
6 Üyeler
15 adet Kılavuz yazıldı
4Kılavuz Yorumları
Caution! It is IMPOSSIBLE to insert the cable of the digitizer through the opening without REMOVING FIRST the screen (not the digitizer).
The two parts of the cable of the digitizer (connector + chip) are glued together when you remove the broken one, but in the replacement, if you glue together they don't pass trought the hole without removing the screen.
If someone has arrived to pass them without removing the screen, congratulations: I've broken the cable of a new screen in the process :(
I had to do this process twice, and here's what I've learned:
1) The motherboard does not need to be removed. I suspect this guide has you remove it so you don't damage any components when heating the screen, but there's no physical reason to remove it.
2) Yes, passing the digitizer cable/chip through the hole in the plastic housing is a royal PIA. I may have ruined the first screen I tried it with. Doh! For the second go round, instead of removing the LCD (like Hector recommends above), I just made the hole bigger. How, you ask? I took an emory nail file and trimmed it with scissors to be just narrower than the hole - then I filed away! With a few minutes of careful filing, I was able to double the size of the hole the cable has to pass through. Voila! There's still plenty of plastic left for the double-sided tape to be applied on the inside. Just be sure to clean up all the plastic dust first with a small vacuum or Q-tip before re-installing the screen.
tried this, broke first replacement digitizer screen , learned how to procede, Hector appears to be right if you remove the lcd screen it appears to double the size of the hole the cable passes through. what i would also like to see here are the following:
what material to use to "glue" the digitzer chip/connector together and in step 16 it shows the digitzer cable being removed from the metal it is attached to...how/what does one reattach it with?
Did anyone ever answer how to glue the flat cable (ground?) back on?