Giriş
The entirety of the Moto 360 is very fragile. Take extreme caution when using tools. You will have to use the iOpener, so be sure to review this guide for instruction if you are unfamiliar with using it.
Neye ihtiyacın var
-
-
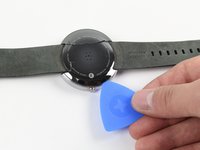
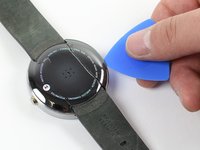
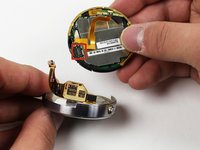
Set the watch face down on a flat surface.
-
Place the heated iOpener on the face of the rear cover to loosen the adhesive underneath.
-
-
-
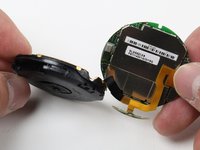
Follow the instructions here to remove the back cover without force by using some needles in the right places:
-
Then continue with step 5. Or don't use needles and just continue with the next steps.
-
-
-
-
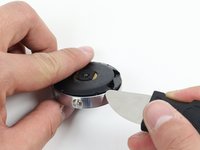
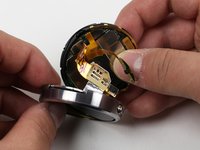
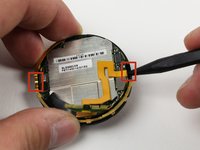
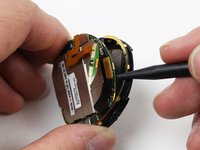
Detach the copper ribbon connecting the motherboard and the display.
-
For reassembly, attach copper ribbon where it is marked.
-


To reassemble your device, follow these instructions in reverse order.
To reassemble your device, follow these instructions in reverse order.
İptal et: Bu kılavuzu tamamlamadım.
73 farklı kişi bu kılavuzu tamamladı.
Ekip

Cal Poly, Team 17-32, Amido Winter 2015 Cal Poly, Team 17-32, Amido Winter 2015 üyesi
CPSU-AMIDO-W15S17G32
4 Üyeler
18 adet Kılavuz yazıldı
41Kılavuz Yorumları
Thanks for the guide. However I found several steps at least misleading, or not directly applicable to my Moto 360. I'm not sure if this is because the Moto 360 internal construction has varied over different production iterations.
The key difference is this guide implies that the inner body can simply be slid up and out of the metal shell with slow and careful prying. Actually, there are 4 curved plastic parts (call them locking pins) that fit corresponding slots in the metal shell and the plastic inner body at each side of the top and bottom clasp attachment points. Once inserted during manufacture, there is no way the body will ever slide up and out of the shell. I had to apply significant pressure to bend the shell out and pry the body out past the locking slots. However, it's possible that the locking pins could have been removed with tweezers permitting a less energetic disassembly of the watch.
Actually, there is a way to remove them. They are flat and tiny, near the watchbands' holes. To remove them, insert something (like a needle, or a toothpick) into the 4 carved out parts and their heads will pop out. Use a screwdriver or nail to gently peel it out. After that, hold the top and bottom (where the watchbands are), and pull the inner body up.
I made a video that includes removal of the retaining clips, a critical step missing from all the iFixIt Guides: https://youtu.be/r1as_h5jnBM
To answer Mike's question, the outside dimensions of the rectangular battery are 30mm x 28mm x ~2.6mm. However, that's not the full story, as the part of the battery module containing the electronics and where the wires attach is thinner than the rest, providing a space about 3mm wide along the narrow edge of the battery that sits above other components on the board.
My asseessment is that there may be space for a slightly larger battery if it was not rectangular, but this would require careful design and provide only marginal benefit.
could an ipod nano battery fit inside?