Ana içeriğe geç

Motorola Moto G4 Play Charging Port Replacement

Neye ihtiyacın var

  1. Motorola Moto G4 Play Charging Port Replacement, Battery: adım 1, 3 resimden 1. Motorola Moto G4 Play Charging Port Replacement, Battery: adım 1, 3 resimden 2. Motorola Moto G4 Play Charging Port Replacement, Battery: adım 1, 3 resimden 3.
    • Open case with a plastic opening tool that has the same size as the divot located at the bottom left of the phone. If you don’t have an opening tool, use your finger nails.

  2. Motorola Moto G4 Play Charging Port Replacement: adım 2, 3 resimden 1. Motorola Moto G4 Play Charging Port Replacement: adım 2, 3 resimden 2. Motorola Moto G4 Play Charging Port Replacement: adım 2, 3 resimden 3.
    • Lift the case by the nearest corner to the divot and remove it from the phone.

  3. Motorola Moto G4 Play Charging Port Replacement: adım 3, 3 resimden 1. Motorola Moto G4 Play Charging Port Replacement: adım 3, 3 resimden 2. Motorola Moto G4 Play Charging Port Replacement: adım 3, 3 resimden 3.
    • Place the plastic opening tool into the notch located at the bottom of the battery compartment, and lift upwards. If you don’t have an opening tool, use your finger nails.

    • Remove battery from your phone.

  4. Motorola Moto G4 Play Charging Port Replacement, Midframe: adım 4, 3 resimden 1. Motorola Moto G4 Play Charging Port Replacement, Midframe: adım 4, 3 resimden 2. Motorola Moto G4 Play Charging Port Replacement, Midframe: adım 4, 3 resimden 3.
    • Remove any SIM card and/or memory card present using your hand.

  5. Motorola Moto G4 Play Charging Port Replacement: adım 5, 2 resimden 1. Motorola Moto G4 Play Charging Port Replacement: adım 5, 2 resimden 2.
    • Remove the small silicon cover at the bottom right of the camera using tweezers.

  6. Motorola Moto G4 Play Charging Port Replacement: adım 6, 1 resimden 1.
    • Remove the sixteen (16) 3mm Phillips PH000 screws securing the midframe.

    • Some phones have two shorter screws, one on each side of the battery (double marked with orange circles at left). If your device has these shorter screws, make sure they go back in their original holes.

  7. Motorola Moto G4 Play Charging Port Replacement: adım 7, 3 resimden 1. Motorola Moto G4 Play Charging Port Replacement: adım 7, 3 resimden 2. Motorola Moto G4 Play Charging Port Replacement: adım 7, 3 resimden 3.
    • Remove the back panel assembly with your hands.

  8. Motorola Moto G4 Play Charging Port Replacement, Charging Port: adım 8, 2 resimden 1. Motorola Moto G4 Play Charging Port Replacement, Charging Port: adım 8, 2 resimden 2.
    • Use tweezers to pop up the antenna wire.

  9. Motorola Moto G4 Play Charging Port Replacement: adım 9, 2 resimden 1. Motorola Moto G4 Play Charging Port Replacement: adım 9, 2 resimden 2.
    • Use the flat end of a spudger to pry up on the connector at the bottom of the battery space.

  10. Motorola Moto G4 Play Charging Port Replacement: adım 10, 1 resimden 1.
    • Remove the two (2) 3mm Phillips PH000 screws securing the charging port.

  11. Motorola Moto G4 Play Charging Port Replacement: adım 11, 3 resimden 1. Motorola Moto G4 Play Charging Port Replacement: adım 11, 3 resimden 2. Motorola Moto G4 Play Charging Port Replacement: adım 11, 3 resimden 3.
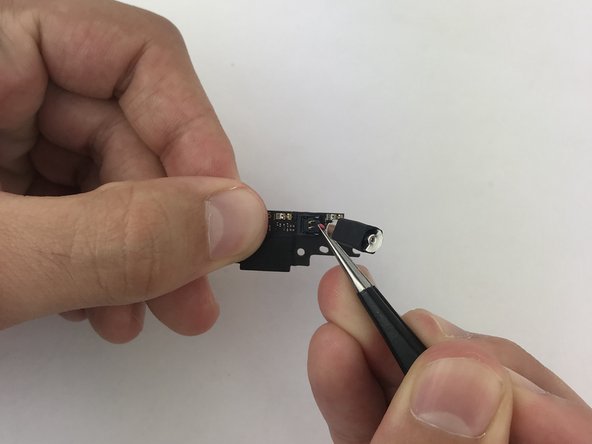
    • Insert the tweezers under the vibrator and gently lift up the whole part.

  12. Motorola Moto G4 Play Charging Port Replacement: adım 12, 3 resimden 1. Motorola Moto G4 Play Charging Port Replacement: adım 12, 3 resimden 2. Motorola Moto G4 Play Charging Port Replacement: adım 12, 3 resimden 3.
    • Pop up on the vibrator's connector to separate it from the charging port.

Sonuç

To reassemble your device, follow these instructions in reverse order.

12 farklı kişi bu kılavuzu tamamladı.

Francisco Hernández

Üyelik tarihi: 02/15/18

708 İtibar

2 adet Kılavuz yazıldı

Ekip

USF Tampa, Team S17-G4, Boczar Spring 2018 USF Tampa, Team S17-G4, Boczar Spring 2018 üyesi

USFT-BOCZAR-S18S17G4

4 Üyeler

11 adet Kılavuz yazıldı

2 Yorum

Excellent guide.

The hardest parts were getting the “small silicon cover” off and putting the vibrator's connector back in.

I highly recommend people to take a photos of their phone’s small details for later reference when you put it back together again.

Slippery Jim - Yanıt

The hardest part for me was removing some of the screws, not to mention finding the proper screwdriver (tip: look at your local hardware store before buying online). The battery connector was a pain too, you just need to press it fearlessly.

generalwatermelon38 - Yanıt

Yorum Ekle

İstatistikleri Görüntüle:

Son 24 Saat: 7

Son 7 gün: 13

Son 30 gün: 43

Her zaman: 5,663