Ana içeriğe geç
Onarım Topluluğuna Katılın - Hesap Oluşturun

Motorola Razr V3 Camera Replacement

Neye ihtiyacın var

Videoya Genel Bakış

    1. Motorola Razr V3 Camera Replacement, Battery: adım 1, 2 resimden 1. Motorola Razr V3 Camera Replacement, Battery: adım 1, 2 resimden 2.
      • Remove the back cover by pressing down the silver button.

      • Pull the cover away from the phone.

      FixBot'a Sor

      Yorum Ekle

    2. Motorola Razr V3 Camera Replacement: adım 2, 2 resimden 1. Motorola Razr V3 Camera Replacement: adım 2, 2 resimden 2.
      • Remove the battery by pushing down on the top and pulling it away from the phone.

      FixBot'a Sor

      Yorum Ekle

    1. Motorola Razr V3 Camera Replacement, Upper Casing: adım 3, 1 resimden 1.
      Bu adımda kullanılan alet:
      Tweezers
      $4.99
      • Use tweezers to pry off the four rubber screw covers from the inside face.

      • Our phone is missing the two left screw covers, be careful not to lose yours too!

      FixBot'a Sor

      Yorum Ekle

    2. Motorola Razr V3 Camera Replacement: adım 4, 1 resimden 1.
      • Remove the four T5 Torx screws that were underneath the rubber covers.

      FixBot'a Sor

      Yorum Ekle

    3. Motorola Razr V3 Camera Replacement: adım 5, 1 resimden 1.
      • Use the plastic opening tool to pry the top cover away from the phone.

      • The side buttons on the phone may fall out when the top cover is separated from the phone. They can easily be put back by placing them in their original spot.

      FixBot'a Sor

      Yorum Ekle

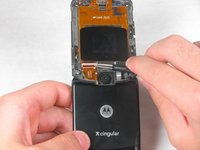
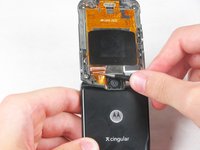
    1. Motorola Razr V3 Camera Replacement, Camera: adım 6, 2 resimden 1. Motorola Razr V3 Camera Replacement, Camera: adım 6, 2 resimden 2.
      Bu adımda kullanılan alet:
      Tweezers
      $4.99
      • Use tweezers to flip up the ZIF tab on the camera ribbon cable socket.

      • Gently pull the camera ribbon cable out of the ZIF socket.

      FixBot'a Sor

      Yorum Ekle

    2. Motorola Razr V3 Camera Replacement: adım 7, 1 resimden 1.
      • Using a pair of tweezers gently grab and remove the camera from the phone.

      FixBot'a Sor

      Yorum Ekle

Sonuç

To reassemble your device, follow these instructions in reverse order.

İptal et: Bu kılavuzu tamamlamadım.

2 farklı kişi bu kılavuzu tamamladı.

Christian

Üyelik tarihi: 04/18/13

281 İtibar

2 adet Kılavuz yazıldı

Ekip

Cal Poly, Team 3-46, Amido Spring 2013 Cal Poly, Team 3-46, Amido Spring 2013 üyesi

CPSU-AMIDO-S13S3G46

4 Üyeler

56 adet Kılavuz yazıldı

0Kılavuz Yorumları

Yorum Ekle

İstatistikleri Görüntüle:

Son 24 Saat: 1

Son 7 gün: 12

Son 30 gün: 43

Her zaman: 2,587