Ana içeriğe geç

NVIDIA GeForce GTX 970 GPU Replacement

Neye ihtiyacın var

  1. NVIDIA GeForce GTX 970 GPU Replacement, GPU: adım 1, 2 resimden 1. NVIDIA GeForce GTX 970 GPU Replacement, GPU: adım 1, 2 resimden 2.
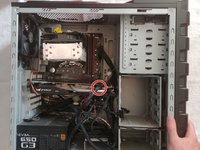
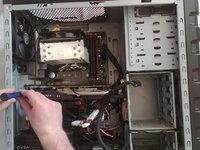
    • Unplug all the external cables from the computer and ensure that the power supply is switched off.

  2. NVIDIA GeForce GTX 970 GPU Replacement: adım 2, 2 resimden 1. NVIDIA GeForce GTX 970 GPU Replacement: adım 2, 2 resimden 2.
    • Remove the case side panel by applying pressure to the side and sliding the side panel toward the back of the case.

    • Some cases may have screws that must be removed or tabs that must be pressed before the siding will slide off.

  3. NVIDIA GeForce GTX 970 GPU Replacement: adım 3, 3 resimden 1. NVIDIA GeForce GTX 970 GPU Replacement: adım 3, 3 resimden 2. NVIDIA GeForce GTX 970 GPU Replacement: adım 3, 3 resimden 3.
    • Pinch the lock at the end of the GPU power cable and carefully disconnect it.

  4. NVIDIA GeForce GTX 970 GPU Replacement: adım 4, 3 resimden 1. NVIDIA GeForce GTX 970 GPU Replacement: adım 4, 3 resimden 2. NVIDIA GeForce GTX 970 GPU Replacement: adım 4, 3 resimden 3.
    • Remove the two Philips #1 mounting screws that attach the GPU to the inside of the case.

  5. NVIDIA GeForce GTX 970 GPU Replacement: adım 5, 3 resimden 1. NVIDIA GeForce GTX 970 GPU Replacement: adım 5, 3 resimden 2. NVIDIA GeForce GTX 970 GPU Replacement: adım 5, 3 resimden 3.
    • Press down the locking tab at the base of the GPU.

  6. NVIDIA GeForce GTX 970 GPU Replacement: adım 6, 1 resimden 1.
    • Remove the GPU from the case. If it does not move, check to make sure that steps 3-5 were properly performed.

  7. NVIDIA GeForce GTX 970 GPU Replacement: adım 7, 2 resimden 1. NVIDIA GeForce GTX 970 GPU Replacement: adım 7, 2 resimden 2.
    • When inserting a replacement GPU, ensure that the base is lined up properly with the appropriate slot on the motherboard.

    • Once the replacement GPU is lined up, press down until you hear a click or can see that the locking tab is flipped up again.

Sonuç

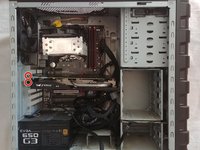
To finish reassembly, follow steps 2-4 in reverse order.

11 farklı kişi bu kılavuzu tamamladı.

Nicholas Eichman

Üyelik tarihi: 03/22/21

415 İtibar

1 Kılavuz yazıldı

Ekip

0 Yorum

Yorum Ekle

İstatistikleri Görüntüle:

Son 24 Saat: 3

Son 7 gün: 28

Son 30 gün: 96

Her zaman: 6,458