Neye ihtiyacın var
-
-
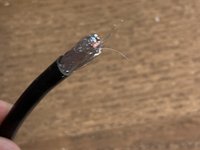
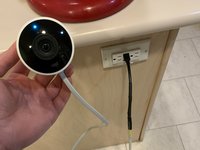
The Nest Outdoor Camera (not to be confused with the Nest IQ Outdoor Camera) gets power through a long USB cable that connects to a power adapter, which connects to an outlet. The USB connector is not as waterproof as advertised, and this one got wet, became corroded, and the camera stopped working.
-
-
-
Take a close look at the USB power adapter (which runs from the outlet to the USB hub) and the USB cable (which runs from the USB cable to the camera). Are they both corroded?
-
Google/Nest no longer supports or makes this product, so replacement power adapters are hard to find. Fortunately, this power adapter is functionally a phone charger cube, which converts wall power to 5V 1.4A USB power. It can be replaced by any comparable charging adapter that outputs 5V and 1.4+Amps in a female USB A port.
-
-
-
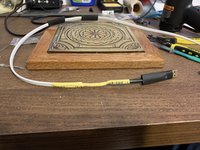
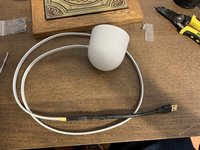
If you're removing the power adapter from the setup, your required cable length may change. Measure how far you need the power cable to run. When I did this, I added an outdoor USB outlet near where the camera would (re)mount, so I chose to make the cable significantly shorter.
-
Measure the camera USB cable (from the camera, not the USB) to your desired length. Give yourself a few extra inches in chase you cut the wires while striping.
-
-
-
Cut the camera cable at the desired length using wire cutters.
-
Carefully begin stripping the white sheathing. I found that a careful incision with an Xacto knife along the length of the sheathing helpful to get started. Use scissors or wire cutters to remove excess insulation once pulled off the wires.
-
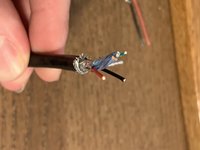
I stripped the wire ~2 inches (which is longer than shown in this photo).
-
You should see a red wire, a black wire, and two other wires bundled in an additional sheath. There may also be loose wire mesh around the wires, which you can pull away and cut off.
-
-
-
Figure out what length of new USB cable you want and cut it to that length. Leave a few extra inches in case you cut the wires while striping
-
-
-
-
Carefully strip 1-2in of the outer plastic from the USB cable. You'll likely see some wire mesh and/or foil. Peel those away.
-
-
-
Sorry - I stopped taking photos at this point.
-
Carefully strip ~1inch off the red wire on the camera and the USB cable. They will probably be stranded core (made of lots of smaller wires). Twist each wire to make the stranded core more solid.
-
-
-
It's very easy to forget this step when splicing. Slide several heat shrink wrap tubes over the prepped wires. You'll want a small one on the red wire and black wire and several much larger ones on the camera cable for putting it all together later.
-
Heat shrink wrap tubing is cheap - you're better off having an extra tube on the wire that you don't need (and can carefully cut off later) than being one short and having exposed wires.
-
-
-
There are lots of good tutorials online on soldering and splicing wires.
-
Using your favorite method, splice the red wires together. Solder them well.
-
-
-
Slide your heat shrink tubing from further down the red wires until it covers the spliced connection. Use a heat gun to shrink the tubing into place.
-
Be careful not to shrink the tubing around the black wires or the camera cable.
-
-
-
Same exact steps here with the black wires. It doesn't matter which color wire you do first - I have them listed as separate steps to limit potential mixups.
-
There will likely be other wires in both USB cables. They're not needed for power and can be ignored.
-
-
-
Now you're done with soldering.
-
Slide your heat shrink tubes from the camera cable down to the red and black spliced wires. Use the heat gun to shrink the tubes into place. You may need multiple tubes.
-
-
-
If all went well, you're now done!
-
Plug the camera into it's power adapter (or a comparable USB power supply). If the blue light turns on, it works!
-


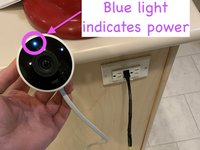
Great work! Plug the new USB cable into the power adapter (or a comparable USB power supply) and wait a moment for the camera to turn on. If it works, you’ll see a blue light and then a green light. Use the Nest app to setup the camera, if necessary.
İptal et: Bu kılavuzu tamamlamadım.
3 farklı kişi bu kılavuzu tamamladı.
3Kılavuz Yorumları
My dog chewed through the power cable about 2 inches above the plug. I bought them in 2017 so I don’t think I can just buy a new cord and make it work. Is it a total loss at this point?
I purchased the recommended USB cable and power supply. Followed the steps, plugged it in and the camera does not turn on. I wondering if the corrosion from the moisture (my USB connector and power supply looked exactly like your photo) shorted out the electronics in the camera altogether. I have no way to really know this unless you have any other suggestions.
My outdoor nest cam shorted out as well. However, my issue was not the USB connection but the power adapter.
Once I cleaned up the superficial corrosion and test it with an indoor USB connection the camera side worked.
However, the adapter was fried, I have been searching for an outdoor adapter and unfortunately no success so far. The worst part is that nest has stopped supporting or making this adapter.
I find it ridiculous that nest sold us a product that once it breaks there is no way to replace it. Unless you decide to buy the updated unit.
I really don't mind them trying to sell new product but for those of us who are industrious and can find work around they should be able to get the required part to keep out product functioning.