Ana içeriğe geç

Nikon COOLPIX P7700 Back Casing Replacement

Neye ihtiyacın var

  1. Nikon COOLPIX P7700 Back Casing Replacement, Back Casing: adım 1, 2 resimden 1. Nikon COOLPIX P7700 Back Casing Replacement, Back Casing: adım 1, 2 resimden 2.
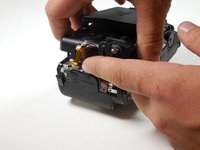
    • Turn camera to the left side and remove the two 4.3 mm black side screws using the Phillips #00 screwdriver.

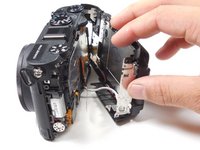
    • Remove the side panel.

  2. Nikon COOLPIX P7700 Back Casing Replacement: adım 2, 1 resimden 1.
    • Open the touch screen, and remove the three 4.3 mm black screws inside using the Phillips #00 screwdriver.

  3. Nikon COOLPIX P7700 Back Casing Replacement: adım 3, 1 resimden 1.
    • Remove the 4.3 mm black screw on top of the camera, right above where the screen folds out. Use the Phillips #00 screwdriver.

  4. Nikon COOLPIX P7700 Back Casing Replacement: adım 4, 1 resimden 1.
    • Remove the two 4.3 mm black screws on the right side of the camera using the Phillips #00 screwdriver.

  5. Nikon COOLPIX P7700 Back Casing Replacement: adım 5, 1 resimden 1.
    • Remove the 4.3 mm black screws on the bottom of the camera using the Phillips #00 screwdriver.

  6. Nikon COOLPIX P7700 Back Casing Replacement: adım 6, 2 resimden 1. Nikon COOLPIX P7700 Back Casing Replacement: adım 6, 2 resimden 2.
    • Begin separating the camera into two parts.

    • It is okay to remove the orange ribbon. This will be easily put back into place when re-assembling.

  7. Nikon COOLPIX P7700 Back Casing Replacement: adım 7, 1 resimden 1.
    • Remove the back casing.

Sonuç

To reassemble your device, follow these instructions in reverse order.

2 farklı kişi bu kılavuzu tamamladı.

Dustin Wahl

Üyelik tarihi: 03/11/15

775 İtibar

4 adet Kılavuz yazıldı

Ekip

Colorado Springs, Team 2-7, Panko Spring 2015 Colorado Springs, Team 2-7, Panko Spring 2015 üyesi

UCCS-PANKO-S15S2G7

3 Üyeler

10 adet Kılavuz yazıldı

0 Yorum

Yorum Ekle

İstatistikleri Görüntüle:

Son 24 Saat: 1

Son 7 gün: 1

Son 30 gün: 7

Her zaman: 1,771