Ana içeriğe geç

Nikon COOLPIX S9500 Lens Replacement

Neye ihtiyacın var

  1. Nikon COOLPIX S9500 Lens Replacement, Removing Screws: adım 1, 1 resimden 1.
    • Remove the three 4 mm screws from the bottom of the camera using a #00 Phillips screwdriver.

    • Remove the single 3.5 mm screw from the bottom of the camera using a #00 Phillips screwdriver.

  2. Nikon COOLPIX S9500 Lens Replacement: adım 2, 2 resimden 1. Nikon COOLPIX S9500 Lens Replacement: adım 2, 2 resimden 2.
    • With the bottom of the camera facing you, slide the latch on the compartment to the left.

    • Swing the battery compartment door open.

    • Remove the 3.5 mm screw from the inside with a #00 Phillips screwdriver.

  3. Nikon COOLPIX S9500 Lens Replacement: adım 3, 1 resimden 1.
    • With the screen facing you, locate the two 3.5 mm screws on the left face of the camera. Remove them using a #00 Phillips screwdriver.

  4. Nikon COOLPIX S9500 Lens Replacement: adım 4, 1 resimden 1.
    • With the screen facing you, locate the three 3.5 mm screws on the right face of the camera. Remove them with a #00 Phillips screwdriver.

    • Two of the screws are located under the port tabs.

  5. Nikon COOLPIX S9500 Lens Replacement: adım 5, 2 resimden 1. Nikon COOLPIX S9500 Lens Replacement: adım 5, 2 resimden 2.
    • Locate the crease where the case comes together.

    • Using a plastic prying tool, pry at the line to remove the camera case.

    • It may take several attempts to remove the case. Remember to pry at all the crease locations on the camera, and not just one spot.

  6. Nikon COOLPIX S9500 Lens Replacement, Navigation Panel Removal: adım 6, 3 resimden 1. Nikon COOLPIX S9500 Lens Replacement, Navigation Panel Removal: adım 6, 3 resimden 2. Nikon COOLPIX S9500 Lens Replacement, Navigation Panel Removal: adım 6, 3 resimden 3.
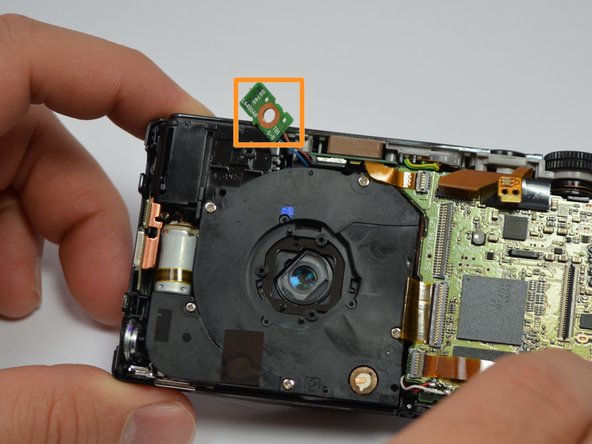
    • Slide the yellow navigation panel to the right so that it can be lifted up.

    • It may take a little pressure to get the panel to separate.

    • Be careful not to damage the ribbon cable that is still attached to the camera.

  7. Nikon COOLPIX S9500 Lens Replacement: adım 7, 1 resimden 1.
    • Remove the three 4 mm screws with a #00 Phillips screwdriver.

  8. Nikon COOLPIX S9500 Lens Replacement: adım 8, 1 resimden 1.
    • Locate the magnet and copper tape on the left side of the camera.

    • Gently pull the copper tape off of the metal plate.

    • The copper tape is attached with some glue, so a little force will be needed to detach it.

  9. Nikon COOLPIX S9500 Lens Replacement: adım 9, 3 resimden 1. Nikon COOLPIX S9500 Lens Replacement: adım 9, 3 resimden 2. Nikon COOLPIX S9500 Lens Replacement: adım 9, 3 resimden 3.
    • Lift the screen up and swing it to the right, exposing the circuit board underneath.

    • The navigation panel should still be attached to the circuit board with a ribbon cable as indicated in red.

    • Detach the ribbon cable that is connecting the LCD screen and the circuit board.

  10. Nikon COOLPIX S9500 Lens Replacement, Lens: adım 10, 1 resimden 1.
    • Remove the three 4 mm screws using a #00 Phillips screwdriver.

  11. Nikon COOLPIX S9500 Lens Replacement: adım 11, 2 resimden 1. Nikon COOLPIX S9500 Lens Replacement: adım 11, 2 resimden 2.
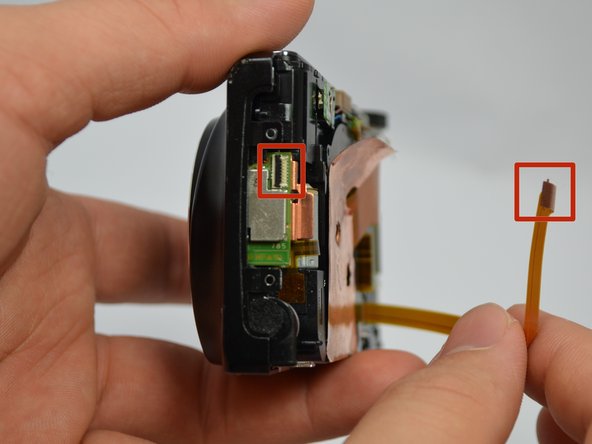
    • Disconnect the ribbon cable from the left side of the camera.

    • You can do this by lifting the small black strip with your nail and rotating it 60 degrees on top of the connector. These connectors are fragile so don't use to much force. Now you can easily take the flat cable out (same for the other connectors).

  12. Nikon COOLPIX S9500 Lens Replacement: adım 12, 1 resimden 1.
    • Using tweezers, remove the lens cover from the lens.

    • Be sure not to damage this delicate piece.

  13. Nikon COOLPIX S9500 Lens Replacement: adım 13, 2 resimden 1. Nikon COOLPIX S9500 Lens Replacement: adım 13, 2 resimden 2.
    • Remove the 3.5 mm screw holding down the Wi-Fi card.

    • Move the Wi-Fi card away from the device.

    • The Wi-Fi card is not actually detached yet. Be careful not to damage the wires.

  14. Nikon COOLPIX S9500 Lens Replacement: adım 14, 2 resimden 1. Nikon COOLPIX S9500 Lens Replacement: adım 14, 2 resimden 2.
    • Using your fingers, push the lens from the front of the camera to loosen it.

    • Lift the lens unit from the other side so it is free from the case.

    • The lens unit is still connected by a ribbon cable.

  15. Nikon COOLPIX S9500 Lens Replacement: adım 15, 1 resimden 1.
    • Detach the ribbon cable connecting the lens unit and circuit board.

  16. Nikon COOLPIX S9500 Lens Replacement: adım 16, 1 resimden 1.
    • The lens can now be removed from the camera.

Sonuç

To reassemble your device, follow these instructions in reverse order.

14 farklı kişi bu kılavuzu tamamladı.

Jim Bui

Üyelik tarihi: 01/20/15

811 İtibar

6 adet Kılavuz yazıldı

Ekip

USF Tampa, Team 1-4, Blackwell Winter 2015 USF Tampa, Team 1-4, Blackwell Winter 2015 üyesi

USFT-BLACKWELL-W15S1G4

4 Üyeler

12 adet Kılavuz yazıldı

3 Yorum

So, does this mean that one the camera is put back together the lens open automatically again?

pattimetalika - Yanıt

Ja, das ist so.

Lothar L. -

Hallo,

bereits das dritte mal habe ich ein Objektiv bei der S9500 ausgebaut und ein Ersatz eingebaut, jedesmal geht die Kamera nicht mehr an.

Was kann das nur sein? Einen Akku Türschalter hat diese Kamera ja nicht.

Habe schon hunderte Nikons zerlegt, passiert mir nur bei dieser Type, da muss doch was verstecktes eingebaut sein?

Lothar L. - Yanıt

Yorum Ekle

İstatistikleri Görüntüle:

Son 24 Saat: 3

Son 7 gün: 10

Son 30 gün: 46

Her zaman: 7,127