Ana içeriğe geç

Nikon Coolpix AW130 Front Panel Replacement

Neye ihtiyacın var

  1. Nikon Coolpix AW130 Front Panel Replacement, Battery: adım 1, 2 resimden 1. Nikon Coolpix AW130 Front Panel Replacement, Battery: adım 1, 2 resimden 2.
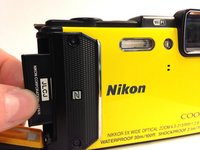
    • Using your thumb and pointer finger, open the card/battery hatch by pressing the center button of the wheel and turning the entire wheel to the left.

    • When reassembling, you must turn this wheel to the right until it clicks.

  2. Nikon Coolpix AW130 Front Panel Replacement: adım 2, 2 resimden 1. Nikon Coolpix AW130 Front Panel Replacement: adım 2, 2 resimden 2.
    • You should feel the door begin to loosen. Carefully pull the hatch open.

  3. Nikon Coolpix AW130 Front Panel Replacement: adım 3, 1 resimden 1.
    • Push the yellow battery/charger compartment tab up using your thumb nail.

  4. Nikon Coolpix AW130 Front Panel Replacement: adım 4, 2 resimden 1. Nikon Coolpix AW130 Front Panel Replacement: adım 4, 2 resimden 2.
    • After pressing the yellow tab, the battery should loosen.

    • Slowly pull the battery completely out.

  5. Nikon Coolpix AW130 Front Panel Replacement, Front Panel: adım 5, 2 resimden 1. Nikon Coolpix AW130 Front Panel Replacement, Front Panel: adım 5, 2 resimden 2.
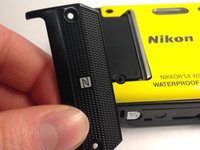
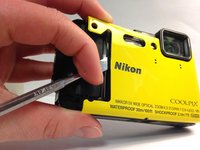
    • Using the T4 Torx Screwdriver, remove the 2, 4mm screws holding the N-Mark plate in place.

    • Carefully pull the plate off of the face.

  6. Nikon Coolpix AW130 Front Panel Replacement: adım 6, 2 resimden 1. Nikon Coolpix AW130 Front Panel Replacement: adım 6, 2 resimden 2.
    • Using the metal spudger tool, pry the colored face from the camera body.

    • Avoid bending or scratching the front face.

Sonuç

To reassemble your device, follow these instructions in reverse order.

6 farklı kişi bu kılavuzu tamamladı.

Bir Yorum

Hello, has this front panel influence on cameras sealing function? Or is it only as shield against mechanical demage?

Slavomir - Yanıt

Yorum Ekle

İstatistikleri Görüntüle:

Son 24 Saat: 2

Son 7 gün: 4

Son 30 gün: 7

Her zaman: 1,435