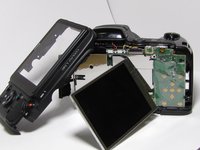
Ana içeriğe geç

Nikon Coolpix L340 LCD Screen Replacement

Neye ihtiyacın var

  1. Nikon Coolpix L340 LCD Screen Replacement, LCD Screen: adım 1, 3 resimden 1. Nikon Coolpix L340 LCD Screen Replacement, LCD Screen: adım 1, 3 resimden 2. Nikon Coolpix L340 LCD Screen Replacement, LCD Screen: adım 1, 3 resimden 3.
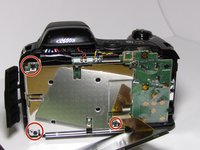
    • Remove two 5 mm Philips #000 screws on the left hand side of the camera located on the side where the batteries are inserted.

    • Remove two 5 mm Philips #000 screws on the bottom of the camera.

    • Remove two 5 mm Philips #000 screws on the left hand side of the camera located near the power button.

  2. Nikon Coolpix L340 LCD Screen Replacement: adım 2, 3 resimden 1. Nikon Coolpix L340 LCD Screen Replacement: adım 2, 3 resimden 2. Nikon Coolpix L340 LCD Screen Replacement: adım 2, 3 resimden 3.
    • After removing all six screws, you should be able to remove the plastic cover that holds the buttons and keeps the LCD screen in place.

    • Once you remove the back cover you should be able to access the bracket piece that holds the LCD screen.

    • Notice that the LCD screen is connected to the motherboard via a very fragile circuit piece, be very care removing the old and attaching the new LCD screen so that nothing else gets broken.

  3. Nikon Coolpix L340 LCD Screen Replacement: adım 3, 2 resimden 1. Nikon Coolpix L340 LCD Screen Replacement: adım 3, 2 resimden 2.
    • In order to get to the motherboard to disconnect the old LCD screen, you need to remove three 5 mm Phillips #000 screws that connect the bracket piece to the motherboard.

  4. Nikon Coolpix L340 LCD Screen Replacement: adım 4, 2 resimden 1. Nikon Coolpix L340 LCD Screen Replacement: adım 4, 2 resimden 2.
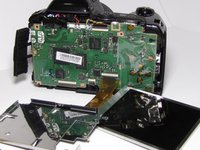
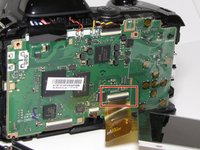
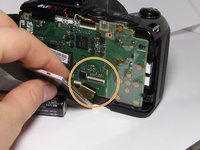
    • To remove the old LCD screen from the motherboard, there is an off-white ribbon on the motherboard that, the thin black ZIF (Zero Insertion Force) connector that needs to be lifted up so that the circuit piece connected to the LCD screen can be pulled out.

    • Using tweezers or fingers gently disconnect the LCD screen.

Sonuç

To reassemble your device, follow these instructions in reverse order.

Bir başkası bu kılavuzu tamamladı.

Joseph Harrington

Üyelik tarihi: 03/04/16

143 İtibar

1 Kılavuz yazıldı

Ekip

UMass Dartmouth, Team 3-3, Bhusal Spring 2016 UMass Dartmouth, Team 3-3, Bhusal Spring 2016 üyesi

UMASSD-BHUSAL-S16S3G3

4 Üyeler

8 adet Kılavuz yazıldı

2 Yorum

Is there a plastic cover as part of the rear cover on the L340? Trying to determine what exactly is cracked

megblackwell - Yanıt

Very helpful. Thanks

Haibin Zheng - Yanıt

Yorum Ekle

İstatistikleri Görüntüle:

Son 24 Saat: 0

Son 7 gün: 1

Son 30 gün: 13

Her zaman: 2,365