Ana içeriğe geç

Nikon Coolpix L610 Plastic Cover Replacement

Neye ihtiyacın var

  1. Nikon Coolpix L610 Plastic Cover Replacement, Plastic Cover: adım 1, 2 resimden 1. Nikon Coolpix L610 Plastic Cover Replacement, Plastic Cover: adım 1, 2 resimden 2.
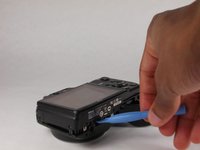
    • Remove the four (3.20 mm) Phillips #00 screws at the bottom of the device.

  2. Nikon Coolpix L610 Plastic Cover Replacement: adım 2, 1 resimden 1.
    • Remove the top (4.10 mm) Phillips #00 screw adjacent to the battery compartment.

    • Remove the bottom (3.20 mm) Phillips #00 screw adjacent to the battery compartment.

  3. Nikon Coolpix L610 Plastic Cover Replacement: adım 3, 1 resimden 1.
    • Remove the top (4.20 mm) Phillips #00 screw adjacent to the mic side of the camera and opposite the battery side.

    • Remove the lower (3.20 mm) Phillips #00 screw adjacent to the mic side of the camera and opposite of the battery side.

  4. Nikon Coolpix L610 Plastic Cover Replacement: adım 4, 3 resimden 1. Nikon Coolpix L610 Plastic Cover Replacement: adım 4, 3 resimden 2. Nikon Coolpix L610 Plastic Cover Replacement: adım 4, 3 resimden 3.
    • Separate the case using the plastic prying tool. This can be done by placing the tool in the position that is shown and in the position on the left side of the camera.

Sonuç

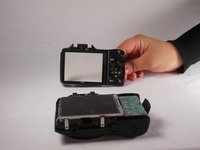
To reassemble your device, follow these instructions in reverse order.

Bir başkası bu kılavuzu tamamladı.

Jeremy

Üyelik tarihi: 01/21/15

1.027 İtibar

5 adet Kılavuz yazıldı

Ekip

USF Tampa, Team 9-4, Brown Winter 2015 USF Tampa, Team 9-4, Brown Winter 2015 üyesi

USFT-BROWN-W15S9G4

4 Üyeler

12 adet Kılavuz yazıldı

Bir Yorum

getting the front and back covers off is less than half the procedure. now you have to get at the pin that that holds the battery cover in place. next the battery cover has a metal contact strip with 2 more screws. but behind that there is a release button and a very small spring that has to be transfered to the new battery cover. then the pin that holds cover needs to put in place. after cleaning the screens. then put on the covers front and back. carefull to use the correct screws in hte right holes. suggest doing work over a white piece of paper. having a well lite area. using a magnofy glass is helpful. als having a magnet and tweezers availble. 1st time be prepared to take well over an hour.

CHRIS MITCHELL - Yanıt

Yorum Ekle

İstatistikleri Görüntüle:

Son 24 Saat: 0

Son 7 gün: 4

Son 30 gün: 16

Her zaman: 1,757