Ana içeriğe geç

Nikon Coolpix S230 LCD Screen Replacement

Neye ihtiyacın var

  1. Nikon Coolpix S230 LCD Screen Replacement, LCD Screen: adım 1, 3 resimden 1. Nikon Coolpix S230 LCD Screen Replacement, LCD Screen: adım 1, 3 resimden 2. Nikon Coolpix S230 LCD Screen Replacement, LCD Screen: adım 1, 3 resimden 3.
    • Ensure the camera is turned off and the battery is removed.

    • Using a Phillips #000 screwdriver, remove the four 2-mm screws from the side of the camera.

    • Remove the two 3-mm screws from the other side of the camera.

    • Finally, remove the three 4-mm screws from the bottom of the camera.

  2. Nikon Coolpix S230 LCD Screen Replacement: adım 2, 3 resimden 1. Nikon Coolpix S230 LCD Screen Replacement: adım 2, 3 resimden 2. Nikon Coolpix S230 LCD Screen Replacement: adım 2, 3 resimden 3.
    • Insert the plastic opening tool into the seam where the front and back parts of the case meet on the bottom of the camera, and slide it along the bottom. Continue along the next side to separate the back part of the case.

    • If necessary, continue along the third and fourth sides until the case separates easily.

    • Lift the back off of the case.

  3. Nikon Coolpix S230 LCD Screen Replacement: adım 3, 2 resimden 1. Nikon Coolpix S230 LCD Screen Replacement: adım 3, 2 resimden 2.
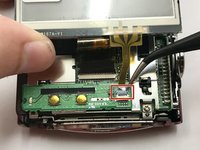
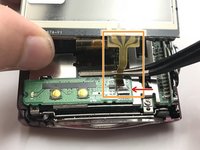
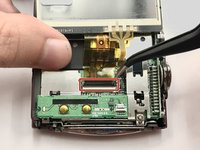
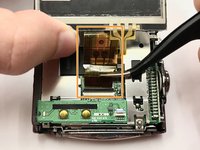
    • Carefully lift the LCD screen to reveal two orange ribbons connecting the screen to the camera.

    • Use tweezers to carefully lift the blue retaining flap holding down the orange ribbon cable. (Flap can be seen open in the second photo)

    • Slowly wiggle the ribbon cable back and forth while pulling away from the zero insertion force (ZIF) connector to disconnect the cable.

  4. Nikon Coolpix S230 LCD Screen Replacement: adım 4, 2 resimden 1. Nikon Coolpix S230 LCD Screen Replacement: adım 4, 2 resimden 2.
    • Using tweezers, lift the black retaining flap holding down the larger orange ribbon cable.

    • Carefully remove the ribbon cable from the ZIF connector as before.

  5. Nikon Coolpix S230 LCD Screen Replacement: adım 5, 1 resimden 1.
    • Lift the LCD screen away from the camera.

Sonuç

To reassemble your device, follow these instructions in reverse order.

Chris Helms

Üyelik tarihi: 01/31/17

1 İtibar

3 adet Kılavuz yazıldı

Ekip

Baylor, Team 3-1, Whitney Spring 2017 Baylor, Team 3-1, Whitney Spring 2017 üyesi

BU-WHITNEY-S17S3G1

4 Üyeler

8 adet Kılavuz yazıldı

0 Yorum

Yorum Ekle

İstatistikleri Görüntüle:

Son 24 Saat: 0

Son 7 gün: 6

Son 30 gün: 15

Her zaman: 508