Ana içeriğe geç

Nikon Coolpix S4100 LCD Screen Replacement

Neye ihtiyacın var

  1. Nikon Coolpix S4100 LCD Screen Replacement, External Casing: adım 1, 3 resimden 1. Nikon Coolpix S4100 LCD Screen Replacement, External Casing: adım 1, 3 resimden 2. Nikon Coolpix S4100 LCD Screen Replacement, External Casing: adım 1, 3 resimden 3.
    • Using a Philips #000 head screwdriver, remove the 8 screws (3.30 mm) visible on the external part of the camera.

    • There are 2 on each side, and 4 on the bottom.

  2. Nikon Coolpix S4100 LCD Screen Replacement: adım 2, 1 resimden 1.
    • Remove the black casing on the back of the camera that runs around the LCD screen.

  3. Nikon Coolpix S4100 LCD Screen Replacement: adım 3, 1 resimden 1.
    • Using the Philips #000 head screwdriver, remove the 1.90 mm internal screw located just above the lanyard mount.

  4. Nikon Coolpix S4100 LCD Screen Replacement: adım 4, 3 resimden 1. Nikon Coolpix S4100 LCD Screen Replacement: adım 4, 3 resimden 2. Nikon Coolpix S4100 LCD Screen Replacement: adım 4, 3 resimden 3.
    • Pry off the front shell casing.

    • If you find this difficult, use a prying tool to help gently remove the casing.

  5. Nikon Coolpix S4100 LCD Screen Replacement: adım 5, 1 resimden 1.
    • Using the Philips #000 head screwdriver, remove the 3.30 mm screw located on the side of the camera near the lanyard mount.

  6. Nikon Coolpix S4100 LCD Screen Replacement: adım 6, 2 resimden 1. Nikon Coolpix S4100 LCD Screen Replacement: adım 6, 2 resimden 2.
    • Using the Philips #000 head screwdriver, remove 2 additional 3.30 mm screws holding the lanyard mount in place.

  7. Nikon Coolpix S4100 LCD Screen Replacement: adım 7, 3 resimden 1. Nikon Coolpix S4100 LCD Screen Replacement: adım 7, 3 resimden 2. Nikon Coolpix S4100 LCD Screen Replacement: adım 7, 3 resimden 3.
    • Remove the lanyard mount and accompanying side shell casing off of the camera.

  8. Nikon Coolpix S4100 LCD Screen Replacement: adım 8, 1 resimden 1.
    • Using the Philips #000 head screwdriver, remove the 3.30 mm screw securing the top shell casing.

  9. Nikon Coolpix S4100 LCD Screen Replacement: adım 9, 1 resimden 1.
    • Using the Philips #000 head screwdriver, remove the 3.40 mm screw located on the front of the camera in the upper corner by the LED light.

  10. Nikon Coolpix S4100 LCD Screen Replacement: adım 10, 1 resimden 1.
    • Remove the remaining side shell casing.

  11. Nikon Coolpix S4100 LCD Screen Replacement: adım 11, 1 resimden 1.
    • Remove the top shell casing.

  12. Nikon Coolpix S4100 LCD Screen Replacement, Functional Button Plate: adım 12, 1 resimden 1.
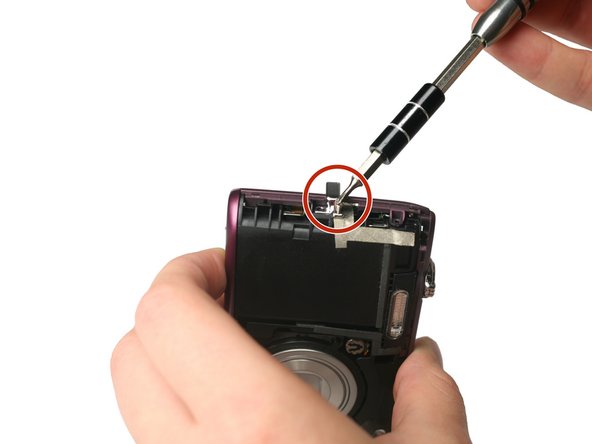
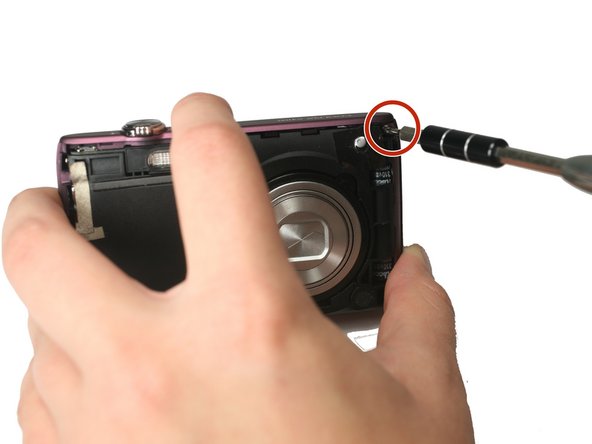
    • Using the Philips #000 head screwdriver, remove the 3.40 mm screw located near the functional buttons.

  13. Nikon Coolpix S4100 LCD Screen Replacement: adım 13, 1 resimden 1.
    • Using precision tweezers, remove the ribbon cable that runs from the functional buttons plate to the under side of the motherboard.

  14. Nikon Coolpix S4100 LCD Screen Replacement: adım 14, 1 resimden 1.
    • Using precision tweezers, lift up the bottom of the functional buttons plate and remove the metal plate.

  15. Nikon Coolpix S4100 LCD Screen Replacement, LCD Screen: adım 15, 2 resimden 1. Nikon Coolpix S4100 LCD Screen Replacement, LCD Screen: adım 15, 2 resimden 2.
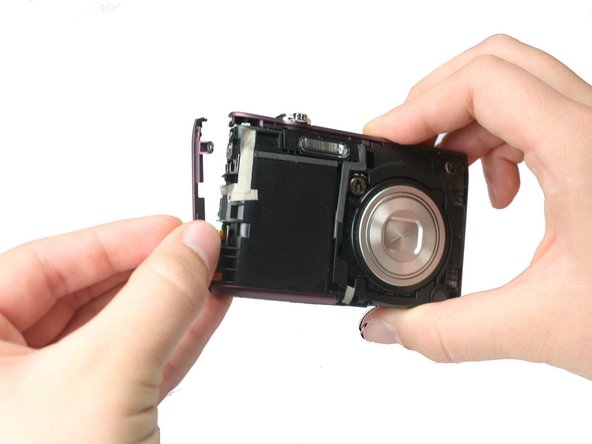
    • Using precision tweezers, gently remove the ribbon cable running from LCD to the bottom side of the motherboard.

  16. Nikon Coolpix S4100 LCD Screen Replacement: adım 16, 2 resimden 1. Nikon Coolpix S4100 LCD Screen Replacement: adım 16, 2 resimden 2.
    • Using precision tweezers, gently lift up on the black strip of the ZIF Connector securing the cable from the LCD to the motherboard.

    • Then, gently remove the wire by pulling the base of the ribbon cable towards the LCD screen.

    • Do not poke or destroy the cable itself. Be careful to only grab the black fold in the tweezers.

    • The black strip will fold back to reveal the cable, but remain attached to the motherboard.

  17. Nikon Coolpix S4100 LCD Screen Replacement: adım 17, 2 resimden 1. Nikon Coolpix S4100 LCD Screen Replacement: adım 17, 2 resimden 2.
    • Remove the LCD screen from the metal mount.

Sonuç

To reassemble your device, follow these instructions in reverse order.

Matthew Willis

Üyelik tarihi: 09/22/15

586 İtibar

4 adet Kılavuz yazıldı

Ekip

Baylor, Team 4-2, Williams Fall 2015 Baylor, Team 4-2, Williams Fall 2015 üyesi

BU-WILLIAMS-F15S4G2

4 Üyeler

8 adet Kılavuz yazıldı

0 Yorum

Yorum Ekle

İstatistikleri Görüntüle:

Son 24 Saat: 1

Son 7 gün: 2

Son 30 gün: 14

Her zaman: 753