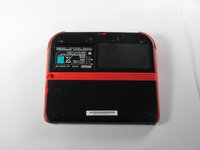
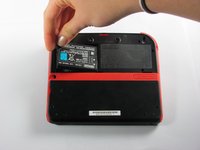
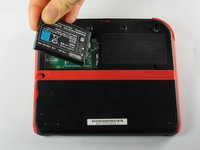
Ana içeriğe geç

Nintendo 2DS Joystick Replacement

Neye ihtiyacın var

  1. Nintendo 2DS Joystick Replacement, Battery: adım 1, 1 resimden 1.
    • Remove the two Phillips captive screws securing the upper rear panel.

    • The captive screws will not completely detach from the back panel.

  2. Nintendo 2DS Joystick Replacement: adım 2, 2 resimden 1. Nintendo 2DS Joystick Replacement: adım 2, 2 resimden 2.
    • Hinge the upper rear panel upwards and outwards to remove it.

  3. Nintendo 2DS Joystick Replacement: adım 3, 3 resimden 1. Nintendo 2DS Joystick Replacement: adım 3, 3 resimden 2. Nintendo 2DS Joystick Replacement: adım 3, 3 resimden 3.
    • Remove the battery from its housing by lifting it up from the side closest to the outside edge.

  4. Nintendo 2DS Joystick Replacement, Rear Panel: adım 4, 1 resimden 1.
    • Remove the ten Phillips screws attaching the rear panel.

  5. Nintendo 2DS Joystick Replacement: adım 5, 1 resimden 1.
    • The rear panel is attached to the motherboard by a ribbon cable, so be careful not to lift the rear panel too far from the device.

    • Carefully pull the rear panel straight up from the device.

  6. Nintendo 2DS Joystick Replacement: adım 6, 1 resimden 1.
    • Use your fingernail or the flat end of a spudger to flip up the connector securing the ribbon cable to the motherboard

    • Remove the cable from the connector

    • Take the opportunity to remove the Left and Right triggers, they have hinges that may break and springs that may jump away.

  7. Nintendo 2DS Joystick Replacement, Joystick: adım 7, 2 resimden 1. Nintendo 2DS Joystick Replacement, Joystick: adım 7, 2 resimden 2.
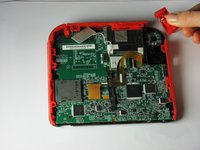
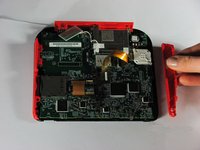
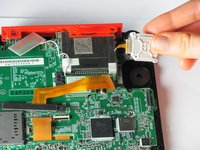
    • Remove the trigger button on the top right corner by pulling upwards and outwards.

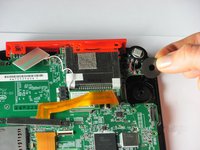
    • Remove the right red side panel by pulling outwards.

  8. Nintendo 2DS Joystick Replacement: adım 8, 1 resimden 1.
    • Use a spudger to lift the gray locking lever on the joystick ribbon cable ZIF connector. Pry straight up from the motherboard on the side of the connector opposite the cable.

    • Gently slide the cable straight out of the connector.

  9. Nintendo 2DS Joystick Replacement: adım 9, 1 resimden 1.
    • Remove the two Phillips corner screws holding the white joystick cover.

  10. Nintendo 2DS Joystick Replacement: adım 10, 2 resimden 1. Nintendo 2DS Joystick Replacement: adım 10, 2 resimden 2.
    • Remove the joystick cover. It should detach with little force.

    • Remove the joystick washer under the joystick cover.

Sonuç

To reassemble your device, follow these instructions in reverse order.

20 farklı kişi bu kılavuzu tamamladı.

Fina Beauchamp

Üyelik tarihi: 01/12/15

2.982 İtibar

6 adet Kılavuz yazıldı

Ekip

Cal Poly, Team 70-1, Forte Winter 2015 Cal Poly, Team 70-1, Forte Winter 2015 üyesi

CPSU-FORTE-W15S70G1

4 Üyeler

35 adet Kılavuz yazıldı

12 Yorum

My ribbon cable is broke, Is there a way to fix it?Thanks.

Deez Smith - Yanıt

When I put the circle pad back in, my 2DS thinks that I am holding up and right on it, when in reality it is in the neutral position. Please help.

CraftedGamer 1170 - Yanıt

Use the calibrate option in system settings. Also make sure the cable is connected nicely.

Jilvenhong Dickinson -

Recalibrate it in system settings.

Artemy Matveev - Yanıt

The guide fails to mention that the joystick ribbon cable is locked into the motherboard. You can use a spudger to lift the grey tab, leveraging upwards on the side opposite of the ribbon cable. The tab will pop up and should make getting the ribbon cable out (and back in) easier.

I followed this guide and ripped the ribbon cable while attempting to get it connected back to the system. If I had known the grey tab unlocks, I might not have ripped the cable by trying to force it back under the pins. My iFixit tweezers were also very sharp, and may have cut the ribbon cable. Would anyone be able to recommend something gentler for the ribbon cable?

Ryan G - Yanıt

Yorum Ekle

İstatistikleri Görüntüle:

Son 24 Saat: 12

Son 7 gün: 86

Son 30 gün: 407

Her zaman: 28,960