Bu sürüm, hatalı düzenlemeler içerebilir. En son doğrulanmış bellek kopyası dönün.
Neye ihtiyacın var
-
Bu adım çevrilmemiş. Çevrilmesine yardım edin
-
Remove the expansion pack cover by pushing in the tab and pulling out.
-
-
Bu adım çevrilmemiş. Çevrilmesine yardım edin
-
Remove the six screws on the bottom side indicated in the example with a gamebit head or screwdriver.
-
-
-
Bu adım çevrilmemiş. Çevrilmesine yardım edin
-
Remove the fourteen screws indicated in the example using the larger Phillips screwdriver.
-
-
Bu adım çevrilmemiş. Çevrilmesine yardım edin
-
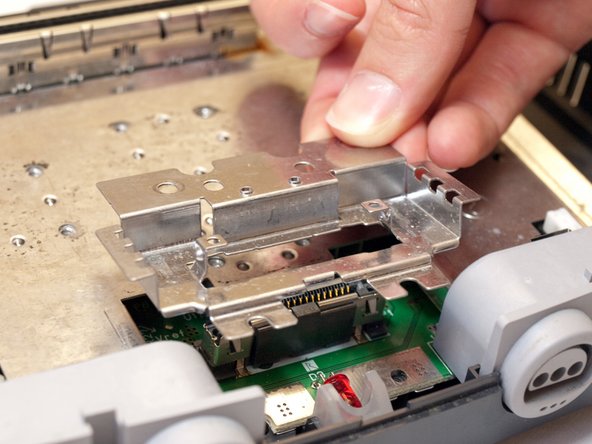
Remove the metal plate indicated in the example by sliding it back and then lifting it up.
-
-
Bu adım çevrilmemiş. Çevrilmesine yardım edin
-
Remove the two screws indicated in the example using the smaller Phillips screwdriver.
-
-
Bu adım çevrilmemiş. Çevrilmesine yardım edin
-
Remove the screw to the right of the LED light using the larger Phillips screwdriver.
-
-
Bu adım çevrilmemiş. Çevrilmesine yardım edin
-
Remove the small metal bracket from the back of the expansion pack slot.
-
-
Bu adım çevrilmemiş. Çevrilmesine yardım edin
-
Remove the small metal bracket from the front of the expansion pack slot with the metal spudger.
-
-
Bu adım çevrilmemiş. Çevrilmesine yardım edin
-
Remove the small metal bracket behind the expansion slot using the spudger.
-
-
Bu adım çevrilmemiş. Çevrilmesine yardım edin
-
Remove the seven screws indicated in the example using the larger Phillips screwdriver.
-
-
Bu adım çevrilmemiş. Çevrilmesine yardım edin
-
Lift off and remove the metal plate as indicated in the example.
-


İptal et: Bu kılavuzu tamamlamadım.
5 farklı kişi bu kılavuzu tamamladı.
Ekip

Cal Poly, Team 5-4, Regan Fall 2009 Cal Poly, Team 5-4, Regan Fall 2009 üyesi
CPSU-REGAN-F09S5G4
7 Üyeler
15 adet Kılavuz yazıldı