Giriş
Replace the power switch on the Nintendo DS Lite.
Neye ihtiyacın var
-
-
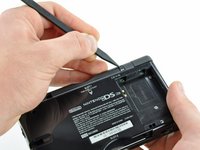
Unscrew the Phillips screw securing the battery cover to the lower case.
-
Pry the battery cover upward with a spudger or fingernail, and lift out of the lower case.
 FixBot'a Sor
-
-
-
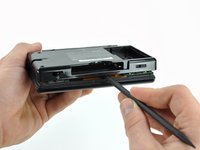
Wedge the edge of a spudger in between the side of the battery and the lower case housing and pry upward to dislodge the battery.
-
Remove the battery from the DS Lite.
-
-
-
Use the tip of a spudger to pry both rubber feet off the DS Lite.
-
-
-
-
Remove the following screws securing the lower case to the body of the DS Lite:
-
Two 4.3 mm gold Phillips screws
-
One 3.9 mm black Tri-point screw
-
One 3.3 mm silver Phillips screw
-
Three 5.5 mm silver Tri-point screws
-
-
-
Insert the edge of a spudger in between the lower and upper case near the top right corner of the DS Lite.
-
Carefully run the spudger along the right edge of the DS Lite, creating an opening in the process.
-
Continue running the spudger along the backside of the DS Lite until the majority of the lower case has been separated from the upper case.
-
-
Bu adımda kullanılan alet:Tweezers$4.99
-
Use a pair of tweezers to carefully remove the power switch.
-


To reassemble your device, follow these instructions in reverse order.
İptal et: Bu kılavuzu tamamlamadım.
20 farklı kişi bu kılavuzu tamamladı.
Ekip

Cal Poly, Team 16-30, Maness Winter 2010 Cal Poly, Team 16-30, Maness Winter 2010 üyesi
CPSU-MANESS-W10S16G30
4 Üyeler
29 adet Kılavuz yazıldı
4Kılavuz Yorumları
What about replacing the soldered portion of the switch? The tip that moves with the plastic to turn the handheld on/off has broken off of mine
Yeah, what he said..
If the plastic tab has broken off of the soldered part of the switch, you could try to glue a replacement tab onto the internal sliding mechanism, but more likely you’ll end up gumming up the works and effectively destroying the part, but then again it’s not as if you have a lot to lose by trying.
Alternatively you’ll need to get a replacement switch and desolder the broken part then installing the new part. Be careful that you don’t get the iron in contact with the top of the switch as that may melt the moving parts together, potentially necessitating another replacement.
Just desolder the old faulty switch and solder in your new replacment.