Ana içeriğe geç

Bu sürüm, hatalı düzenlemeler içerebilir. En son doğrulanmış bellek kopyası dönün.

Neye ihtiyacın var

  1. Bu adım çevrilmemiş. Çevrilmesine yardım edin

    : adım 1, 1 resimden 1.
    • Place the controller (buttons down) on a solid surface.

    • Remove the six 9.2mm Tri-wing Y0 screws that hold the back panel in place.

  2. Bu adım çevrilmemiş. Çevrilmesine yardım edin

    : adım 2, 1 resimden 1.
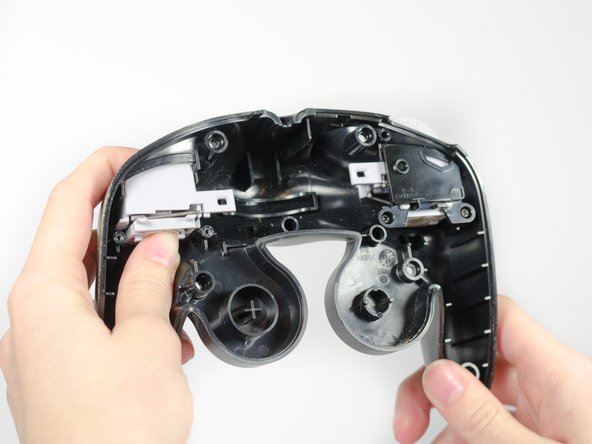
    • Gently lift the back panel up, separating it from the front panel.

    • Some of the buttons may fall out if they are knocked around.

  3. Bu adım çevrilmemiş. Çevrilmesine yardım edin

    : adım 3, 2 resimden 1. : adım 3, 2 resimden 2.
    Bu adımda kullanılan alet:
    Tweezers
    $4.99
    Satın Al
    • Grab the Z-button by the peg with tweezers and lift it out of the controller.

    • During re-assembly, make sure the plastic rim and spring fit into the slot provided, or else the case will not shut.

  4. Bu adım çevrilmemiş. Çevrilmesine yardım edin

    : adım 4, 1 resimden 1.
    • Carefully unhook the cable that is looped around the peg.

  5. Bu adım çevrilmemiş. Çevrilmesine yardım edin

    : adım 5, 1 resimden 1.
    • Lift the circuit board out of the controller.

    • Do not grab the rumble motor to lift the circuit board as shown in the picture. It will in many cases just remove the rumble motor. Instead, grab the edges of the board.

  6. Bu adım çevrilmemiş. Çevrilmesine yardım edin

    : adım 6, 1 resimden 1.
    • Remove the two 8.9mm Phillips Head #0 screws.

  7. Bu adım çevrilmemiş. Çevrilmesine yardım edin

    : adım 7, 1 resimden 1.
    • Remove black cover.

  8. Bu adım çevrilmemiş. Çevrilmesine yardım edin

    : adım 8, 3 resimden 1. : adım 8, 3 resimden 2. : adım 8, 3 resimden 3.
    • To remove the trigger assembly, depress the trigger with your index finger as if you are using the controller normally.

    • Hold the grey square bracket onside of the controller with your thumb.

    • Keep your fingers in the same place while rotating upwards towards you to remove trigger assembly.

  9. Bu adım çevrilmemiş. Çevrilmesine yardım edin

    : adım 9, 1 resimden 1.
    • Pull the metal clip from the trigger.

Bitiş Çizgisi

11 farklı kişi bu kılavuzu tamamladı.

Sean Michel

Üyelik tarihi: 01/14/13

2.496 İtibar

8 adet Kılavuz yazıldı

Ekip

Cal Poly, Team 19-44, Regan Winter 2013 Cal Poly, Team 19-44, Regan Winter 2013 üyesi

CPSU-REGAN-W13S19G44

4 Üyeler

26 adet Kılavuz yazıldı

2 Yorum

Don't forget to aline the trigger slider holes and the slider pins on the board when putting it all back together.

buttpug - Yanıt

Hallo ich habe da mal eine Frage. Ist es möglich die Empfindlichkeit der Trigger zu beeinflussen ? Leider reagieren sie erst sehr spät da mann den Knopf sehr weit hereindrücken muss.

danke schon mal

Otti

Ottitrotti - Yanıt

Yorum Ekle

İstatistikleri Görüntüle:

Son 24 Saat: 5

Son 7 gün: 39

Son 30 gün: 127

Her zaman: 27,022